


If you need feathers from exotic birds, you don't have to look for them in distant countries. You can make these feathers yourself. Moreover, everything you need is available in every home!
For the base of the feathers we need wire. This can be any wire, for jewelry or for electrics, freed from insulation. Not the thinnest and not the thickest. I have a wire with a cross section of 0.6 mm.
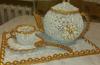
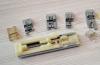
For the feathers you see in the picture, I used regular bobbin thread and floss thread (Fig. 1). In general, you can use any thread for feathers, depending on the desired result. For example, wool, acrylic, iris and others.

I made three different feathers. That is, the feathers themselves are made exactly the same, but their shape and color are different. By combining threads of different colors, you can achieve different results accordingly.
As for the auxiliary tools, I needed wire cutters, pliers, scissors, a ruler, a piece of cardboard, a comb, and one tablespoon of starch.
To create the plumage, prepare a template from cardboard - a rectangle 9cm wide and 10-15cm long. Fold it in half. Our template is ready (Fig. 2). 
We wind the threads on it - turn to turn (Fig. 3). 
We cut the threads with scissors (Fig. 4). 
We got these equal pieces of thread (Fig. 5). From these we will make that part of the feather, which is called the fan. 
So, we have prepared everything we need and are starting to create the pen. My finished feathers are 18 cm long.
We cut a piece of wire 18-19 cm long. We wrap 3.5-4 cm of wire with thread in two layers - we wind the thread back and forth, starting five centimeters from the end of the wire. We tie the ends of the thread and cut them, leaving the ends about 5 cm (Fig. 6). 
Now we tie the pieces of thread (I took 2 threads together) with two knots onto the wire and move them to the end of the wire wrapped in thread (Fig. 7). The process is not quick, so you need to be patient. 
When we have 12 cm of wire filled with tied pieces of thread, we compact them, moving them closer to each other. We cut off the excess part of the wire, leaving 5-6 mm of open ends (Fig. 8). 
We bend these ends on both sides so that the threads do not fall apart. When pressing the wire between the pliers and the threads, you must place paper or plastic film so as not to damage the threads (Fig. 9, 10, 11, 12, 13). 


This is what the feather blank looks like from the reverse side, that is, where the pressed wire is visible (Fig. 14). 
And this is how it looks from the front side (Fig. 15). 
The most time-consuming part of the work is over and we begin to form the feather.
To do this, prepare a starch solution from 1 tablespoon of starch per 300 ml of water: boil 200 ml of water and pour starch mixed into 100 ml of cold water with constant stirring. Stir for about a minute until you get jelly.
You can dip the feather blank into the solution, or you can spread it on the surface and apply the starch solution with a brush. I recommend the second method, as it is more convenient.
My surface was a thermos. To prevent the feather from sticking to the surface, place a plastic bag or cling film under it (Fig. 16). 
Apply the starch solution with a brush (Fig. 17). 
Then we take a comb and comb our feather, giving it the desired shape. After combing, the threads should be smoothed with the back of the comb. Then they will lie flat, one to one, and not puff up (Fig. 18). 
Leave the feather until completely dry.
Remove the dried feather. It has a convex shape (Fig. 19). 
I am describing the process of creating one feather because they are all made the same way, despite the obvious differences. Now I have three feather blanks.
How to make feathers from threads so that they look like real ones?
We arm ourselves with scissors and cut off all the extra tails, giving the feathers a neat shape. You can round the top of the feathers to make them look more natural (Fig. 20). 
However, the shape of all the feathers turned out to be different (Fig. 21). This is because each feather specifies what shape it should be. You will see this for yourself when you start pruning them. The feathers can be slightly bent. 
If you want to make specks like on the blue feather (Fig. 22), you need to take PVA glue and thread of the color that the specks should be. We fold the thread several times and cut it finely and finely with scissors. Take a brush and make dots on the feather with PVA glue. Sprinkle them with chopped thread. Press lightly and leave for 40 minutes until completely dry. Shake off the excess shredded threads, additionally removing them with a brush. 
Using threads of different colors and textures, alternating them according to your design, you will get interesting, ordinary or unusual feathers that can be used in the interior, to decorate carnival costumes, gift wrapping and much more.
If you need feathers from exotic birds, you don't have to look for them in distant countries. You can make these feathers yourself. Moreover, everything you need is available in every home!
In this master class we will show you how to make feathers from threads with your own hands. For the base of the feathers we need wire. This can be any wire, for jewelry or for electrics, freed from insulation. Not the thinnest and not the thickest. We have a wire with a cross section of 0.6 mm.
For the feathers you see in the picture, we used regular bobbin thread and floss thread (Fig. 1). In general, you can use any thread for feathers, depending on the desired result. For example, wool, acrylic, iris and others.

We made three different feathers. That is, the feathers themselves are made exactly the same, but their shape and color are different. By combining threads of different colors, you can achieve different results accordingly.
As for the auxiliary tools, we will need wire cutters, pliers, scissors, a ruler, a piece of cardboard, a comb, and one tablespoon of starch.
To create the plumage, we prepare a template from cardboard - a rectangle 9cm wide and 10-15cm long. Fold it in half. Our template is ready (Fig. 2).

We wind the threads on it - turn to turn (Fig. 3).

We cut the threads with scissors (Fig. 4).

We got these equal pieces of thread (Fig. 5). From these we will make that part of the feather, which is called the fan.

So, we have prepared everything we need and are starting to create the pen. Our finished feathers are 18cm long.
Cut a piece of wire 18-19cm long. We wrap 3.5-4 cm of wire with thread in two layers - we wind the thread back and forth, starting five centimeters from the end of the wire. We tie the ends of the thread and cut them off, leaving the ends about 5 cm (Fig. 6).

Now we tie the pieces of thread (we took 2 threads together) with two knots onto the wire and move them to the end of the wire wrapped in thread (Fig. 7). The process is not quick, so you need to be patient.

When we have 12 cm of wire filled with tied pieces of thread, we compact them, moving them closer to each other. We cut off the excess part of the wire, leaving 5-6mm open ends (Fig. 8).

We bend these ends on both sides so that the threads do not fall apart. When pressing the wire between the pliers and the threads, you must place paper or plastic film so as not to damage the threads (Fig. 9, 10, 11, 12, 13).


This is what the feather blank looks like from the reverse side, that is, where the pressed wire is visible (Fig. 14).

And this is how it looks from the front side (Fig. 15).

The most time-consuming part of the work is over and we begin to form the feather.
To do this, prepare a starch solution from 1 tablespoon of starch per 300 ml of water: boil 200 ml of water and pour starch mixed into 100 ml of cold water with constant stirring. Stir for about a minute until you get jelly. Lay the feather on the surface and apply the starch solution with a brush.
Our surface was a thermos. To prevent the feather from sticking to the surface, place a plastic bag or cling film under it (Fig. 16).

Apply the starch solution with a brush (Fig. 17).

Then we take a comb and comb our feather, giving it the desired shape. After combing, the threads should be smoothed with the back of the comb. Then they will lie flat, one to one, and not puff up (Fig. 18).

Leave the feather until completely dry.
Remove the dried feather. It has a convex shape (Fig. 19).

We describe the process of creating a single pen because they are all made the same way, despite the obvious differences. Now we have three feather blanks.
How to make feathers from threads so that they look like real ones?
We arm ourselves with scissors and cut off everything unnecessary, giving the feathers a neat shape. You can round the top of the feathers to make them look more natural (Fig. 20).

However, the shape of all the feathers turned out to be different (Fig. 21). This is because each feather specifies what shape it should be. You will see this for yourself when you start pruning them. The feathers can be slightly bent.

If you want to make specks like on the blue feather (Fig. 22), you need to take PVA glue and thread of the color that the specks should be. We fold the thread several times and cut it finely and finely with scissors. Take a brush and make dots on the feather with PVA glue. Sprinkle them with chopped thread. Press lightly and leave for 40 minutes until completely dry. Shake off the excess shredded threads, additionally removing them with a brush.

Using threads of different colors and textures, alternating them according to your design, you will get interesting, ordinary or unusual feathers that can be used in the interior, to decorate carnival costumes, gift wrapping and much more.
Feathers are one of the beautiful works of nature. In order not to injure the birds by plucking their tails, you can simply take a sheet of colored paper and make as many feathers as you need - of any size and color.
Now I will show you how to make a feather from paper. All you need is paper - colored or white, scissors and glue. Well, inspiration.
If you decide to make not simple feathers like mine, but Firebird feathers like in the picture, you will certainly succeed too.
So, first we take the feather template from the monitor or print it out. To see the template in full size, click on it.

Take the paper, fold it in half along the width of the template, cut off the unnecessary part (Fig. 1, 2).


We trace the template with a pencil and cut out the blank for the pen (Fig. 3).

Then we make the feather itself out of it (zoologists call this part of the feather “fan”) - we cut the folded workpiece with scissors into narrow strips diagonally, about 2/3, not reaching 1/3 of the fold (Fig. 4, 5, 6) 


To add fluffiness to the future feather, slightly twist the resulting fringe in different directions (Fig. 7). 
But you can do without this, then you will get an ordinary neat feather, like this (Fig. 8).

Now we need to make the shaft of the pen: take a strip of paper approximately 15-20 cm long and 2 cm wide and twist it into a tube, twisting it onto a match or toothpick (Fig. 9).

When rolling, apply glue to the strip of paper in several places. Be sure to coat the end of the strip with glue (Fig. 10).

Apply glue to the pen blank along the inner fold (Fig. 11)

Glue the feather shaft to the feather itself (Fig. 12).

This is what happened in the end (Fig. 13).

The green feather is made in exactly the same way as the pink one. It only differs in shape and size (Fig. 14).

Please note that no animals (birds) were harmed in the making of these feathers!
I showed how to make the simplest feather out of paper. There are other options: for example, you can make feathers from foil, corrugated paper, thick paper; paper folded in several layers; starched fabric; from threads; glue or sew a wire along the bend of the feather, which will allow you to bend it in the desired direction.
So, without special expenses, you can make a magnificent decoration for the interior, a toy for a child, a souvenir or anything else!
In this master class we will show you a great way to make a feather from threads in the macrame style. Literally anyone can do it, the method is extremely simple and quick to implement!
How to make a feather from threads with your own hands
WHAT YOU NEED TO PREPARE:
- Thick threads (a thin cord will do);
- Scissors.

Let's start creating a pen
We cut a thread 20 cm long and lay it on the table with a fold in the center (see photo below). We also prepare two threads 8 cm long, bend each in the center and lay them according to the photo below.

One of these threads needs to be threaded into the loop of the other, the ends of the second thread also need to be pulled into this loop and tightened together.

We lay the next two threads below and tighten them in the same way, only on the other side.


According to this scheme, you need to create the required number of feather layers. Next, each thread of the feather needs to be unraveled so that the product takes on a magnificent shape.

At the next stage, we arm ourselves with scissors and cut the product on both sides, giving it the shape of a feather.

As a result of these manipulations, you get such a beautiful feather, which will certainly find a place in your home decor.

How to make a feather out of paper (video):
Enjoy your homemade projects, come visit us again, see you again in the next reviews!
I doubted whether to put up these “creations”, but at work my fellow mothers became interested, and I photographed the manufacturing process just in case, so I present for your consideration this invention of mine, in a “manner”, or rather technique, that is unusual for me.
As always, it arose in the process of working on flowers; I tried to make greenery or twigs from threads.
For work you will need:
- wire,
- threads,
- glue,
- Instead of a tube, you can take any base for winding. The wider it is, the larger the feathers will be.
Any threads (I have the thinnest ones). Only later did I realize that you can wind them on a ruler (not necessarily a round base), the main thing is that the center of the “trunk - feather” is in the middle of the base. We wrap the wire with a napkin or corrugated paper (lubricate it with glue), after a few turns we again lubricate it with glue (only the place where the wire itself is), and at the very end we also lubricate it. We wind as many threads in a circle (along the base) so that there are no gaps. And also IMPORTANT: let it dry thoroughly (before cutting). I dried it on the radiator for about half an hour. We cut from the back side of the “trunk” (exactly opposite the wire), preferably with a scissor (scissors are not very convenient.)

We glue the top with separate tassels (on the back side of the feather). Yes, this is the advice given by the riveter after my MK: “In order not to glue the top, bend the wire, insert a bunch of threads into the loop, twist the tip, you get a fan of threads.” (I think it’s more convenient....)
We trim the excess with scissors - creating the shape of a feather - of your choice.

We comb it, paint it with watercolors, glue sequins, in short, whatever you have enough imagination for. . We comb it again with a fine comb and spray it with hairspray - for greater strength...

This is an experiment with different threads...I tried white threads last, and from them the feathers were born....Before that, the greens were “tormented”)))))

You can make Christmas trees like this (I added the toys and beads in Photoshop)

The same principle applies to these thistle flowers that I’m making for a field bouquet (it’s still in the project). How to sculpt these little white ones - I show you in

Is everything clear here? First we wrap one color, then another on top. Put a little glue into the sepals.

After the sepals are formed, we also varnish them.

The female colleagues immediately put the feathers into a fan. Or maybe hang it on the Christmas tree? Or maybe use it for a carnival costume? I don’t know... I hope my idea will find application
You might also be interested in:
Moreover, there are simply a lot of main components for this activity in any kitchen! What if...

Stylists who make recommendations for creating a basic men's wardrobe, in one...

Laser carbon peeling was originally developed in Asia, and has now become one of...

Graphic style tattoos are truly unusual, which is why they are usually separated from others...
When you buy a new sewing machine in a box of tools and accessories, you always...

