


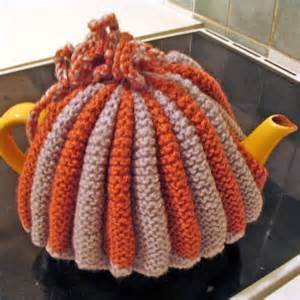
There are a lot of master classes on making a warmer for a teapot or mug in the shape of a rooster or his life partner, a hen, and there is plenty to choose from. For those who know how to crochet, this bright option is suitable:


For those who like to sew more, you can use the following options:


When practical things. such as teapot warmers are also made at a high artistic level; they not only decorate the interior of the kitchen, but bring their quiet, cozy charm to the Russian tea ceremony.
A heating pad in the shape of a Cockerel or a hen will look very elegant. Try one of the options if the process drags you on. then you can make such heating pads Rooster and Hen as gifts for Easter and New Year celebrations with the symbol of the Rooster.
I really like teapot warmers, crocheted or knitted, they are invariably elegant and provide good warmth and keep their shape; in addition, you can usefully recycle the remains of brightly colored yarn.


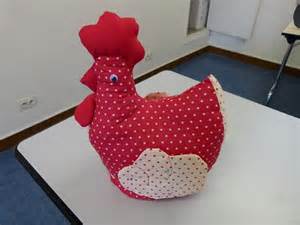
A heating pad for a chicken and cockerel teapot can also be sewn from fabric or drape or felt. If you are sewing a heating pad from fabric, you will need to make several bottom layers with padding polyester. which will keep the kettle warm.


A cockerel heating pad for a teapot can be sewn from felt.

According to the pattern, you need to cut out several parts from felt of different colors. You can sew by machine or by hand, guided by the photo. To ensure that the heating pad retains heat well, the skirt can be duplicated with several layers of synthetic padding, hemming them inside.

To make a heating pad in the shape of a cockerel for a teapot, we will use multi-colored scraps of cotton fabric. This fabric holds heat very well. The brighter the fabric, the brighter and funnier the warmer will be.

To make such a heating pad you will need the following parts.
The technological sequence will be as follows.
To sew this heating pad, we use the diagram below; when enlarged, each cell of the pattern should be 5 centimeters.


It’s right to start sewing the cockerel dress first. The rooster outfit and the cone heating pad are sewn using the same pattern. It is better to sew a cone from flannel.
The easiest way is to sew a heating pad by hand from two parts, connecting them to each other - it will look like a cap. First, you should make a common part to completely cover the kettle, and then additionally attach elements for the spout and handle of the kettle, sewing a head and neck to the chicken on one side and a tail on the other.
It is more difficult to make a heating pad for a teapot from several parts, sewing them together: the head and body, beak, beard and comb, wings, tail. But this heating pad turns out to be more attractive.

You can also sew this original heating pad for a teapot in the shape of a Rooster:

It requires the following parts:
Pattern diagram:

First, a suit is sewn together, which is made from six wedges.
Another heating pad Chicken with a pattern:


There is also such an interesting, cozy heating pad, as in the image:

You will need for work:
The filler can be holofiber; you will also need a ring, a couple of beads for the eyes and accessories, such as a needle and thread, scissors.
The master class can be viewed in detail and step by step at the link.
Another interesting option for a knitted heating pad:

There is also a master class for her.
I'll probably add how to knit a heating pad for a mug. For example, I almost never use a teapot; I brew herbs for tea directly in a mug. Perhaps someone does the same, so a mug warmer will come in handy. The easiest way is probably to crochet. Even a beginner can knit such a thing, since there are no complex elements to the cockerel figurine.
A cockerel looks like this

And here is a description of how to tie

With the approach of the New Year - the Fire Rooster, I want to pamper my family with symbolic things to bring good luck into the house.
With one of these little things you can make a chicken for a teapot, saving the heat of the most popular drink in our harsh winters.
The simplest and most uncomplicated version of a heating pad for a teapot can be sewn on several layers of fabric. Choose a fabric that is more colorful and brighter.


It’s easy to make a heating pad for a teapot or mug in the shape of a cockerel or chicken. Absolutely anyone can do it.
Firstly, you can sew such a heating pad from fabric, insulation (for example, padding polyester), various ribbons, braid and lace.
The cutest version of the hot water bottle, in my opinion, is chicken with chicken.

To make it you will need
You will find a detailed description of working with photographs here.
If you are not very good at sewing, then you can make a simpler heating pad. One of the simplest options is this perky cockerel.

The cockerel can be cut using this pattern.

The next simple option is this Chicken Ryaba.

A detailed description of the work on Ryaba can be found here
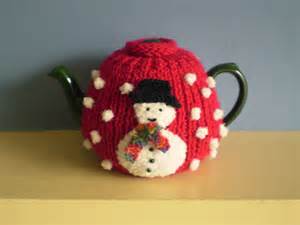
You can not only sew a heating pad for a teapot, but also knit it. If you know how to knit even a little, you may well end up with a chicken like this Chernushka (although it’s just as easy to make a chicken of a different, cheerful color).

Step-by-step instructions for making this chicken can be found here
The next version of the heating pad - Cockerel - is suitable for those who know how and love to knit.
The New Year is coming soon, and this year will be the year of the fiery Rooster, so I propose to sew such a funny rooster for a teapot for yourself or as a gift to your loved ones. This work is simple and practically both a teenager and an adult can sew it.
For work we will need a main fabric, in this case I have flannel. Lining fabric chintz, lace, red fabric for the comb and beard, a piece of yellow fabric 8*8 cm for the beak, a pair of eyes, threads to match the fabric and padding polyester. The padding polyester should be thick, if you have it thin, then you need to take it in two layers. You can use batting.

The pattern is given without allowances. The seam allowance on the sides of the Cockerel and the neck should be 1 cm, and at the bottom 4 cm. When you cut the lining, 2 parts need to be cut with an allowance of 4 cm, and two without an allowance, just make allowances for the sides and along the neck.

The whole work consists of three parts. The first is the cut of all the details. The second is sewing the carcass of the Cockerel insulation. The third is sewing the top and assembling our product. And so let's start cutting. We cut out 2 parts of the body of the Cockerel from flannel, make allowances. We outline the pattern with a piece of dry soap. Don't trace with a ballpoint pen!

In the pattern of the upper part, I cut out the wing so that it would be convenient to mark the place for sewing on the lace imitating wings. We apply markings along the face of the fabric of the already cut piece with soap.

We cut the Cockerel's tail, as well as his comb and beard.

Fold the padding polyester in half, apply the pattern and cut it out without allowances.

We put padding polyester on the inside of the lining with a bottom allowance and cover it with a lining piece, which we made without an allowance. We combine the edges, fold the seam allowance to the top and pin it together, as in the next photo.

Now we manually sweep both parts from all sides. We do this so that when we quilt our part, the padding polyester does not move inside.

Now we start stitching from bottom to top, then turn, stitch 3 cm and go down, etc. So, without stopping, we quilt the entire part. This is what it will look like.

Next we take the quilted 2 parts and match the edges. The hem of the fabric should be at the top and sew along the side, then we go along the neck and again along the side. You get this design. We do not process the edges, as they will be inside the product.

Let's proceed to the second stage. Sew the lace to the wing marked on the pattern.

I have narrow nylon lace. I layered them and sewed them like this.

Now we baste and sew on the comb, making small folds. We do this on both parts.

Fold the yellow fabric for the beak in half, then again and diagonally so that you get a triangle. This is a beak. We pin it or sew it so that it looks into the inside of the product, as in the photo. We turn away the comb. I forgot to take a picture of this moment, so I took a picture when I was sewing the second cockerel. When you have inserted the beak, put on the second piece and pin or stitch along the side, then go along the scallop, then again along the side.

This is what it should look like when you have chipped both parts. When you have stitched it, turn our Petya out. There is no need to process the edges.

Now you have turned the Cockerel inside out, straighten the seams with your hands and stuff the comb, but not very tightly, with padding polyester. Now put the insulation piece we just sewed on the top of the carcass like a sock on your foot. Correct all the edges, wrap the bottom flannel allowance inside the Rooster, pin it with pins and hem it by hand.

This is how you will get it inside, everything is very neat.

We sew the tail. We put lace on the face of one part, put the second part on top and sew it, turn it inside out, put in padding polyester and sew the bottom. The tail is ready!

Warmers for the kettle.


The ancient custom of covering the teapot with special dolls has survived to this day. Interestingly, the dolls have hardly changed. We offer you several new versions of an old invention.
The heating pads, despite some differences, are made according to the same principle, using which in the future you will be able to invent and make your own.
The basis of any heating pad is the cover. Its pattern can be very diverse, however, the process of making the cover is the same for all models. From any thick fabric, remove the two outer parts of the cover. Sew them together along the ABC line using an over-the-edge seam. Cut out exactly the same two parts and sew them from flannel. You now have the outer and inner parts of the case. Now turn both parts right side up and fold as shown in the picture. From thin foam rubber, cut two gaskets in the shape of the cover, insert them inside the outer part and, as far as possible, sew the inner and outer covers together along the AOB line. Insert the inner part of the cover into the remaining hole and straighten it so that there is foam rubber between the parts on both sides. Now sew up the hole with a “blind seam” and the heating pad cover is ready.
Covers for heating pads “Cow”, “Lion” and “Cat” are made using one pattern.
PATTERNS OF EXTERNAL DETAILS OF THE COVER OF THE KETTLE HEATER
Source: M. Kalinich, L. Pavlovskaya, V. Savinykh “Handicrafts for children”

Sometime in 1996, I came across an original Hot Water Doll for a teapot in a store. A few years later, I came across a similar model in one of the needlework magazines. I will introduce it to you. Based on this model, I then created a series of warmers dedicated to the symbols of the year according to the Chinese horoscope. I made all the patterns arbitrarily, the main thing was to fit the size of the teapot (they are also different).
We will make a blank for a warmer skirt from light chintz measuring 50x80 cm. Fold the fabric in half and put inside a strip of batting (padding polyester) in several layers, measuring 24x79

This blank needs to be quilted for the strength and stability of the skirt. Sew it together and get a bell skirt.

From thick knitwear or other suitable fabric we cut out 2 parts of the Monkey’s head and body. First we sew on a dress and lace for each detail.

Only then do we sew the halves together, turn them inside out, stuff them with batting through the bottom seam and sew them up.
We sew the ears to the head-body. We sew the arms long, stuff them loosely, stitch the palm, marking the fingers with seams. We sew sleeves from small rectangles, decorate them with lace, and gather the sleeve with thread where it is sewn to the body. We sew the sleeves together with the arm. We sew the body to the warmer skirt. Decorate the face. We make a hairstyle from loose yarn. We cut out the mouth from a large oval, collect it with thread around the perimeter, tighten it and stuff the resulting lump with cotton. Sew the muzzle with a hidden seam. We embroider the mouth and use beads to mark the nostrils. From beads - eyes.

Now we need to sew the overskirt. We take a rectangular piece of chintz 28x85 cm, sew on lace, braid, an apron decorated with various braids, sew on the skirt, turning the top edge 1.5 cm in order to insert the tape later. We put the skirt on top and tie the ribbon into a beautiful bow at the back of the doll.

It would be nice to give the doll a name and embroider it on the apron. This gives her a special charm.

If you get creative, you can sew other dolls, for example, a Pig.

Do-it-yourself heating pad for a teapot

The procedure for sewing a heating pad for a teapot, regardless of the model, is almost always the same. The basis of any model differs only in configuration and additional components, such as an apron, hat, bows, and the like. For any teapot warmer you need a base fabric, lining fabric, synthetic padding, various braids, threads, buttons, patterns.
We cut out the main fabric, lining fabric and padding polyester according to the pattern, having previously folded the fabric with the right side inward.
Kettle warmer PEACOCK
First of all, we decorate the cut out main part, that is, we sew on a bright braid. You can sew on colorful patches to imitate the colorful tail of a peacock. We sew the padding polyester and the lining of the heating pad together, insert it into the tail and process the edge.
For the body of the bird, a plain fabric is best suited. We cut it out according to the pattern, sew it on the wrong side, turn it right side out and carefully fill it with padding polyester. There is no need to fill it tightly with padding polyester. We cut out a beak from leather and sew it to the peacock’s head. Determine the location for the eye and sew on the button. We sew a crest onto the top of the bird's head. It can be made from braid with lurex. Now we connect the peacock’s body with the tail, and secure the head with several stitches.


Kettle warmer MOUSE
The basis of the warmer is the mouse's dress. First of all, we cut out boots 4 parts. After sewing and turning it right side out, we fill it with padding polyester. We sew the boots into the mouse's dress while processing the edge of the heating pad. When the dress is almost ready, sew a frill of fabric or lace along the edge.
Mouse head: We cut out 4 parts of the ears, sew them in pairs, turn them inside out and along the front side we will lay a stitch along the edge of the ears. We cut out 2 parts of the mouse's face, put ears between them and stitch them. Turn it inside out, fill it with padding polyester, and sew up the hole. Hair - from any thread, we braid it, tie bows. Next, we sew on a nose button (or embroider with black thread), freckles (beads), and button eyes. We sew the finished head to the dress-body.


Warmer for a teapot CAT or CAT
The cat's body is simply a cap with a frill made of fabric or lace.
Cat head: Cut out 2 parts of the head, sew them together, turn them inside out, fill them with padding polyester, and sew up the hole. We cut out the mustache from cloth. We cut out the overlay for the muzzle, gather it around the perimeter with a strong thread, fill it with synthetic padding and sew it to the muzzle along with the mustache and tongue. Sew on the nose-button and eyes. We sew the head to the body. You can sew a tail on the cat and decorate its head with a hat.
Winter has come with its long and dark evenings. We spend more and more time at home. So, finally, you can do some handicrafts! In this article you will see models of covers and warmers for teapots, handmade using knitting needles, crochet hooks or sewn on a sewing machine. It seems, why is it needed, this cover for the teapot? I agree that its practical application is quite controversial. But these products cannot be denied the decorative qualities. It will decorate and refresh your kitchen, and will certainly attract the attention of guests. This article presents the following models of covers and warmers for the kettle:
- made from fabric
- fabric warmers with applique
- warmers made using patchwork technique
- crocheted and knitted
Let's take a closer look at the models of heating pads sewn from fabric on a sewing machine.
Here is a completely simple model. The two fabrics are chosen to your liking and sewn together, right sides together, as if you were sewing a bag. Do not sew one side and turn the product inside out through this hole. Then, tucking the edges of the fabric inward, sew up the fourth side of the future heating pad. (By the way, thin batting or padding polyester could be laid between these two fabrics.) Stepping back 3-4 centimeters from the edge, sew a drawstring on both sides of the future cover. Now just place the kettle on the finished “creation” and lift both edges to the kettle lid. Insert a string into the drawstring and tighten it around the teapot. The heating pad is ready!
The next model is probably no more difficult to sew than the previous one. The pattern is simple: draw a regular oval and divide it into two parts. The width of the oval should be more than half the circumference of the teapot by 2-3 centimeters. The height of the heating pad can be equal to the height of the kettle, or maybe more.

Of course, the design of your heating pad should match the decor of your kitchen. And, if you are crazy about cats, then sew a cat. But choose the right fabric color.

If you are so skilled that you can embroider on a teapot warmer, then your work will become even more attractive.

New Year 2017 will be the Year of the Rooster according to the Eastern calendar. Perhaps someone would like to sew a heating pad in the shape of a cockerel or a chicken for themselves or as a gift for someone else.
Watch a useful video that may help you achieve your plan.
Not sure if you can handle sewing a rooster-warmer? Then just sew a heating pad with a New Year's theme.

I think that any creative work (including sewing a teapot warmer) deserves respect. Moreover, the work done in appliqué technique. The products are made as follows: any shapes are cut out of fabric and sewn to another fabric chosen as a background. The result is completely original products. Such works are also often combined with embroidery.

Watch a master class on making a hot water bottle for a teapot in the shape of a house.
Products made using patchwork technique, require certain skills for their production. You need to learn how to combine and sew fabrics together. First you need to try sewing simple patterns in patchwork style. If you are satisfied with your products, proceed to more complex forms.

Watch a master class on how to sew a patchwork warmer for a teapot.
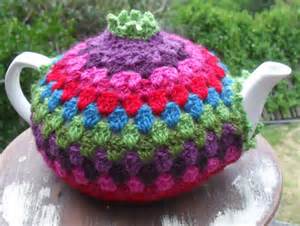
Let's move on to knitted warmers, crocheted or knitted. Of course, those who know how to knit just need to look at some model they like, and then it’s a matter of skillful hands and several hours of work. And novice needlewomen will have to learn a little or ask more experienced housewives. Start with simple models. Here is a heating pad knitted on knitting needles. Two identical fabrics are knitted, and then they are sewn together, leaving holes for the handle and spout of the teapot.

There are many simple models. If you are not yet confident in your knitting capabilities, learn from simple examples.
To decorate simple warmers, you can use buttons, beads, sequins and other small items you have at home.

Usually, heating pads are knitted onto a specific teapot. Therefore, be sure to try on the product while working.

To make the teapot look elegant, just tie a decoration on the lid.

If you know how to knit well, choose any pattern and get to work.
You can come up with many different models of heating pads and finally knit one for your teapot. For example, various crocheted fragments can be sewn together to create a hot water bottle for a teapot.

Tea warmers decorated with flowers have always been and will remain popular. Boundless space for creativity: who will get what kind of flowers?

And the hot water bottles turn out one more beautiful than the other.

But these “roses” can be assembled even from an ordinary narrow knitted strip!

Not only the floral theme is very popular in knitting warmers for dummies, but also berries.
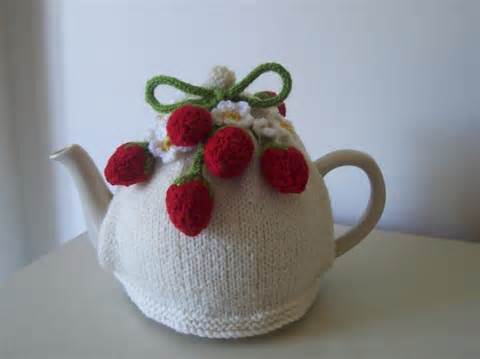
You can combine both berry and flower if it’s difficult to choose which you like best.

Another detailed master class on crocheting a heating pad for a teapot.
The New Year is approaching and many are trying to come up with something original in the form of a Christmas tree. For us this will be a heating pad for the teapot.

Another example of a Christmas tree warmer for holiday tea parties.

And someone will want to knit a snowman or Santa Claus and decorate a teapot warmer with these New Year's symbols.
It’s easy to knit a Christmas tree and a snowman on knitting needles, and then sew them onto the finished warmer.

A Christmas star on the dishes, figurines of New Year's toys and a teapot in “winter” clothes: a pleasant evening, just right for tea.

The symbol of the approaching New Year is the Rooster. Chicken is also suitable for a teapot warmer. You can, of course, knit this “bird” that is brighter and more expressive. It's up to who likes it more.

And here is a teapot warmer in the shape of a chicken.

If you want more ideas for decorating a warmer for a teapot, watch this video. Best wishes to everyone!
We all love to drink real aromatic tea from a teapot with sweets or pies. To make the tea brew stronger (some people like it “thick”), the tea leaves remain hot for a long time; there are teapot warmers.
For those who know at least a little how to use a sewing machine, make DIY kettle warmer from fabric it will be quite easy. It can be either sewn or knitted.
At the samovar, me and my Masha
We’ll drink some tea until the morning...
What you need to sew a fabric heating pad for a teapot
To keep the teapot hot for a long time, you need insulation inside. The insulation is usually batting or padding polyester.
You will also need a little lining (preferably natural fabric, it will be in direct contact with the hot kettle, I used fabric from bed linen), as well as the main beautiful fabric itself.
Well, it’s also a good idea to have a sewing machine of any model, then things will go much faster! And the right attitude - you must be sure that everything will turn out great!
Here is the pattern of my heating pad (without seam allowances) for a life-size teapot, so to speak:

It should be noted that there is no universal heating pad pattern for all teapots. Because such dishes are sometimes produced in completely different sizes and bizarre shapes. Everyone has their own. The goal is for the cover to cover the entire brewer and fit on without tension, freely. At the same time, it should not be too large.
So if you have two teapots, one small and the other large, very different in size, then it is better to sew a heating pad for each. Since I have several, but almost the same, only the height is different, I sewed one for everyone; if necessary, I simply bend the bottom inward and the cover becomes shorter.
To sew the simplest one, we’ll make a pattern in the form of a rectangle, possibly with rounded edges to make it look nice. To estimate how much fabric will fit and how it will need to be cut, you need to take two measurements with a centimeter.
The best way to do this is described a couple of paragraphs below, and a formula for constructing a pattern taking into account seam allowances is also given.
If you want to get an interesting, original kitchen heating pad and are willing to spend extra time, then you can make a heating pad for the teapot in the shape of an animal - chickens, kitties, cows, lions, owls - the scope for imagination is great. You just need to make an additional head (sew to the body, i.e. to the heating pad itself at the top side) and a tail (sew into the seam). This shape is suitable for a cow, cat, dog.

If you have time and desire, you can sew such a chicken (or cockerel) with your own hands on a sewing machine. It consists of many small double-sided parts, inside each, even very small element, there is an insulating lining, some parts are simply filled with synthetic wool or whatever you found at home - finely cut unnecessary shreds, insulation from an old jacket, etc. . (no one will ever look inside these fragments, everything will remain inside).
The size can also be reduced or increased depending on the size of the brewer.
If you want to make a slightly different shape of the body, you can, for example, increase the height of this pattern - make the top round or elongated towards the top - this is how you can make a chicken or a sitting cat, the head will be in the middle. If desired, you can sew on the paws or just mark them with a stitch.

Cow hot water bottle under Khokhloma
My first thought was to sew myself a heating pad in the shape of a cow, but then I got lazy, and in the end I decided to make this very simple version of a heating pad for a “medium” teapot.

Hot water bottle for a teapot - a simple pattern from Khokhloma fabric
First, let's measure our teapot with a flexible centimeter, one measure (X) - from the bottom vertically upward through the highest point (along with the lid!) to the bottom of the opposite side, the second (Y) - a horizontal measure of "diameter" (equator), along the most prominent parts – on one side there is a spout, on the other there is a handle.
X/2 + 2 * 1.5 cm + 2 cm
Y/2 + 2 * 1.5 cm + 2 cm.
I have two different kettles. I made the heating pad of such a size that it would be possible to use both teapots.
One teapot is taller, so when I use a small one, I turn the bottom a few centimeters (about 5) inward.
On the rectangular pattern, round the two upper corners. You need two such parts.
How to sew a heating pad for a teapot with your own hands
To make it easier to use, we’ll immediately prepare a loop; it will be sewn into the seam on top. You can use ready-made ribbons or make them from the same material.
We fold the parts with the right sides inward (don’t forget to insert a loop!), Sew the two parts along the rounded side.
We cut out similar parts from padding polyester (2 pieces), lining (4 pieces - on top, bottom of padding polyester). The insulation can be taken along with the lining from an old jacket; I used cotton fabric as a lining, which I had left over after remaking my pillowcases (instead of 80x80, I now have 40x80). Attach the synthetic winterizer to the lining, connect, and quilt. Fold the parts with the fabric inward and sew along the curved line.
Place the cotton cap inside the front part of the heating pad, now all that remains is to process the lower part - carefully bend the edges inward, iron it with an iron, stitch it by hand or use a sewing machine, whichever is more convenient for you.
I found such a beautiful fabric in the Russian style at home, just right for my idea, I already have oven mitts and a mitten made of a similar material, now I came through another kitchen product.

My kettle and hot water bottle
There you go. We brew strong tea, cover it with our new hot water bottle, and prepare to drink it with cookies or cakes.
You may be interested in:
Another warmer for a teapot - knitted from leftover threads and yarn in the shape of a house with sewn windows, a pipe, a door and flowers in front of the house. The pattern is very simple, as is the knitting pattern. Interesting finishing with small embroidery. Inside there is a sewn insulation cover made of synthetic padding polyester with a lining.
A cute idea to decorate a warmer for hot boiled eggs for Easter with embroidery with a simple Easter motif in the form of bunnies sitting on a green meadow. The pattern is very simple, a rectangle with rounded edges, the same as for a teapot, only much smaller. For sewing you need scraps of fabric, sewing threads, a machine, for embroidery - a hoop, floss and a needle. A description of the work plus a color counting drawing is attached.

Pattern-diagram with description and photographs for knitting cute eared animals that serve as a kitchen accessory - these are testicle warmers for breakfast. By following the link, you will find another photo of another, I think a simpler version, made with crochet. All these are nice, interesting little things for the kitchen made from leftover yarn, single balls of yarn lying around, made with your own hands.

Toys that are actually made to be warm covers - to warm your testicles, to keep them warm for breakfast - are a cute kitchen accessory. You can make it in the shape of your favorite animal, here you will find a white cow with black spots and a bell on its neck, a flirty pig with a red bow, gray sheep with a pearl necklace.
You might also be interested in:
Gemma is an example of miniature carving of colored stones and gems - glyptics. This view...
98/104 (110/116) 122/128 You will need Yarn (100% cotton; 125 m / 50 g) - 250 (250) 300...

Periodically replenishes its collection of publications dedicated to various colors and shades in...
A correctly tied scarf around the neck affects the external image and characterizes the internal...
251 03/26/2019 6 min. You can wear high heels and an expensive suit, make...

