


DIY paper hare for children over 6 years old
"Hare made of paper strips for primary schoolchildren."
This work is intended for teachers and parents, as well as for children of primary school age.
Target: designing a hare from paper strips.
Tasks:
- introduce the method of gluing paper strips into a cylinder, into rings, into droplets.
- develop hand motor skills,
- develop creative abilities.
Required material:
- landscape thin sheet,
- scissors,
- glue - pencil,
- felt-tip pens.

Progress of the lesson:
Guess the riddle:
The scythe has no den,
He doesn't need a hole.
Legs save you from enemies,
And from hunger - bark. (Hare)
Today we will make a hare. Winter has come and snow has fallen. Guys, what color will we make the hare? (White)
- Why is the hare white in winter? (This is camouflage. On white snow, a white hare is hardly noticeable.)
Stages of work
1. Take a white thin sheet and fold it in half. On one half we measure three narrow strips 1.5 cm wide, and leave the other half whole. Cut along the lines. Cut out two short strips of pink paper for the ears.


2.Fold half a white sheet in half and cut it into two wide strips.

3. Bend one wide strip slightly from the edge and cut it off. We got two wide strips of different lengths.

4. We glue two cylinders from wide strips, and from the cut-off part we make a ring - this is the tail.

5. We glue two large cylinders into the number 8.

6. Take narrow strips: glue droplets from two narrow strips, and cut the third strip in half.

7.Glue rings from two short strips and glue pink ears onto white droplets - “ears”.

8. Glue the ears, paws, tail, mustache, eyes, nose to the hare. Eyes can be made using a hole punch.

9. The hare is ready! You can finish the front legs.
Works of my students.


The bunny is a participant in many cartoons, so children really love this simpleton character. It is easily recognizable by its long ears, so it is easy to make from a variety of materials. To find out what you can make a hare from, let’s look at several simple ways to make children’s crafts.
Hare made of felt (fleece)
This is the easiest way to make a little bunny quickly, without needles or glue. For the figurine you need felt, or fleece or other soft fabric. Scissors and a hair tie (bills) or thin ribbon.

This is a master class on how to make a hare craft for beginners (for the little ones):
- Cut a square out of fabric.
- Start rolling a thin rope from one corner to the other.
- Release the resulting tourniquet a little so that it becomes 2 times thicker.
- We fold the tourniquet in half, take about ½ of the half in our left hand and lift it up - these are the future long bunny ears.
- Using an elastic band for hair (bills) or a colored thin ribbon, grab it several times from the side of the ears. We straighten the ears, they should look up and to the sides.

The toy is ready, but you can sew or glue small black buttons-eyes and a red nose.


A pair of cardboard bunnies
For this bunny craft we will need:
- a roll of cardboard from foil (can be from toilet paper or cling film);
- scissors;
- A4 paper (pink and black or brown);
- pencil;
- ready-made “eyes” (beads);
- multi-colored pom-poms;
- brush;
- paints (can be acrylic or gouache);
- ribbon (yellow, blue-green);
- glue gun (stationery glue);
- paper or artificial flower (for decoration);
- You can use small pompoms (optional for tails).

For 2 bunnies, one roll of foil is enough for us.

Detailed instructions for making crafts:
First, you need to outline the contours of the future ears of our hares with a simple pencil. To do this, divide the roll into approximately 3 parts; long ears with rounded ends (not touching) will be located in the center. Then, where the ears are, cut with scissors to make 2 hares.

If the roll is from toilet paper, then the bunnies can be cut out with scissors after marking. Paint two bunny rolls: 1 white, 2 gray. Then set aside and let them dry.

Take pink paper and cut out 2 small hearts with scissors - these will be the noses of the hares and 2 inner ears, as shown in the picture. Cut black (brown) paper into thin strips, 3 pieces for each hare (6 strips in total).

Glue 3 strips just above the center of the roll, cover them with a heart-nose on top. Glue ready-made eyes over them or draw them yourself with black paint (felt-tip pen). You can glue dark beads instead of eyes.

Glue pink ears onto the ears of the roll (they should be smaller in size). Draw a mouth for 2 hares with paints or a felt-tip pen.

The white hare is a girl, you can decorate her with an artificial flower near her ear, and attach a pompom tail to the back. The gray hare is a boy, he can have a dark pom-pom tail, and a bow made of a bright ribbon (yellow, blue or green) on his chest.

The crafts are ready, a couple of mischievous bunnies will perfectly decorate the table for Easter, if there are toilet paper rolls, they will fit colored eggs. Creative and fun.


Bunny made from a wooden stick (stool legs)
An unusual hare can be made from the leg of a broken, unnecessary round stool (small chair).

To do this you need:
- paints (red, green and black);
- brush;
- a piece of twine or light thin rope (mustache);
- two white pom-poms for the face;
- a small piece of white soft cloth;
- colored ribbon (green, yellow, etc.) for a tie.

Let's look at how to make a hare craft with your own hands step by step:

First, let's paint the blank (round leg). You need to paint in several layers for a smooth color:
- the upper quarter of the stick is white;
- the second quarter is pink (red);
- the lower half of the workpiece is green.

After drying, decorate the hare on top. There are white polka dots on the red shirt, and on the top of the green pants we draw white stripes, highlighting the transition from red to green with stripes (waves) for beauty.


The white part will be the bunny's head. Here we draw pink (red) cheeks for blush. We make the mustache from twine or thin rope (we tie 2 pieces of twine into a knot in the center). We close the antennae with 2 white pom-poms on top, so that the cheeks are above them. Even higher we draw the eyes and eyebrows of the hare.

You need to cut out long ears from a piece of white soft fabric and attach the crafts to the top of your head. We tie a beautiful tie (yellow, green) from a colored ribbon and glue it to a red shirt. If you have white yarn, you can make a strand of hair for your eared friend.

Our bunny groom is ready! This is a great souvenir that will look beautiful on a shelf, or you can even give it to your child's friend.

Photos of rabbit crafts


Colored paper gives a lot of scope for creativity. Although even from a simple white one you can make something interesting. For example, a little white bunny. Let's try to make a craft with our own hands.

We will need the following materials:
sheet of plain white paper
sheet of green paper
pencil
scissors
glue stick
How to do:

1. Cut out a long rectangle from white paper - the body of a bunny. Let's make another rectangle a little shorter and a very small rectangle. This will be the head and tail of the bunny. Fold a small piece of white paper in half, draw a bunny ear and cut along the line. Unfold and separate the ears with scissors, without cutting all the way through. Let's make markings on the body and ears: mark the places of the cuts with a solid line, and the folds with a dotted line.

2. On the parts of the bunny’s body, make cuts along the solid markings, bend the legs along the dotted markings. Glue the bunny base to a sheet of green paper.

3. Make a tail from a small rectangle. To do this, roll it up into a tube and glue it.

4. Roll the remaining rectangle into a cylinder and glue it to the other side of the body. The result is a head.

5. Glue the ears to the head.

6. This is the kind of bunny you get at this stage.

7. Cut out two circles from white paper and draw the pupils with a pencil. Glue the resulting eyes to the bunny's head. Let's draw the bunny's nose and mouth with teeth using a pencil. This is the kind of bunny we got!
If desired, you can complement the craft with a flower meadow or a bed of carrots.
How difficult is it to make an origami craft? It's actually not as difficult as it seems. Some people prefer to spend their leisure time reading a book, others - bead weaving, but origami is now also becoming a very popular activity. And today we will talk about patterns for making a bunny: from simple single paper according to the scheme of Akira Yoshizawa (Yoshizawa), a modular bunny, and also remember the Easter bunny.
A simple paper hare: diagram and interpretation
Modern models are much more interesting and brighter. But there are also classical schemes. However, in order to master the modern origami technique, many of the initial figures need to be remembered. Here is the origami figure “Bunny” - one of these models, which is the fundamental principle.
Let's look at it. Origami "Bunny" turns out to be small. Like all figures made in this way, it is made up of one colored sheet of paper. How to make such a cute paper hare? Just following the pattern.
Origami bunny: assembly instructions
We will provide graphic instructions explaining how to make a rabbit according to the pattern of a wonderful origami master from Japan, whose name is Akira Yoshizawa. This is a popular scheme. Perhaps even an adult will not understand it the first time, but it is interesting. Especially for those who want to learn how to perform the best origami models from memory, without diagrams.
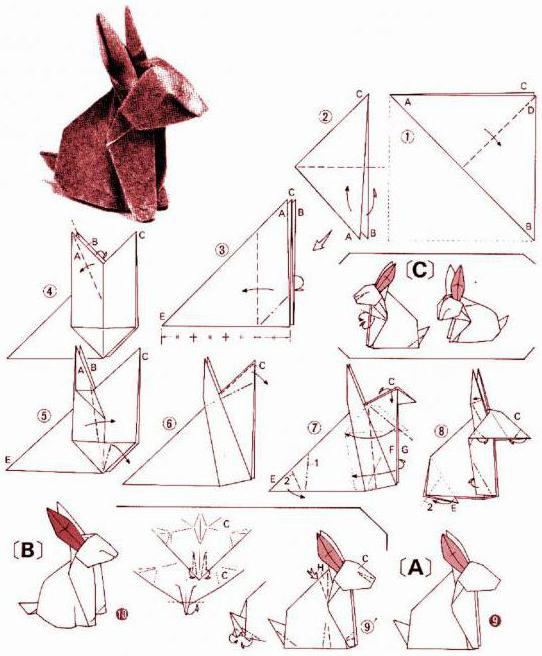
So what is it? In the diagram, each bend for each corner is clearly indicated. Dotted lines indicate corner bends and pre-fold lines. As indicated in Figure 9, for example. Tail assembly is described separately. The arrows indicate which way to fold the paper: up or down.
There is an additional diagram for this craft. We also present it in the article.

This way, a beginner can see the process of making a craft in all planes at once and imagine in advance what a voluminous finished hare will look like. To do this, the diagram presents a view from the left, and from the right, and separately from the back. Master Yoshizawa taught geometry. And he knew exactly how to make the scheme accessible. Therefore, comments are unnecessary.
There is a simpler bunny pattern that will require a little effort and time. This is an animal with a pocket on the back where you can put a painted egg for Easter and decorate the table. This origami “Easter Bunny” may not be the cutest craft, but it’s very suitable for the Easter holiday. And it is done very simply.
Triangular modules: learning to build modular figures
Modules in volumetric origami use triangular, rectangular and square. How to make the module needed for origami "Bunny"?
- We cut many rectangular blanks measuring 37x53.
- Bend the rectangle lengthwise in the center, then across, also in the center.
- Unbend. We need the first fold. We bend the corners of 2 rectangles to it, those that turned out on both sides of the main fold.
- Turn over to the other side. There you can see two small “tails” below. We bend them upward on one side and the other. Definitely on top of the triangle.
- Fold the small triangular “pockets” on the sides to the other side.
- Now bend the finished module in half.
There are a lot of such modules needed. One sheet of A4 produces 32 modules of this shape and size. Calculate in advance how many sheets and what color you need for your craft.
Modular origami "Bunny"
Like all modular crafts, the bunny pattern begins with a basic connection of modules of the 1st and second row. Take 3 or 4 modules and connect them with the modules of the second row so that the long corners remain at the top. Modules of the 3rd row are placed on the 2nd row.
The body, which has an origami paper bunny, will be slightly narrower than the head. In each row, count the modules so that there are exactly 24 elements. Then you need to narrow the ball a little, moving the elements towards the center. Somewhere from the 6th row, change the color of the modules so that it is clear that this is a bunny skirt.
Start attaching the head and prepare 28 elements for the 1st row of the hare's head. Continue laying the rows, and then don’t forget about the ears and attach these parts of the craft using exactly the same method.

You will get a wonderful modular origami “Bunny in a Skirt”. But if you want to build the same figure without a skirt, then it will be easier. The boy can be collected in his pants.
Other examples of module hares
There are various schemes according to which other hares are collected. If you don’t like any of the above options, you can come up with and make a new origami “Bunny” - a new unique pattern. You can endlessly experiment with origami crafts. For example, add a bouquet or basket to the hare's paws. Or let it be with a bow tie or tie.
Working with paper requires some artistic taste. You must first imagine what the new model will look like, and then put the idea into practice, thanks to knowledge of the modular origami technique. This is what the masters do.
But the basis of the scheme remains the same. It is also used to make penguins, owls, kittens, monkeys and other animals. Having learned how to make a rabbit, you can easily create an owl and the famous Pikachu from the cartoons.
- Print this picture in A4 format.
- Cut it along the lines.
- Bend and glue so that you get the bunny in the picture at the top right.
You can do something like this, paper bunny.
How to make such a bunny can be seen in the photo, all the steps are one by one. It can be used to decorate the Easter table, put paints inside. You can decorate with ribbons, flowers made from ribbons or paper, eyes, you can glue them or draw them.


Here is another not bad lesson on how to make a hare out of paper, although this method is probably not the easiest, but probably the most beautiful of all presented here))
Here is a video from youtube. The main thing in this matter is straight hands, not like mine)))
We recently made a hare with a carrot using the papercraft technique. How to do it?

We got it all done quickly and very simply!
In the West, it is very popular to make paper crafts for Easter, including a rabbit. I will offer you some detailed photo-schemes how to make an Easter bunny out of paper.


Third. Quite childish :) Make these bunnies with your child, it will bring both you and him a lot of fun:

I wish you success.
You can make a bunny or a rabbit by printing out its development - a drawing on a printer, preferably on a color printer, but you can also do it in black and white (then touching it up). Then we cut along the contour and glue it together. There are different deployment options, this, of course, is not the simplest.


Assembling an origami hare from paper may seem like a very difficult task for beginners, but it seems only at first glance, all you need for this is patience, accuracy and compliance with the assembly rules according to the diagram. In general, watch the video and do everything step by step. It is important not to miss any one little thing, because... in origami, even the smallest detail can seriously affect the assembly of the hare.
It couldn’t be easier to make a hare out of paper, you just need to do everything according to the instructions, and the video clip shows how to do it in an even more difficult way, but it is the best. According to the picture, you just need to make 8 movements and your hare is ready. To do this, you need to take the paper, fold it into a triangle, then again and again, everything as shown in the figure.

I've been getting into origami lately, so I'm closer to paper crafts in this direction. I suggest watching a video that describes in detail all the steps to create a bunny. For this you only need colored paper. Bunny color of your choice.
Paper hare using origami technique. Choose the bunny that you like best, as I provide several patterns. I liked the first option the most.
Whole bunny


and the head of a hare

Do you remember the robot hare from the cartoon Well, Wait a minute? So, this is also a robot hare. Cut out the template, fold and glue.


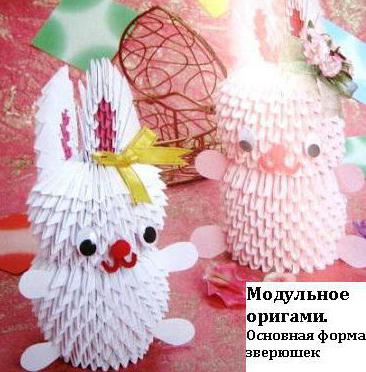
A paper hare can be made in several ways. The most difficult, but at the same time the most interesting, is the bunny of modules. Anyone who knows how to make modules can handle the hare without any problems. We make 522 modules in the shape of a triangle.

We lay the modules in rows. If you want to change the color, then arrange the modules like this: first, for example, a white row, then a yellow one, and so on.

It is very difficult to collect, but the most difficult thing is the hare's head. Not only is the structure shaky, but your head can also twist. Be careful.
It's better to do everything slowly. And if you don’t know origami techniques, then I invite you to watch the lesson.
A paper bunny is a wonderful craft that you can make with your child. In this case, it is very useful to have a video master class or step-by-step instructions. The bunny models themselves can range from simple ones that can be made from an ordinary napkin to complex designs made from small paper parts.
This is probably the simplest origami bunny.

And these are bunnies made from small parts - using the quilling technique. To make them, they first spin parts from paper strips, and then fold and glue together such a miracle.

Continuing the origami theme, here is a good video where everything is shown in detail. True, here this animal is called a rabbit, but I don’t know what kind of rabbits are in America, it reminds me more of a hare.
You might also be interested in:
Gemma is an example of miniature carving of colored stones and gems - glyptics. This view...
98/104 (110/116) 122/128 You will need Yarn (100% cotton; 125 m / 50 g) - 250 (250) 300...
Periodically replenishes its collection of publications dedicated to various colors and shades in...
A correctly tied scarf around the neck affects the external image and characterizes the internal...
251 03/26/2019 6 min. You can wear high heels and an expensive suit, make...

