


Many home decorations and fun toys for the New Year holiday can be made from ordinary pine and fir cones.
On New Year's Eve, the first thing you need to do is put up a Christmas tree. Or maybe from cones? Surprise all your guests. To get a tree like the one in the photo below, glue a cardboard cone base and, starting from the bottom, attach small cones to it with hot glue. You can’t glue many rows at once; let it dry completely and continue making the tree the next day.
For beauty and reliability, wrap this tree with thick jute twine.

Pine cones and candles are a good combination.

Such Christmas trees-cones in candlesticks will decorate any table when there are lit candles, festive garlands and glasses filled with champagne nearby.

Be sure to decorate the chandelier with beads and pine cones for the New Year holiday.

Such pine cone pendants will not wither, fall off, or break.

The chandelier is always the center of attention, and all the decorations that will be placed on it are well lit.

Ordinary cones from any tree, even completely unprocessed ones, are very decorative.

This material has many advantages over others:
- natural
- safe
- universal for any crafts
- free (if you just collect it in a forest or park)
- easy to glue
- emits a pleasant pine scent
- keeps its shape well when dry

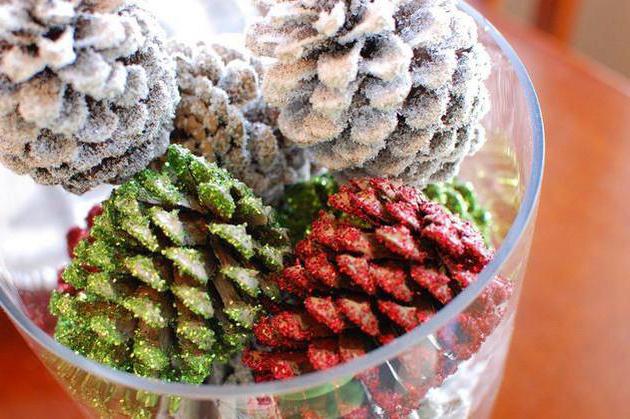
Tested: if you put ordinary pine cones in a transparent glass vase before the New Year, a festive mood will certainly come.
You can take your time and work with the pine cones. One option is to soak the buds in bleach. Take regular white, do not dilute it, and pour it over the pine cones placed in a glass jar. Be sure to cover with a lid. Leave for 5-6 hours. Then remove the buds and dry them. They should turn white.

You can paint the cones using a thin brush with regular tooth powder, diluted to the consistency of thick sour cream. You need to paint the tips of the scales, then the cones will be “frosted”.

To get silver, gold or colored glitter pine cones, use spray paint.


Or take a hard brush, use it to apply PVA glue to the pine cones and sprinkle generously with glitter. You will see the result when the buds dry.

Try making the pine cones colorful. Using a brush, carefully paint the pine cone with different colors.

To paint pine cones, it is not necessary to go through every scale with a brush. There are several other ways. Here is one of them: take the cone by the edge with tweezers and dip it into the paint, then immediately take it back out, hold it for a while until the paint drips and put it to dry.

Use acrylic paint, but water-based paint will be cheaper for painting ceilings. It is easily diluted with water to the desired consistency. Pour the paint into several containers and add different colored dyes to each of them, stir thoroughly. Paint the pine cones with these paints and let them dry. Dyes in small bottles can be purchased at hardware stores.

Another way to color cones: pour paint into a plate and roll the cone over it, coloring only the tips of the scales.

Another way: you can quickly paint the bump with a foam sponge.

Painted pine cones look elegant in transparent vases.

But not only in vases, but also in baskets, cones look wonderful.

This dish with colored cones reminded me of Easter colored eggs.

And look how unusual and elegant the colored cones turn out if you glue thin strips of tinsel cut to them with a glue gun.

Thin sections of trees and pine cones can serve as the basis for creating New Year's candlesticks. But be sure to take care of fire safety: place the candles securely in glass or metal candlesticks and secure the pine cones around them using a glue gun.

This New Year's composition evokes romantic feelings.

Of course, if you put the candles in deep jars, then there will certainly be nothing to be afraid of. Tie such “candlesticks” with a harsh thread and decorate with pine cones and pine needles.

If you have painted a lot of pine cones and don’t know where to put them, make a large candlestick.

And this glowing basket is just a New Year’s garland, complemented by pine cones and a bow, how beautiful!

Use the pine cones in their natural form, bleach or paint, decide for yourself. Any cones are an excellent material for home decoration.

Don't forget to hang these toys on the Christmas tree. 
Ordinary pine cones on New Year's Eve can turn into lush turkeys or peacocks.

Aren’t such owls amazing creatures? They are not difficult to make, the main thing is to glue the eyes, and the nose can be made from plasticine.

And this, apparently, is their mother keeping a vigilant eye on her children.

And such a flock of small birds can settle in your apartment not only on New Year’s Eve.

Look at this hedgehog, it’s not at all difficult to make. The main thing is to stock up on a basket of pine cones. Make the nose from the top of a dark plastic bottle, and cut out the eyes from white cardboard.

Try making flowers from pine cones. To do this, disassemble several cones into plates. Using a glue gun, glue sequential rows of plates in a circle onto a cardboard circle.


Several of these gnomes can improve the mood not only of children, but also of adults. You can decorate a Christmas tree with them or tie them to a rope and make a garland.

And such little skiers will keep the gnomes company.

Don't miss the opportunity to make something with your children from natural materials. Such work is undeniably useful for both children and their parents. Firstly, it's communication. Secondly, for the rest of his life the child will remember that pleasant feeling when he and his mother or father made toys for the New Year together. Thirdly, this activity develops the motor skills of children's fingers. Fourthly, this work relieves stress, because a person calms down while working with natural material. We can go on and on about the undoubted benefits, but it’s time to finish the article. All the best to you!
Useful tips
The cone is an excellent natural material from which you can make many different crafts.
One of the popular crafts made from pine cones is Christmas tree .
There are several ways to make a Christmas tree from a pine cone, and we have selected the most interesting crafts on this topic for children and adults. Decorate your home and create a festive atmosphere in it.
On our website you will also find:
- 20 small DIY Christmas trees that will decorate any home
- How to make a Christmas tree with your own hands
Christmas tree made of cones. Popular option.
Almost any type of cones is suitable for such a tree.

You will need:
Thick paper or cardboard
Hot glue, super glue or liquid nails
Fir branches (artificial or natural)
Spray paint (if desired)
Decorations (tinsel, artificial snow)
Lots of bumps.
1. Make a cone out of cardboard.
2. Using glue, attach the pine cones to the cone.
3. If desired, you can paint the Christmas tree any color using spray paint.
* You just need to paint outdoors, away from children, with a mask and preferably with safety glasses, because... Spray paints contain substances that are harmful to health.
4. You can glue spruce branches and various decorations between the cones.
5. All that remains is to decorate the Christmas tree to your liking.
Christmas tree made of cones (step by step instructions)

You will need:
Cardboard or thick paper
Wooden or cardboard delivery (you can make it yourself)
Adhesive tape
Old newspaper
Hot glue or superglue
Decorations (garlands, tinsel)
Lots of bumps.
1. Make a cone from a thick sheet of paper or purchase a ready-made foam cone.
2. Fill the inside of the paper cone with old newspaper for added stability.

3. Cut off the top of the cone, and use duct tape to attach a circle of cardboard to the top of the cone. This was done to make it easier to glue the cones to the top of the tree.
4. Cut out a large circle from cardboard - the base of the Christmas tree - and attach this circle to the cone (see image).
5. Start gluing the pine cones to the cone from the bottom up. To avoid large gaps, you can turn the cones of each next row with the crown in the opposite direction and then glue them.

6. When all the cones are glued, you can decorate the tree with garland and/or tinsel.
Small Christmas tree made of pine cones (photo instructions)

For one Christmas tree you will need:
PVA glue
Artificial snow or white (silver) sparkles
Mini pompoms (can be replaced with multi-colored beads).


Here is another version of a similar Christmas tree
Small tree made of pine cones (photo)

You will need:
Wine cork
Knife and scissors
PVA glue
Hot glue or superglue
Glitter (if desired).

1. Trim the bottom of the pine cone to make it flatter.

2. Cut the wine cork into 2 equal parts - these will be the bases for the Christmas trees.
3. Glue 1 pine cone to each base.


4. Apply a little PVA glue to each pine cone and sprinkle them with salt. You can add glitter.

How to make a big Christmas tree from pine cones (master class)

You will need:
Wooden slats and wire (to make a tapered frame)
Cardboard or plywood (for making the base of the Christmas tree)
Hot glue or superglue
Aerosol paint (any suitable color)
Decorations (tinsel, bows, toys)
Lots of bumps

1. Create a wooden frame using wooden slats and wire. Make it stable by adding a base of several sheets of thick cardboard or plywood.

2. The pine cones can be glued to the frame or attached to wire (using small pieces of thin wire), or both.

3. Decorate the Christmas tree as desired and to your taste. You can add spray or acrylic paint, tinsel, garlands, bows and/or small Christmas decorations.
Here is another option for a large tree made of pine cones, which uses a large frame for plants made of thick wire (you can make it yourself and just buy it):


Craft "Christmas tree" from pine cones

You will need:
Foam cone
Spray paint (in this example with a glitter effect)
Zlata Belaya | 2.12.2015 | 7963Zlata Belaya 12/2/2015 7963

These ideas will appeal to lovers of needlework. Decorations made from pine cones do not require a lot of additional materials and help create a wonderful atmosphere of a magical holiday.
Pine cones are an ideal material for creating original holiday decorations. They go well with a Christmas tree, especially a natural one, and help you feel a forest or village atmosphere.
Creating New Year's decorations is a very exciting activity that can unite all family members. We offer several ideas for pine cone decorations.
1. Lampions
Lanterns are an indispensable element of a festive evening. You can make them yourself from unnecessary jars, pine cones, green fir branches and small candles.
Place a few green twigs and/or pine cones in the jar, as well as a candle. You can tie the jar with a decorative bow or jute cord. Such lamps will create a warm and cozy atmosphere.
2. Table decoration
Decorations made from green living twigs and cones look especially attractive. However, if you don't have the time or ability to create original arrangements, simply place fir legs, pine cones and a garland of lights in a large jar. Cones in glass containers tied with multi-colored threads will also look beautiful.
3. Garlands
Instead of store-bought garlands, you can make original chains from pine cones - and a festive atmosphere is guaranteed.
The garland can consist of natural cones or painted white - this will create the effect of snow. Chains of pine cones can be tied into bows or attached to dried flowers. This is a wonderful decoration for the fireplace, doors, windows or Christmas tree.
4. Gift packaging
This original gift packaging will delight lovers of simplicity and eco-style. Simply wrap the gift in newspaper or gray paper and decorate it with fir legs and cones. Beautiful and tasteful, and also original and without kitsch.
5. Vignettes
Cones can be used for table setting, especially if you plan to invite many guests. Such natural vignettes will be ideal for the holiday.
6. Wreaths
A simple and at the same time original Christmas wreath can be made from pine cones tied with a bow. If desired, you can add spruce branches and bells to the decoration. A wreath in combination with rowan will also look fabulous.
7. Bouquets
Cones are a suitable material for creating unusual bouquets. In this case, the cones can be combined with fresh white flowers.
8. Pendants
Pendants made of pine cones on multi-colored ribbons or jute cords can be used as natural Christmas tree decorations or decor for chairs and entrance doors.
Cones can be coated with paint of any color. Jewelry in silver, gold, white and red shades looks especially advantageous.
9. Christmas trees
Original small Christmas trees are one of the simplest and most stylish decorations. Place the cones into small pots, paint them in different colors or decorate them, for example, with felt balls reminiscent of Christmas tree decorations.
Based on materials from the website www.polki.pl
Pine or have long become very common materials for New Year's crafts. Such a gift from the forest will certainly be created in the house and will become an excellent interior decoration. The cones are durable, and therefore any craft will remain in the apartment for several years and will look as if it had just been brought. Before figuring out how to paint pine cones for crafts, you need to pay some attention to the next part of the article.
How to choose a painting material
It turns out that everything is not so simple, and you need to choose your cones wisely. After all, they will soon become a decoration of the house. It is best to choose open cones, which will look more interesting, but if none were found in the forest, you can also collect closed specimens. After drying in the oven over low heat, natural materials will begin to open up. The process itself does not take very much time.
Preparatory stage
Immediately before work, when thinking about how to paint cones for the New Year, you need to spend some time preparing the selected specimens. Some of them may contain contaminants that must be removed. To do this, each cone is carefully examined, and if necessary, washed and dried. The drying procedure is best done in a well-ventilated room, but using heating devices for drying is not recommended.
In the absence of severe contamination, all cones are thoroughly cleaned with hard brushes to remove particles of earth or other debris.
If the materials for crafts were collected wet, they must be dried. An oven is suitable for this purpose. This measure is necessary so that the future decorative element can please its owner for a long time.
It is important to know that the buds contain large amounts of resin. You need to get rid of it using digestion technology. The collected materials are washed under running hot water (2-3 times). Then they need to be placed in a pan, filled with water and a small amount of washing liquid added. The digestion process lasts 3 hours, and the water itself is changed several times.
After the time has passed, the cones are taken out of the pan, transferred to a towel and wait for the water to drain. Then they need to be dried. To do this, future crafts are placed in a warm place for several days. During this time, just figure out what you can use to paint the pine cones for the craft.

There is another subtlety in opening the cones. As mentioned above, you can use the oven. But if time permits, then natural materials are simply placed in a warm room and waited until they begin to open. If you need to leave the opening at a certain stage, it is recommended to use wood glue. The cones are dipped into it using clamps, and then transferred to polyethylene to dry. The adhesive mass will not allow the scales to open further.
What paint to paint pine cones
So, you have the cones at hand, all that remains is to determine what to paint with, because there are a huge number of painting materials. First of all, you should consider ease of use. Sold in large jars with a wide neck, where you can completely immerse the cone. This approach will significantly speed up the painting process.

Some people prefer acrylic paints or gouaches. Here there will be a little more work, because you will have to spend some time painting each cone with a brush. The work itself is not difficult, just more labor-intensive. But you don’t have to think about how to paint pine cones for the New Year.
You can use spray paints. This choice has its advantages: a large number of colors, there is paint with glitter (which will make the pine cone even more original), and, again, quick processing of natural materials.
What do you need for work?
Before you create a New Year's masterpiece and think about how to paint the pine cones white, you need to have the following materials on hand:
- the required number of pine cones;
- white paint (it is recommended to opt for alkyd enamel, which dries quickly);
- a piece of steel wire;
- several newspapers.
Step-by-step instructions
Wire will be needed to facilitate the painting process. At one end the steel is bent into a hook so that a pine cone can be easily secured to it. The same hook is made on the opposite side so that in the future you can hang the craft to dry.
It is necessary to choose a place in the room where to subsequently place the cones for drying. Here newspaper is spread on the floor in several layers so that liquid paint does not get on the parquet or carpet.

Before starting work, shake the jar containing the paint. Then attach the cone to one of the hooks and immerse it in the jar. When removing the cone, you need to hold it over the jar to allow excess dye to drain.
The cones are hung in the chosen place to dry. After the crafts have dried, you can carefully remove them from the hooks. For convenience, you can install two chairs, put any stick of suitable length on the backs (even an ordinary mop will do) and hang the pine cones on the stick. So, the answer to the question of how to paint pine cones white has been received.
What other colors can you paint pine cones?
To make the pine cones look more original and festive, you can choose any color you like; everything is left to the discretion of the person making the craft. To work you will need the following things:
- a thick piece of foam rubber;
- paint (gouache);
- acrylic varnish;
- polyethylene film;
- a pair of gloves;
- the required number of cones.
Painting is done like this. You need to take gold gouache and mix it with acrylic varnish, after which the resulting liquid is evenly distributed over the foam rubber. How well each flake is painted depends on the thickness of the layer. That is why it is recommended to take a thick piece of foam rubber.
At the workplace, you need to spread a plastic film so as not to stain the surface with paint, place foam rubber on top, put a pine cone on it and slowly turn it clockwise. Before performing the step already described, it is recommended to protect your hands with gloves. It is especially worth noting that the paint is consumed in small quantities.

During operation, the foam rubber must be periodically turned over to the reverse side, because... the paint material will flow to the bottom. After reading this part of the article, there should be no questions left about how to paint pine cones gold.
Small tricks
Some people, before painting cones for the New Year, first bleach them so that the paint adheres better. To do this operation is quite simple, you need to have on hand:
- a large amount of bleach containing chlorine;
- bucket;
- plate;
- a pair of gloves;
- a few cones;
- cargo.
Place the pine cones in a selected bucket and fill it with bleach until it completely covers the natural materials. You need to place a plate on top that will prevent the cones from floating to the surface. A weight is needed to hold the plate; you can use a brick or some other heavy object.
The whitening process itself takes 24 hours. After this time, the cones must be washed in plenty of water and dried. After all these actions they should open up and become light in color. Once everything is dry, you can start painting the cones for the New Year.
How to give pine cones an unusual look
To make the cones more decorative, you can use glitter, which is applied to the edges of the scales. If the choice fell on acrylic paints to complete the craft, then it is recommended to use a varnish suitable for wood at the final stage of work. This will give the craft a glossy, sparkling look.

If you need to cover the cone with several layers of paint, you should remember that it takes time for each layer to dry completely. Before you take on another paint and continue working, you need to make sure that the first coat is completely dry. Otherwise, you may damage the work already completed.
Precautions
The article listed many options for painting pine cones to make them beautiful and unusual. In conclusion, we need to talk about safety measures, because incorrect use of paint and varnish products can lead to serious troubles. This is especially true for work in which children take part.
If you decide to use aerosol paints, you need to remember that they contain volatile substances that are harmful to the respiratory system, and the paint itself is explosive and flammable.
During work, it is recommended to use special eye protection glasses and respirators. You should wear gloves on your hands to protect your skin. If work is done indoors, it must be ventilated. It is recommended for adults to use aerosol paints, while very young children should be occupied with less dangerous preparations for the holiday. The same goes for coating buds with varnishes that have a pungent odor.
All work with substances that can be harmful to human health must be carried out in compliance with all safety precautions. If the weather permits, it is best to use varnishes and other substances with a specific aroma in a well-ventilated area, or even outside.
We hope that after reading this article you will no longer have to rack your brains over how to paint pine cones for crafts.
You might also be interested in:
When you buy a new sewing machine in a box of tools and accessories, you always...

We give gifts to loved ones, friends, colleagues for birthdays, New Year, etc...

Javascript is required to view this map Grunes Gewelbe Museum, which means “Green...

Experts recommend using a circle when bathing your baby because of its beneficial...

Conspiracies to find out the truth Every person deep down dreams of having sincere...

