


It's very easy to look stylish and modern when you have a gold credit card that someone constantly tops up, and you only wear clothes in branded and fashionable stores. But if you have an average salary and a closet filled with clothes that have long gone out of fashion (but are still in excellent condition), then becoming a “cover girl” is very difficult. Isn't it true?
In fact, there's a secret that can even turn dad's T-shirt into a stylish top from Alexander Wang's latest collection. And for this you just need a little imagination, scissors, a needle and old things.
We offer 35 ideas on how to turn unfashionable, old, boring things into stylish new items, like the girls from fashion blogs.
1. Denim skirt No. 1
We will need:
Long denim skirt with buttons or press studs. It can easily be purchased in second-hand stores
piece of cardboard
chalk or soap
scissors

First of all, we decide how long our skirt will be. Depending on this, we draw a horizontal line on the wrong side.
Cut out a template with a rounded side from cardboard. The width of the template depends on the width of the bottom of the skirt (ours is 10 cm). On the wrong side of the product, applying the template to the line, draw semicircles along the entire length of the skirt. We cut the fabric with sharp scissors, following the intended pattern.
If desired, we can rub the rounded edges with pumice to create a fringe, or leave everything as is.
Voila! A stylish miniskirt is ready.
2. Denim skirt No. 2

We will need:
The bottom that remains from denim skirt on the buttons
scissors
sewing machine or needle and thread

This is a more complex option. We measure how long we want the skirt to be and cut off the excess top. We measure our waist, hips and cut off excess fabric along the side seam line, and then carefully stitch or sew.
We mark the undercuts and sew them together with a regular needle and thread. Then we make a small lapel at the waist and stitch it or sew it by hand. We fasten the skirt in front so that there is a large slit at the bottom.
The second minimalist skirt is also ready!
3. Stole skirt
We will need:
Large stole (scarf) rectangular shape, preferably from light fabric, which does not crumble.
thin cord
cardboard
sewing pins
scissors
needles and threads
First of all, measure your waist circumference. Now a little math, but not too complicated)))
Add half of it to this number. This extra length will give us the opportunity to gather the skirt at the waist, easily remove it and tighten it back. Then, divide the number by 3.14. This will be the diameter of our circle that we draw on paper. We draw two cross lines on it that pass through the center to make 4 sectors of the same size.
Here is the formula for perfect waist at 60 cm.
60 + 30 (waist plus half this value)
90: 3.14 = 28.5 (circle diameter)
Cut out a circle from cardboard. Then, fold the fabric in half twice. We apply one sector of the circle to the inner corner of the fabric, trace it and cut it out. We bend the edge of the skirt (along the waist) by 2 centimeters and harden it with pins along the entire length. We cut holes along the fold line at a short distance from each other (5 cm). We thread the lace through all the holes. At the end, we tie knots so that the lace does not accidentally slip out.
And we have a completely new skirt ready!
4. Miniskirt made of stole or scarf

We will need:
Long stole or scarf
Wrap the scarf around your hips once. Then, we turn it over twice from the front and continue to wrap it around ourselves. We hide the end inside.
5. Black dress with a sexy neckline

We will need:
Old dress with high neckline
leather cord
scissors
needles, threads and pins
sewing machine

We draw a line in front, right in the center of our dress, to make it V-neck. Draw a line from the neckline straight to the waist seam. The neckline can be made either low or high, depending on your modesty. Our version is definitely not for work.
Cut along the line with scissors. We bend the fabric to create a neckline and pin it together. We decide where we want to start our lacing, and from this point we divide the entire length of the neckline into five parts. Mark the points with chalk.
Cut the leather cord into 10 small pieces. We fold them in half, in the form of a loop, and attach them with pins along the cutout on both sides in the places that we marked with chalk. Sew the edges of the neckline to secure the fabric and attach the loops. This can be done manually or using sewing machine.
After all the loops are securely sewn, take a long cord and begin to weave it from the bottom up. We finish the lacing with a small elegant batik.
Sexy evening dress is ready!
6. Short T-shirt dress
We will need:
Big T-shirt
scissors
rubber
needle and thread

Lay the T-shirt out on a flat surface, trim the sleeves, and then cut in a straight line just below the neckline.
From the sleeves we cut out two rectangles of the same size. This will be the top part of the dress. We measure the volume of the chest and the length of the rectangles, if necessary, cut off the excess.
We connect the top parts with the bottom ones, and then sew the sides of the dress.
We sew the elastic under the chest, at the junction of the parts.
And summer short dress ready!
7. Stylish dress with slits on the sides

We will need:
Big T-shirt
scissors
needle and thread
First of all, we cut off the sleeves from the T-shirt, and then cut it horizontally just below the chest. We take into account that the bra does not show.
Then, on the top of the dress in the front we make a small hole. There is a small cut on the lower part of the dress (near the waist). We insert the ends into the hole and sew them together or simply tie them.
Voila! Dress with slits, very fashionable in this spring-summer season, ready!
8. Beach dress from a T-shirt in 30 seconds

We will need:
Big long t-shirt
We put the T-shirt over the neck. We tuck the left sleeve on the right side of the chest, and the right sleeve on the left. This makes a cute off-the-shoulder beach dress.
9. Beach dress from an old skirt
We will need:
Old skirt and T-shirt
scissors
needles and threads
strap

Lay the skirt out on a flat surface and cut off the elastic at the waistband.
We attach a T-shirt to the skirt and cut out along the contour of the armhole and neckline.
We sew the harnesses using a needle and thread. You can use a sewing machine to be safe. We tie it with a belt and the dress is ready!
10. Stylish cocktail dress with a cutout at the belly

We will need:
Old dress
cardboard
sewing machine
scissors
needle and thread

First of all, cut off the sleeves and shorten the length of the dress. We bend the armholes and hem by 1-2 centimeters, press them with an iron and stitch them, or sew them by hand with blind stitches.
Cut out a small triangle from cardboard and trace it along the front center of the dress. We cut through the bottom of the triangle, then make a perpendicular cut up. We bend the fabric and sew all sides of the triangle with small stitches.
Most of the work falls on the sleeves. You need to work hard on them. And then, chic and fashionable cocktail dress ready!
11. Dress with fringe

We will need:
Short dress
scissors
floss threads different colors(on average five flowers that match the color of the dress)
bright thin belt
We choose a dress so that the fabric does not fray. Preferably monochromatic. We make small holes along the entire length of the hem and sleeves, at a distance of 5-10 centimeters from each other.
Then, we cut the floss threads into small bunches of the same length so that they easily fit into the holes on the dress. We pull the threads through the holes, alternating colors. We carefully tie each bundle with a thin thread so that it does not fall apart.
We tie the dress with a bright belt and cheerful summer look ready!
12. Skirt and top

We will need:
Long maxi dress
rubber
scissors
needles and threads
pins

First we turn the dress over so that the front becomes the back. Then we carefully sharpen out unnecessary decorative elements using nail scissors (pocket and braid with buttons). Cut the dress into two parts along the seam line at the waist.
We mark how long we want to make the top and hem its edge manually or using a sewing machine.
We take an elastic band, preferably a wide one, and bend the top of the skirt according to its width. Then we hem the waistband so that the elastic can be inserted inside.
After attaching the elastic to a pencil, knitting needle or stick, we pull it through the loop until it comes out the other side. After this, we sew the ends of the elastic and carefully sew up the hole in the belt.
Voila, the flight suit is ready!
13. Balenciaga White Top

We will need:
White long T-shirt with wide straps. Choose from thick fabric so that it does not fray and the edges do not curl
scissors
needles and threads

The first step is to cut out the back from the T-shirt so that its length is a few centimeters below the clasp of our bra. We cut it out, retreating slightly from the line of the side seams.
Then turn the shirt over to the right side and mark the middle. Cut along a straight vertical line from the neckline to the very bottom.
We put on the top. Long ends wrap around the waist and tie them at the back. The upper edges of the neckline can be folded under the bra or hemmed.
The result is exactly the same top as from the latest Balenciaga collection.
14. Short white top

We will need:
Large T-shirt (several sizes larger)
scissors
needles, thread or sewing machine
chalk

Cut off the sleeves from an old T-shirt. Then we proceed to the cutout. At this point we need to determine what thickness of straps we want and what depth of neckline. Depending on this, we cut off the neck of the T-shirt.
Then, on the wrong side, draw a horizontal line at the level where our top will end and cut it off. The edges of the top can be hemmed. To do this, you first need to make an overlap of 1 centimeter on all sides. If the fabric is soft and begins to curl a little, leave the top as is.
Voila! The light and cute top is ready. Underneath, you can wear a bright swimsuit, bra or other T-shirt. Ideal for summer holidays or playing sports.
15. T-shirt with a heart

We will need:
Plain T-shirt a couple sizes too big
an old T-shirt or piece of cloth to cut out the heart
scissors
sewing machine
pins
chalk

First, cut off the collar to create a wide-neck T-shirt that falls off one shoulder.
Then, turn the T-shirt inside out and draw a heart. We draw lines inside the heart, at a distance of 2-3 cm from each other. Carefully cut them through.
WITH wrong side sew a piece of bright fabric onto the heart. Then, by hand, we sew each strip of the heart using threads that match the color of the fabric. Trim off the excess and stylish t-shirt ready!
16. T-shirt with bows on the back

We will need:
plain t-shirt in sizea piece of colored fabric or bright old T-shirt
sewing machine
scissors
needle and thread
chalk
We lay the T-shirt back up and mark the place where we want to make the neckline. Carefully cut with scissors. The neckline can go from the throat to the very bottom. It should end in the middle of the back, depending on personal preference.
We make the required number of bows from colored material (minimum 4). Their size directly depends on the width of the cutout on the back. When the bows are ready, manually sew them to the T-shirt, not forgetting to bend the edges of the neckline 0.5-1 centimeter inward. Then carefully sew all the seams.
17. T-shirt with original mesh

We will need:
Wide T-shirt
chalk
scissors
rivets

Lay out the T-shirt on a flat surface, turn it inside out and draw 10 on both sides of the neck vertical lines at the same level (1-2 cm wide). We cut them and connect the strips in a checkerboard pattern using rivets. Then, we make a vertical cut of 20-30 centimeters at the bottom of one side of the T-shirt. We tie the edges with a knot.
Voila, the T-shirt is ready!

We will need:
Big T-shirt
scissors
Lay the T-shirt out on a flat surface and cut off the sleeves to create large armholes; we cut off the throat, forming a deep neckline, and shorten the T-shirt at the bottom. Don't throw away the bottom border, we'll need it later.
At the back we make the cutout a little larger than at the front. Then we tie the fabric between the shoulder blades on the back with a thin ribbon and wind the border on top, which we cut from the bottom of the T-shirt. We make an inconspicuous knot and cut off the excess. We shorten the bottom of the T-shirt in front and beautiful summer T-shirt ready!
19. Denim shirt with cutout

We will need:
Denim shirt
scissors
ruler
pen
needle and thread
sewing pins

Turn the shirt inside out and use a pen to mark a horizontal line where we want to make the cut.
Cut the fabric along the seam lines.
Turn the shirt inside out and fold a few millimeters of fabric inward. We pin and sew with invisible stitches. Iron it and the original shirt is ready!
20. Black cut-out shirt

We will need:
Black shirt (or any other color with a turn-down collar and button placket)
scissors
chalk
sewing pins
needle and thread to match the color of the shirt
glue

First of all, we put on a shirt and stand near the mirror to mark with chalk where we want to make the holes. We need to take into account their location so that our bra does not peek out. Once we have marked the hole on one side of the shirt, we need to copy the design onto paper so that we can then transfer it to the other side and get a symmetrical look.
We cut through the fabric, retreating 1 centimeter from the intended pattern. We make small cuts along the entire edge of the resulting cutout. To avoid wrinkles, it is best to sew on a mannequin or put the shirt on a pillow and pin it at the back. We sew with blind stitches along the entire length or glue with glue if you don’t want to sew. Finally, iron the edges and the shirt is ready!
21. Shirt with a cut-out back

We will need:
Oversized shirt
scissors
needle and thread

Turn the shirt inside out and mark the line where the neckline will be. Carefully cut with scissors along a line from one shoulder to the other.
We bend the edges 1 centimeter and stitch or sew with threads by hand. We retreat 5 centimeters on both sides and make a few stitches to fasten the top and bottom part backs of shirts.
Voila! Stylish thing ready!

We will need:
Plain button-down shirt with turn-down collar
beads of at least two colors
scissors
needle and thread

Lay out the shirt on a flat surface and sew the beads to the collar in a chaotic manner.
23. Sweater with an open back

We will need:
Sweater or sweatshirt (choose from a material that will not stick out or fray)
Velcro or button
scissors
needle and thread

Fold the sweater in half vertically and mark the middle. Then, cut it along the back in a straight line. We sew Velcro or a button on top so that the sweater does not undo itself. If desired, you can fold the edges, press them and sew them with blind stitches.
24. Original sweater

We will need:
Sweatshirt
colored tape
sharp scissors
needles and thread

First of all, we cut off the neck of the sweatshirt so that we get a fairly deep neckline that falls from one shoulder.
Then, using scissors or a cutter, we make about 15 rows of small holes at a distance of 1-1.5 centimeters from each other. The holes should be located at the same level. Their number gradually decreases, reaching the lower rows.
We put tape in the holes. The ends need to be sewn with several hidden stitches to the sweatshirt or simply tied with a knot.
That's it!
25. Sweater with patches on the elbows

We will need:
Sweater
shiny fabric or sequins
scissors
needle and thread
paper and pen

We use our hand as a template. We trace it on paper, forming an oval and cut it out.
We attach the template to shiny fabric and secure it. Cut out the patches. We make sure that they are the same shape.
We attach the patches to the sweater with pins to make sure that they are in in the right place. Using internal stitches, carefully sew the patches to the sweater.

Patches can be of any shape and from any material.
26. Stylish T-shirt scarf

We will need:
Old T-shirt (the larger the better)
scissors
ruler
chalk

Cut off the hem of the T-shirt. Then we draw horizontal stripes on the wrong side, 2-4 centimeters wide.
We get a lot of rings, which we stretch one by one until they begin to curl inward.
Cut the hem of the T-shirt to make it long ribbon. We collect all the rings together and wrap the hem tape several times to secure the scarf. We tie it into a knot, cut off the excess, and tuck the ends under the ribbon.
The unusual scarf is ready! Looks great with long hair or a messy bun.
27. Bright jeans No. 1

We will need:
A pair of jeans
thin brush
paint or corrector
paper
First of all, we decide what kind of pattern we will apply to the jeans. We outline the places where the pattern will be located. Then we cut a stencil out of paper. We apply it to the jeans and very carefully paint over it with paint or corrector so that it does not spread beyond the boundaries of the stencil.
28. Bright jeans No. 2
We will need:
A pair of jeans
cutter
wooden board
sandpaper
marker
We lay the jeans out on a hard surface and mark the places where we want to make abrasions. Then using sandpaper, lightly rub these places.
We put a wooden board inside the trouser leg so as not to cut through the jeans and arm ourselves with a cutter. Making horizontal cuts different lengths at a distance of several millimeters from each other. At the end, we paint over the threads with a regular marker, bright color.
29. Fashionable skirt, shortened in front

We will need:
Long no pleated skirt
scissors
needle and thread
iron

Fold the skirt in half so that the curve runs through the center of the front. Place it on the floor and cut out a piece so that the mini-part smoothly goes to the bottom.
Every time we put on a skirt and see what happens. If necessary, we level it, because it is always better not to cut off than to cut off too much. Once we are satisfied with the long and curved line, we bend all the edges by 1 centimeter and smooth it with an iron.
Then we sew the edges of the hem with small stitches, using threads that match the fabric. At the end, we go over all the seams again with an iron.
Stylish skirt ready!
30. Denim overalls

We will need:
Denim overalls
scissors

We measure the overalls and note how long we want to make it. We cut off the legs not in a straight line, but with a slight rise to the top. Then carefully cut off the pocket on the chest.
To make the jumpsuit look modern, remove the buckles. We shorten the harnesses and make a hole at the end for a button. If desired, the edges of the shorts can be hemmed.
31. Gladiator sandals

We will need:
Sandals toe
long leather cord or thin tapes(4 meters)
scissors
glue

Sandals will look much more natural if you pull the lace through an existing hole.
We cut the cord into two even parts of two meters each. We pull it through the hole and glue it underneath if we don’t want it to slide into different sides.
Then we simply weave it along the foot tightly enough so that the lace does not fall down, and symmetrically so that the sandals look beautiful. We weave as high as we like and end with a small bow at the back.
32. Cat shoes

We need:
Ballet flats (preferably plain with a round toe and plenty of room in the front)
black paint (acrylic), black marker
tassels
masking tape
white paint and white marker
First, cover the shoes with tape, tightly enough so that the paint does not bleed through.
We paint the socks with black paint to make it even color, without light spaces. When the paint is dry, remove the tape and draw small triangles for the ears. You can also use masking tape for this if it doesn’t turn out very smooth by hand.
To draw the eyes, use white paint, marker or corrector. With its help we draw thin mustache and nose.
And voila! Last fashion trend appeared in our wardrobe!
33. New flip flops

We will need:
A pair of the most ordinary flip-flops
ribbon, matching shoe color
beads and beads suitable color
needles and thread
We wrap the flip-flops with ribbon and sew the tip at the bottom so that the ribbon does not unwind.
We sew beads and beads in a chaotic order with a thread of the same color as the ribbon.
In half an hour, stylish flip-flops are ready!
34. Freshening up black shoes

We will need:
A pair of black shoes, with a rounded or pointed
masking tape
brush
white and neon yellow acrylic paint

Cover the shoes with masking tape. Carefully smooth it out so that the paint does not leak underneath.
First, make one layer of white paint and let it dry for several hours. Then we paint it yellow. We remove too pronounced strokes and let the shoes dry a little.
Wet your fingers with water and run them over the paint to smooth out any rough edges and lines. We remove the masking tape when the paint is not completely dry, and then leave the shoes overnight.
Voila! And you get trendy shoes from your old, boring pair.
35. Sports bag

We will need:
T-shirt with bright print
sewing machine
scissors
Cut off the bottom border of the T-shirt and remove a little from the sides. We sew all sides on a sewing machine.
It makes a great sports bag or bag for a shopping trip.
36. New hat from an old sweater

We will need:
· unnecessary sweater
· finished hat (for template)
· scissors
thread, needle

Choose a sweater with elastic at the bottom edge. We cut the blank from the bottom of the sweater so that the elastic rests on the forehead, and one of the edges of the hat falls on the seam of the sweater.
Using the finished hat as a template, we cut it top part blanks. Sew the top and side edges from the inside with a triangle.
Don't throw away any leftover sweaters! You can make a lot more out of them.
37. Sweater boots

We will need:
· sweater
· slippers
· sewing machine
· threads
glue gun
· decorations

Take measurements along your leg and cut out blanks from the sweater. Sew the sides and top edges typewriter boots.
Having threaded the slippers into the bottom of the blanks, glue them using glue gun.
Finished boots can be decorated to your taste. For example, buttons or embroidery.
38. Ballet tutu (without sewing)
We will need:· unnecessary tapes
· wide elastic band

Make a belt from an elastic band. We thread the ribbons through, tying them in a knot at the waist.
To make the pack more fluffy, we make several layers of ribbons, repeating the rows.

We will need:
· long T-shirt or tank top
· scissors

Cut the bottom of the T-shirt into equal strips. We tie the strips, following the sequence in the photo.
40. Bag made from old jeans

I adore denim clothes. Breaking through a couple of bags of old jeans, you find a whole source of inspiration for creating new things. Sturdy material (which, by the way, never goes out of style) makes cute wallets and bags. Here is one option for creating a unique bag from jeans.
We will need:
· jeans
thread with needle
· trouser belt
· piece of colored material
Cut off the top of the jeans with the pockets.
Sew fabric from an unnecessary colored dress or skirt to the bottom edges. Sew the bottom of the bag. We make handles from the belt.
41. Beach bag with fringe from a T-shirt (no sewing)

We will need:
· t-shirt
· scissors
· ruler
· chalk or marker

Having straightened the T-shirt, cut off the collar and sleeves.
We make cuts on the bottom of the T-shirt. You can use a ruler and chalk to draw identical stripes.
We tie the fringe as tightly as possible so that nothing spills out of the bottom of the bag.
42. Tie maxi skirt

You can make something out of old ties long skirt in hippie style.
We will need:
· ties
· threads
· sewing machine
· belt from an unnecessary skirt
We sew the ties at one end to the belt and sew the sides of adjacent ties together.
43. Tie miniskirt

We make a miniskirt in the same way as a maxi. You just need to cut the ties to the required length.
Voila! The sexy bright skirt is ready.
44. Unusual decoupage shoes
Using the decoupage technique, you can hide scuffs and cracks on your favorite shoes.We will need:
· shoes
· PVA glue
· scissors
· paper with drawings

Cut out the necessary figures from paper.
Apply PVA to the surface of the shoes (you must first clean and dry the shoes).
Since PVA dries very quickly, do not apply glue to all shoes at once. Apply it in sections. Having finished laying out the drawings in one area, move on to the next.
When the pictures are dry, you can show off at parties in unusual shoes.
45. Light summer sundress made of scarves

We will need:
· two large scarves or pareo
· ribbon
· threads
· sewing machine

We form a blank from scarves, folding them as needed. For example, by forming a bodice from the corners of scarves.
We sew ribbons to the corners, the ends of which are secured to the back. Sew sides scarves.
46. Gloves made from socks

We will need:
pair of socks· scissors
thread with needle
· decorations

Cut off the toe and heel of the socks.
To prevent the fabric from unraveling, we sew the cut areas with thread. We tuck the edges - the gloves are ready.
You can decorate them bright applications, embroidery or beads.
47. Stylish summer dress made of a baggy sundress

We will need:
old sundress
· tailored dress
· scissors
· threads
· sewing machine
· chalk

Choose a dress from your wardrobe that fits you perfectly. Using this as a template, place the dress on the front of the sundress and trace with chalk. We repeat the steps with the back.
Cut out the trim and sew the edges.
From the leftover fabric you can form a belt, bow or fake pockets that will decorate your new dress.
48. Maxi skirt dress (without sewing)
We will need:long skirt
original belt

We put on the skirt at chest level and tie it with a catchy belt. Ready!
Plus the dress: it quickly turns into a skirt.
49. Plaid poncho coat
We will need:
· plaid
· plate
· blade
· chalk
thread with needle
· belt
![]()
Lay the blanket out on a flat surface and fold it in half.
Place the plate over the neckline and mark a semicircle with chalk. Cut out excess fabric. Cover the collar with thread so that the fabric does not unravel.
At waist level (at the front of the blanket only), mark two slits with chalk and cut them with a razor blade. Sew the cuts with thread.
Insert the belt into the holes. The coat is ready!
50. Burberry scarf coat in a hurry
Burberry is fashion fabrics with an original checkered pattern. Finding such a scarf will not be difficult.We will need:
Burberry scarf
· chalk
thread with needle
· blade
· buttons

Drape the scarf over your shoulders and mark with chalk where you want to sew buttons. Sew on the buttons and carefully use a blade to make holes for them on the opposite side. To prevent the fabric from unraveling at the cuts, stitch their edges with thread.
The advantage of this coat is that it is a transforming item. With a slight movement of the hand, the coat turns into a scarf again!

We will need:
· sweater
thread with needle
· chalk
· decorations

Turn the sweater inside out. Straighten the sweater, place your hand on the side and trace it with chalk. Repeat with the other hand on the opposite side of the sweater.
The blanks should be a little larger required size. Cut out the blanks and sew the edges.
After trying on, cut off the excess edges and turn the mittens inside out so that the seam is on the inside. Ready-made mittens can be decorated to your taste.
52. Unusual scarves from dresses

We will need:
· dress
· scissors
· costume jewelry

Cut off the hem of the dress. Cut strips on the bottom of the fabric.
Tie the ends of the strips at the bases into knots. However, this is not necessary, because the scarf already looks original.
The new thing can be decorated with a brooch or other jewelry.
53. Dress made of sundress and T-shirt

We will need:
sundress· T-shirt
thread with needle
· wide belt
Cut off the top of the sundress and sew the hem to the T-shirt.
Wide belt will not only complement the outfit, but will also highlight your waist.
The top can be decorated with a bow from the remains of a sundress.
54. Sexy lingerie made from a simple bra

Prices for beautiful lingerie can cause depression. And I really want to always be on top. Well, don’t despair, you can make an erotic bra with a minimum of effort.
We will need:
· bra
Packing of rivets for fabric
· pliers or manicure set 
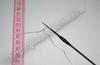
Pierce the fabric of the bra with the sharp edges of the rivet so that the point comes out on the opposite side.
Gently bend the ends of the rivet with pliers.
Form required pattern.
55. Mesh from an old tunic

We will need:
tunic (cotton)· scissors
· basin with hot water
Cut out circles of fabric from the tunic.
Soak in hot water(this will make the edges of the cuts curl up and the material will not unravel). Please note that you can only do this with clothes that fit you loosely. Cotton shrinks in hot water.
Dry it - ready! So easily and quickly a simple tunic turns into a seductive designer outfit.
Don't be afraid to experiment and be bright!
Threads for darning The color, thickness and quality must match the fabrics being repaired. They can also be pulled out from the border at the seams. The stitches in the darning should be small and first go along the grain thread, and then along the weft (across). For a transverse puncture, the needle is passed under the thread, then over it. At the edges of the darning, do not tighten the thread too much so that when it shrinks after washing, the threads do not pull the fabric together. The rows of threads should fit tightly one to the other. You can also darn on a sewing machine with a special device. If the fabric has not been worn through, but has only become very thin, the darning is laid along the grain, without making transverse stitches.
Patches must be made of the same material from which the item is made, or of similar quality and color. Before applying the patch, the material must be washed and ironed so that it does not shrink later. The patch is applied to the repaired area, combining the lobe and weft threads. If the patch needs to be placed near a seam, the seam is trimmed and one side of the patch is inserted into the seam. Then it is basted and after that, bending the edges, sewn hidden seam from the front side and from the back. The basting is pulled out. On a rectangular patch, an oblique cut is made at all four corners to a depth of 0.5 cm. If the patch is not in a visible place, it can be sewn on by machine.
For patterned fabrics, the patch is applied on top. To do this, outline the damaged area, adding 0.5 cm to each side, and cut out the appropriate patch. Folding the edges inward, sew it on. On variegated material, the pattern should match the pattern of the item being repaired.
Damaged areas of any item can be sealed with BF-6 glue or other fabric glue. The prepared patch must be moistened, ironed, placed face up under the damaged area and traced with chalk along the contour through the hole in the fabric. The edges of the patch should be 1-2 cm larger than the damaged area. Separately, prepare an overlay for the patch, which should be 1-0.5 cm larger than the patch itself along the edge. A little glue is applied to clean glass and allowed to dry for 4-6 minutes. Apply dried glue to the moistened fabric, the edges of the patch and the overlay. The gap between the edges of the damaged item and the edges of the patch is also lubricated thin layer glue, allow to dry and lubricate again. The second layer is also allowed to dry, then, after applying an overlay coated with glue, everything is secured with an iron (3-4 seconds). After pre-fastening the patch, turn the item over, place a damp cloth on top and hold it under the iron for 20 seconds, then repeat two or three times, wetting the cloth.
Repairing sheets and towels. Sheets are often wiped in the middle - they are cut along the grain thread and both halves are stitched along the edges.
Towels tend to wear out the ends faster. The towel is cut in the middle and sewn together with the frayed ends. The edges are hemmed.
Jackets and trousers sometimes they require minor repairs: the cuffs of sleeves and trousers wear out. Sleeve cuffs are repaired as follows: the lining is peeled off and the hem of the sleeve is carefully cut off. The ends of the sleeves and the cut strip are ironed, the strip is sewn, then folded, the lining is sewn on and ironed again. On trousers, the edges are repaired in the same way. If the trouser tape is frayed, it is replaced. To prevent the tape at the bottom of the trousers from fraying, it can be impregnated with PVA glue.
Lace curtains Usually they darn, but this takes a lot of time, and the darned places spoil the appearance of the product. Pieces of old curtains that match the pattern can be soaked in starch solution and “glue” the curtains to the damaged area from the inside out, then iron them with a hot iron.
Woolen woven items can be repaired as follows: move the edges of the tear as close as possible, take a piece of the same material, spread it thickly egg white and place it under the torn area, and then iron it from the inside out with a hot iron.
Buttons sew on, leaving the thread somewhat loose. The “stem” thus formed is wrapped several times with thread (it should be longer on thick fabric and shorter on light fabric). A button can be sewn to silk without a “stalk” by slightly pulling the thread. When sewing buttons to outerwear, place a small button or piece of fabric on the other side for strength.
Buttons sew in places where the fabric is not stretched too much. In order to position the sewn buttons exactly opposite each other, you should first sew on the top part of the button, make a chalk mark on the head and press it to the opposite side. The second half of the button is sewn to the place of the print.
Repair of torn seams. If a side seam on a coat, jacket, or jacket is torn, rip the side seam of the lining. If the seam is torn by 2.5 - 3.5 centimeters, it is sewn manually using line stitches; if the length is more than 3.5 centimeters, the parts are first basted, carefully aligning the edges, and stitched on the machine so that the stitch exactly continues the old stitch. Having removed the bastings, the seam is ironed, the lining is straightened and attached to the side seam of the top, the back lining is sewn to the lining by hand with blind stitches.
When repairing clothing - armholes in a damaged area, tear off the sleeve lining from the armhole seam and baste the sleeve to the edge of the armhole so that its fit is even. The basted section of the sleeve is sewn to the edge of the armhole by hand using line stitches. They should exactly continue the old line. The stitch frequency is 4 - 5 per 1 centimeter of stitching. Then carefully straighten the back lining and the floor along the edge of the armhole and attach it with marking stitches to the armhole seam. The seam is ironed tightly, smoothing out bruises. After this, straighten the sleeve lining and sew it to the armhole seam with blind stitches.
The seams of the lining are sewn with hidden hemming stitches. If the seam connecting the lining to the bottom of the product is being repaired, the bottom is first cleaned from the inside out of dust, and then the lining is sewn on.
Repair of the lining at the edge of the sleeves. When starting to repair the bottom of the sleeves, baste the lining to the upper part of the sleeve, at elbow level, and then tear off the lining from the bottom of the sleeve.
The worn part of the lining is cut off by 10 - 12 centimeters. The seams on the cut parts are ripped out. Using these parts of the lining, a new one is cut out, of the same shape, with an allowance of 2 centimeters at each seam.
New parts of the lining are alternately stitched to the lining of the upper and lower halves of the sleeve with a seam 1 centimeter wide. The stitching seams are pressed and the front and elbow edges are sewn down on new areas of the lining. The seams in these areas should be an exact continuation of the old lines, both in width and in direction.
Iron the seams towards the upper half, while bending the edges along the stitch line. The repaired lining is attached to the elbow seam of the sleeve. The lining is straightened inside the sleeve. Baste to the bottom of the sleeve 5 - 7 cm from the edge and sew with hidden hemming stitches.
The repaired sleeve is ironed and steamed.
Repairing the bottom of trousers. If the braid sewn to the edges of the trousers is worn out, it is replaced with a new one. Otporov old braid, the edges of the trousers are thoroughly cleaned of dust and thread ends. The new braid is laid along the bottom of the trousers so that it is thicker, the edge protrudes 1 - 2 millimeters from under the bottom of the trousers. The braid is sewn with hemming stitches on both edges.
In some cases, instead of a special braid, you can sew a strip to the bottom of the trousers cotton fabric 2 - 3 centimeters wide.
Trouser cuffs are repaired like this. First, rip off the entire folded edge of the bottom of the trousers. Clean it of dust and threads and iron it tightly. Worn areas with open holes are plastered. After plastering, the seams are ironed tightly again. Mark a new line for the hem of the trousers. It should go 3 - 5 millimeters above the seam of the piece. Along the new line, the edge of the bottom of the trousers is folded inside out, basted, hemmed by hand and ironed tightly. After this, a special braid or strip of cotton fabric is sewn to the edge of the bottom of the trousers. Iron the bottom tightly, and then iron and steam the entire thing.
Repairing cloth and woolen products. Worn fabric (drape, cloth, wool) is darned from the inside out; the thread must match the fabric in thickness and color. It is best to pull it out from the edge of the same product.
When darning, the stitches are placed so that they approximately coincide with the direction of the fabric threads, that is, they continue them in the place where they were torn or frayed.
In cases where the cloth is torn, it is pieced together: a thread is pulled out somewhere from the edge of the product and both edges of the torn product are sewn together; the needle should not be pierced through, but by grasping half the thickness of the fabric. Using plastering, you can discreetly insert patches on cloth items. For strength, a piece of silk slightly larger than the patch is hemmed from the inside out. When sewing, you need to be careful not to pierce the material.
It is better to sew patches on woolen products in a quadrangular shape. To do this, the torn area is trimmed, cuts are made in the corners, the appropriate patch fabric is selected, the size of which should be half a centimeter larger than the hole, the patch is basted and sewn down by machine or by hand. The seam is smoothed on both sides. The corners of the patch are cut off to prevent wrinkles from forming.
Hello! My name is Sasha Sanochki and I run the Second Street blog, dedicated to stylish and creative clothing alterations. Every day I publish 5 new materials on this topic.
It was not I who personally made all these alterations without exception. But for almost two years every day, I get up at 5 am to find (before work) 5 fresh and interesting ideas for remaking clothes from old to stylish, translate them, process all the photos, making them in the same style, write a post and publish it . In two years, exactly 3,000 of them accumulated.
Every day, in search of materials, I scroll through about 4,000 sites in the reader, and only a third of their materials relate to handmade or fashion - I find the rest of the ideas in gossip columns, style com, films, music videos and even magazines like Forbes sometimes. I just want to collect it all in one place.
I would like to show you at least a few of the 3,000 ideas accumulated on the site over 2 years:
I decided to choose only 5 ideas for each of the popular types of clothing alterations for last month, because it’s difficult to choose from 3000 equally interesting ones). And I tried to choose those that can be shown here, without dragging a bunch of photos with master classes
So, here we go:
5 ideas for altering T-shirts
1. Alteration of the vest:
I love alterations of vests). It couldn’t be simpler: a vest + a bowl of dipping paint. Looks unrealistically cool).
2. Playing with the texture of the T-shirt:

A long cotton T-shirt can be cut into circles, then washed high temperature– the slices will curl and will not “crawl” (just don’t squeeze them in the machine!). Wear with a dress or leggings and a T-shirt.
3. How to tag a guy:
TeenVogue and designer Erin Fetherston give you an idea: put on your lips acrylic paint(ugh, disgusting, yeah) - and boldly leave a print right at the collar of his T-shirt or shirt. After drying, all that remains is to iron it with the hottest possible iron - and your bookplate is on it forever. IMHO, na women's clothing somehow not very good:

...and for men - that’s it). A sweet idea for faithful and gentle lovers and a hot/playful idea for notorious machos).
4. Shirt and T-shirt dress:

What does it mean to combine beautifully)) - take a closer look - the dress is actually a mix of shirts and T-shirts cut and sewn together.
5. T-shirt - blinds:

Tutorial on how to remake two T-shirts into a sort of "blinds" T-shirt for $48 from Anthropologie - can be found on the site, it's too detailed to copy.
5 ideas for jeans alterations
1. Piece Jeans:

I think this fit would be difficult to achieve if they were actually sewn together from pieces. So, most likely, these are thin summer jeans, onto which pieces of other summer and thin ones that match in shades have been sewn. And then they cut off the bottom layer in places. In my opinion, there are only a couple of places where the main fabric up to the knees on top was actually replaced in some area with another.
2. Ulyana Kim dress:

A very beautiful combination of two types of jeans!
3. Isabel Marant painted jeans:

Painted jeans idea by Isabel Marant – permanent marker in your hands - and go!
4. Rework men's t-shirts and jeans:

Listen, well, in my opinion, this is just wildly cool! Something really interesting and wearable for guys. And for girls too. I think that you can decorate both a bag and the back of a jacket with belts in this way.

As a bonus to the picture, here’s a slightly rocker way to slightly increase the length of your jeans or save those that are frayed at the knees). Although with old, stretched and worn out jeans, I think it will look pathetic.
It’s better to use both ideas if HE decides to give up his career office plankton and finally become a rock musician. For the first concerts - that’s it).

5. Teddy bear made from old jeans. Just a bear):
5 ideas for shoe alterations:
1. Men's creative business shoes:

It happened, yes, it happened 5 times already. But in this case I liked the execution - on strict men's shoes. WITH business suit and a tie should break the mold of impressionable partners. You say goodbye after the meeting, they come out from the table to shake your hand - and when they see the shoes, they hang out)….
2.Shredded Converse:

Shredded Converse – the famous model of sneakers - legends of the Converse family, released last year and ideally suited for the hot summer of 2010). They look desperately vintage - shabby, as if crumbling as they go. Ideal for delicate girlish dresses, relaxed knitwear, denim mini-shorts and skinny jeans. They have become an unusual and stylish alternative to the uniform of Moscow streets - ballet flats, gladiator sandals and high-heeled webbed sandals.


Next summer is promised to be just as stuffy, so it makes sense not to throw away your old sneakers, but to repeat this “trick” on your own - at the same time you will save $80 (regular Converse costs from $40, and the Shredded model, which is in the photo - $120).
Everything is quite simple, take nail scissors and go ahead, so below I will list just a few “essential” tips from the source (links to all sources are in the entries on the site):
1. When cutting rectangles between the blocks, make sure not to cut the rectangle behind the leg, at the heel. There should remain a dense rectangular section intended by the manufacturer - it is this that will ultimately hold back the entire structure.
2. Converse sells these models with or without a tongue, depending on the color. Decide what is more convenient for you. If you decide to cut it, draw the same semicircle around your fingers (the same depth) as on your favorite ballet shoes - and cut boldly. It should be 1-1.5 cm wide - wider than the “rubber nose” of a sneaker. It will look like this:
3. It’s convenient to make a “tear” along the cuts simply with your fingers. Rub the edges thoroughly between your fingers as shown in the photo below. The lining of Converse frays more than the top colored thick fabric - so it’s better not to rub it, just the top colorful layer - it will quickly fray to the width of the top layer.
3. How to decorate men's shoes thorny, but nobly:

In this case, the shoes alone (especially if there’s a casual jacket on top) would completely captivate me.
4. Painting shoes with markers and paints:

A great idea for shoe decoration from artist Deborah Thomson. Deborah uses popular techniques with tattoo designs on shoes, and paints wedding shoes, etc. etc.
5. Shoes with painted soles:

An original move is to paint not the shoes themselves, but only their soles. It doesn’t bend as much as shoe socks, for example, which means the paint in these places won’t crack. Given that high heels- and it will look good. For example, I always notice untorn yellow price tags on shoes in these places when I follow someone along the path)).
5 dress alteration ideas
1. Designer: back from sports jersey and sexy dress:

I think it's very cool! From the front, you’re probably a standard “sexy kitten” – and when you turn your back, you show the world the other side of yourself – sporty and perky). And the difference in color only emphasizes this.
The jumper on top - in my opinion, looks like a strap from a cheap sports backpack)).
2. Dress with slits:

Beautiful texture and a way to revive an old dress by throwing a second one on top. On the top dress, if it is made of acetate silk, the design can be “burned out” with a standard wood burner. At school we used to burn out entire lace collars for each other during handicraft lessons.
3. Glowing paints:
Remember, earlier at VDNKh, for example, in the Culture pavilion, luminous paints for fabric were sold in departments with various luminous nonsense? In small round plastic tubes. In addition, they are often found in various stalls, especially for some reason near the station).
This is what you get if you paint clothes with them:

One of my friends used these tubes (of different colors) to paint a dress with a paisley pattern with such luminous colors. I simply placed dots of different colors along the contours of different cucumbers. Since during the day this paint is translucent, and the color she chose (and the dress is colorful) - during the day it was completely unnoticeable. And at night it was a bomb! It looked very even - not at all vulgar, but as elegant as possible - apparently due to the subtlety of the design.
4. Decorate a simple dress:

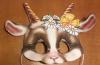
A zebra is not a zebra, a mask is not a mask... in general, this is how, with the help of appliqué, an ordinary white trapeze dress was given an almost mystical look.
5. NedoBeckham reworked a Joseph Altuzarra turtleneck dress.

A new up-and-coming designer is Jezzef Altuzarra and his idea (he clearly sympathizes with Victoria Beckham and her models) to remake the sweater dress:

You will need:
Cotton jersey turtleneck dress (they used American Apparel).
Two shoulder pads.
Scissors, needles and threads.
The recipe for “feeling a little Vicky” is simple:
We cut off the sleeves so as to leave the “wings” at a slight angle.
Using the remnants of the sleeves, we cover the overhead “hangers” on one side.
We hem them on the inside of the dress, at the same time slightly bending the edges.
5 ideas for altering jackets

1. This jacket costs $410 - and the required quantity of pins costs 500-700 rubles. And every second person has a jacket in the Chanel style;).
2. An idea for remaking a jacket from the 2011 lookbook by Junky Styling designers.


3. Jacket with transparent back:

Jacket with part of the back replaced transparent insert. In the show room, the top of the jacket consisted of two parts, one on top of the other: when altering your jacket, you can simply cut it off and sew transparent folded fabric from the inside, sewing it into the side seams:


By the way, did you notice the ribbon decor on the trousers?
4. Another Zara coat:

Zara seems to have finally remembered where they started and started making “edgy” things again. Another Zara coat in my selections is further confirmation of this.

Original reverse side collar - usually the skin is sewn there (it also allows you to keep the collar “raised” - for example, that’s the only way I walk). It can be made from a beautiful tie) - it looks like that’s what was done here.
5 shirt alteration ideas:
1. Shirt makeover idea from ASOS.com:

2. Pants - saruel from a shirt:

Alteration of shirts. If everything is clear with the top (everything was cut off at the level of the pockets and elastic) - then an explanation of the fact that how to make pants a la “saruel” from a shirt– see under the cut:

Source material).

Having outlined a semicircle, we sew the collar along it.

We steam the pockets carefully - they will prevent the shirt material from draping plastically.
In the end it should look like this (after you sew up the hole where the collar should be):

The design is adjustable at the waist with a knot).
3. Unusually “stained” shirt:

Ingenious, unusually soiled shirt)! In a bright cage - turquoise - purple - I will definitely repeat it for myself. It will be enough, I think, to dip it 6/8 in black paint on fabric like Dylon (it doesn’t need to be heated, boiled, or other perversions).
4. A neat way to reduce your shirt size:

5. Hybrid:

Hybrid GMO shirts and hoodies from Hussein Chalayan.
5 accessory ideas
1. 0_o suddenly!

Garter chain for stockings.
2. Congenial Clutch:

One of the few easy-to-sew clutch bags, which only benefits from ease of manufacture. And the pattern for such a clutch couldn’t be simpler and is sold in every second store - I just bought croissants at Azbuka Vkusa today, for example) - in a craft bag perfect size for this matter.
3. Ring bracelet:

If you have been proposed to 8 times and you have never returned the ring, you can make a bracelet out of them and wear it proudly, like a savage, a necklace made from the scalps of defeated enemies. Well, kind of like how stars are painted on airplanes for those shot down in battle).
4. Shoulder straps on the coat:

To make leather shoulder straps like this on a coat, all you need is leather from one glove. Another thing is that they need to be “supported” with something - for example, a belt made of leather of the same texture.
5. Bags and backpacks made from leather jackets:

We have written many times about bags made from old leather jackets. But personally I love it Firstly, backpacks, secondly - this is a simplified, a la masculine style in bags:

I couldn’t even choose what to show you – I liked everything so much! And the prices are quite realistic, not overpriced.
and for a snack - 5 interior ideas:
1. T-shirt rugs:

Laura is a seamstress with over 20 years of experience and great taste. That's why she managed to build successful business This is what many people are trying to make money from: recycling T-shirts from second-hand stores into carpets and rugs.
Laura's rugs always attract attention with their subtle combinations of colors and original forms. 20 photos - under the cut (and there you will also find a link to the photo - a master class on crocheting a similar rug - the main thing there is to understand how to hide the ends by tying cut T-shirts together). Laura herself, in my opinion, braids them, after which she painstakingly sews the braids together ( I would like to know what kind of machine or foot she manages to take such thickness). It takes her 3-4 months to make one carpet from T-shirts.
2. How to decorate a wall with old magazines:

Idea for super budget wall decor from Irina: these strips are simply rolled into tubes and flattened magazine pages, glued to a base.
Moreover, you can decorate not only the wall, but also vases in this way:

And photo frames:

3. Bears - pillows made from shirts:

Annika Jermyn sews bears from old shirts, calling them Mister _ below is the individual name of each _ and sells for $75. You can even order from your own shirt. The toys are large - 40 centimeters high and 48 centimeters wide.
4. Pillows with interesting textures:

Handmade sofa cushion with an ingenious texture. For such labor-intensive work, $265 is not a pity.

Although this $110 pillow with a British flag made of leather is no worse.
5. Cool dude, yo! Mr. Ben Venom sews patchwork quilts from old T-shirts with prints in the spirit of Heavy Metal - in the same style. For connoisseurs, so to speak).

In general, I invite you all to visit “Second Street” who are interested in the topic of clothing or interior alterations)).
PS. The last thing is that we have competitions there, participate with your ideas, the prizes will be good)!
To darn the place it was almost imperceptible, threads are selected by color, thickness and quality that would match the fabrics being repaired. You can pull out the threads from the border at the seams. The stitches in darning should first go along the fabric (along the warp), and then across (along the weft). Start off darning It must be in a strong place, otherwise it will quickly collapse. The stitches should be small. In a transverse pass, the needle is passed under the thread, then over it. At the edges of the darning, do not tighten the thread too much, so that when washing, the shrinkage of the threads does not tighten the fabric. The rows of threads should fit tightly one to the other. You can also darn on a sewing machine, which has a special device.
If the fabric has not been worn through, but has only become very thin, darn along the threads without making transverse stitches.
If a piece of fabric is accidentally snatched and it tears along the weft and warp at the same time, then you need to darn as two separate tears.
Patches must be made of the same material from which the item is made, or of similar quality and color. Before applying the patch, the material must be washed and ironed so that it does not shrink later. The patch is applied to the repaired area, observing the direction of the weft and warp threads. If it needs to be placed near a seam, then the seam is trimmed, and one side of the patch is brought into this seam. Then it is basted and after that, bending the edges, it is sewn with a hidden seam on the front side and on the back. The basting is pulled out. On a rectangular patch, an oblique cut is made at all four corners to a depth of 0.5 cm. If the patch is not in a visible place, it can be sewn on by machine.
For patterned fabrics, the patch is applied on top. To do this, outline the damaged area, adding 0.5 cm to each side, and cut out the appropriate patch. Folding the edges inward, sew it on. On variegated material, the pattern should match the pattern of the item being repaired.
Sheets and towels can be repaired if necessary. The sheets are often wiped in the middle. They are repaired like this: they are cut in the middle along the warp thread and both halves are attached at the edges, and the edges are hemmed.
Towels tend to wear out the ends faster. The towel is cut in the middle and sewn together with the frayed ends. The edges of the towels are hemmed.
Jackets and trousers sometimes require minor repairs: the cuffs of sleeves and trousers wear out. Sleeve cuffs are repaired as follows: tear off the lining and carefully cut off the hem of the sleeve. The ends of the sleeves and the cut strip are ironed, the strip is sewn on, then folded inward, the lining is sewn on and ironed again. On trousers, the edges are repaired in the same way. If the trouser tape is frayed, it is replaced with a new one. The trouser braid has a thickened edge, which should protrude its entire width from the edge of the trousers. If the edge of the trousers themselves is worn out along with the braid, then first rip off the folded edge of the bottom of the trousers, clean it of dirt and iron it. Worn areas are plastered and the trousers are folded 3-5 mm above the plastering line. A new braid is sewn along the edge.
If children's trousers are worn to holes in the back, then in order to apply a patch, they are ripped open at the seams. Then rectangular patches are cut out, leaving 0.5 cm on each side for the seams. On top of the patch with inside It is recommended to hem a strip of satin, this will protect the trousers from rapid wear in the future. The finished patch is pressed firmly, smoothing out its seams. To prevent the braid at the bottom of the trousers from fraying and becoming shaggy, soak it with PVA glue.
Lace curtains are usually darned. But this takes a lot of time, and darned places spoil the appearance of the curtains. It is better to soak pieces of old curtains that match the pattern in starch and glue them to the damaged area of the curtains from the inside out, then iron them with a hot iron.
Things from wool fabric can be repaired as follows: move the edges of the tear as close as possible, take a piece of the same material, spread it thickly with egg white and place it under the torn area, then iron it from the inside out with a hot iron.
The damaged area of any item can be sealed with BF-6 glue or other fabric glue. The prepared patch is moistened and ironed. The patch flap is placed under the damaged area, face up, and through the hole in the fabric, the outline of the flaw is drawn with chalk. The edges of the patch should be 1-2 cm larger than the damaged area. Separately, prepare an overlay for the patch, which should be 0.5-1 cm larger than the patch itself along the edge. Squeeze a little glue onto clean glass and let it dry for 4-6 minutes. Apply dried glue to the moistened fabric, the edges of the patch and the overlay. The gap between the edges of the damaged item and the edges of the patch is also lubricated with a thin layer of glue. The adhesive layer is also allowed to dry, after which it is lubricated a second time. The second layer is also allowed to dry, then, after applying an overlay coated with glue, everything is secured with an iron (3-4 seconds). After pre-fastening the patch, the item is turned over, a damp cloth is placed on top and held under the iron for 20 seconds. The exposure under a hot iron is repeated 2-3 times, wetting the rag.
Welt pockets show wear at edges. To repair them, rip off the staples on the pockets, rip open the bottom frame, unscrew the facing front side. Then it is peeled off and the worn edge is cut off. After ironing, the facing is sewn along the lower edges. The seam is ironed. If the width of the facing is insufficient and there is no spare material, then you have to use fabric from under the bead. To make a pocket frame during repairs, a pocket flap is often used, without which the item does not lose its appearance. The sewn facing is folded inside the pocket and, having swept the edge of the frame, it is sewn along the seam line. Once the repair is complete, the paper clips are placed along the edges of the pocket where they were previously. The burlap of the pocket, if it is worn out only in the lower part, is cut to a strong place and stitched or stitched again.
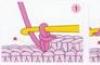
The button is sewn on not drawing strongly to the material, but leaving the thread somewhat free. The “stem” formed in this way must be wrapped several times with thread. This is done so that the loop clasps the button freely without being pulled together. Moreover, the “stalk” should be longer for denser fabrics and shorter for lighter ones. A button can be sewn to silk without a “stalk” without pulling the thread too much. When sewing buttons to outerwear, you need to place a small button or piece of fabric on the other side for strength.
Buttons are sewn in places where the fabric is not stretched too much. In order to position the sewn buttons exactly opposite each other, you should first sew on the top of the button, make a chalk mark on its head and press it to the opposite side. The second half of the button is sewn onto the printed area.
Little tricks
If leather gloves are too tight, wrap them in a damp rag for several hours, then put them on your hands and dry them like that.
Leather gloves sometimes fade on the inside and get your hands dirty. Rub talc on the underside and your hands will remain clean.
To protect white fur from yellowing, we recommend storing it in a blue bag or case in the summer.
You can reduce the wear and tear of clothing on your elbows. This especially applies to knitwear. Sew a piece of light material, preferably the same color, onto the sleeves from the inside out. Then the lining will be rubbed, not the jersey.
Don’t hang something you just took off in your closet. woolen clothes. It must first be ventilated, cleaned of dust, and only then hung in the closet.
Don't hang clothes over the back of a chair. This causes her to lose her shape. When you come from the street, immediately hang your coat or dress on hangers. It is important that they match the shape and size of the clothing. Short hangers will stretch the sleeves, long ones will make dents on them. Dresses with a large neckline slide off any hanger, so the hanger should be covered with fabric.
Wet woolen clothes should not be dried near heating. Heat causes fabric to lose its natural properties.
You might also be interested in:

Good luck to everyone! I think that you’ve already been waiting for me, I promised and I still can’t...
Knitting amigurumi toys is a very exciting activity that both adults enjoy...
Nowadays people have become interested in handicrafts. Many have forgotten what a hook is...
simply necessary in families with small children. Such masks will also come in handy on New Year's...

Christening is an important family and spiritual event. And despite the fact that in my life...

