


Useful tips
On Easter, people not only prepare various dishes, but also create various decorations.
There are many crafts that you can do. with your own hands and at the same time you won’t waste a lot of resources.
There are also crafts that kids can make or you can create with them.
Here are the most interesting and simple crafts that you can do with your children:
Craft for the garden for Easter: use corrugated paper

You will need:
Drawing or print of an Easter egg
Corrugated paper (cut into small squares) or plain colored paper

1. Print or draw an Easter egg on a piece of cardboard.
2. Draw simple patterns on the egg.
3. Crumple all the squares of corrugated paper and begin to carefully glue them on top of the drawn patterns.

DIY chicken for Easter

You will need:

Craft for Easter in kindergarten: paper egg decorated with thread

You will need:
Scissors
Thick multi-colored thread
1. Cut out an egg from cardboard.
2. Tape one end of the thread and begin wrapping the egg.

3. Once the entire cardboard egg is wrapped with string, tape the end of the string back on.
4. Make a small hole at the top of the craft and thread thread or ribbon through it so that the craft can be hung.

Children's crafts on the theme of Easter: an egg from a painted shell

You will need:
Pencil
Painted shell (from shelled eggs)
PVA glue or hot glue
Cotton swab (if necessary).
1. Draw a large Easter egg on paper.

2. Apply glue and start gluing small pieces of shell. Instead of shells, you can use small pieces of crumpled colored paper.

DIY Easter crafts for kindergarten: simple patterns

You will need:
Pencil
Scotch tape (masking tape or electrical tape)
Paint or chalk with water.
1. Draw a large chicken egg on paper.
2. Place several strips of tape over the design.


3. Start coloring the drawing in different colors. You can use paints or dip chalk in water and paint with wet chalk.
4. When you have finished coloring, wait until the drawing dries and carefully remove the tape - you will get a beautiful pattern.
Children's crafts for Easter in kindergarten: stickers

You will need:
Sheet foam (foam paper)
Scissors
Small container with water.
1. Cut out several eggs and details to decorate them from foam paper.
2. Dip the foam sheet eggs into water and stick to the window. To decorate them, dip different parts from the same foam paper into water and attach them on top of the eggs.

Easter crafts for children: decorate eggs with felt-tip pens

1. First boil the eggs.

2. Take markers of several colors and start drawing different patterns or animals.


DIY Easter crafts for school: balloon

You will need:
Plastic eggs (you can use chocolate egg packaging)
Ruler
Simple pencil
Scissors
Glue stick
Thread or twine
Small ring (can be bent from a short piece of wire)
Thin wire.
1. Cut a piece of thin wire about 30 cm long.
2. Thread the wire through the holes in the plastic egg. If there are no holes in the plastic egg, you can make them using a thin nail and a hammer or an awl. Twist the ends of the wire inside.
3. Cut 8 pieces of 80 cm from a strong thread and fold each in half.

4. Start attaching threads to the ring. Since they are folded in half, there will be a loop on one side - you need to thread the ends of the thread on one side into the loop on the other (see image). Repeat the same with the remaining threads.
5. Start tying adjacent parts of the threads into a knot.
6. Make a second row of staggered joints (see image). Continue connecting the threads until you achieve the result you want.
7. Place the resulting blank onto a plastic egg. Thread the thin wire (that you first threaded through the egg) through the ring so that the craft can be hung later.
Making a basket:

8. Draw a square on cardboard measuring approximately 5.5 x 5.5 cm and divide it into 9 small squares.
9. Cut a strip of approximately 3 x 8 cm from another cardboard. You can use tape instead of a paper strip.
10. Cut a cross out of a cardboard square and fold it to form a basket (see image).
11. Attach the basket to the threads using tape - just cover the basket with tape along with the threads.

DIY children's crafts for Easter: a garland of paper eggs

You will need:
Colored or wrapping paper
Old newspaper or pages of an old, unnecessary book (can be replaced with colored cardboard)
Strong thread (twine)
PVA glue
Scissors
A simple pencil.
1. Fold 2 sheets of paper of the same color. Draw a small egg on the top colored paper and cut it out. You can first cut out a template from cardboard and use it.
2. Repeat with a few more sheets of other colors. Make sure that the eggs on all sheets are approximately the same.
3. To make a three-dimensional egg, fold one part in half and glue it to the second part. Repeat the same with other colors.

4. From old newspaper or colored cardboard (its color should contrast with the color of the egg), cut out several “flags” of the same color.
5. Glue one egg at a time into the center of the flag.
6. Lay the string evenly on the table and glue the flags to it.
Now you can hang the decoration on the wall.
Crafts with children for Easter: eggs with confetti

You will need:
Food coloring, vinegar and water
Confetti (you can buy it or make it yourself from colored paper)
Corrugated paper
Glue pencil.
1. Carefully make several small holes in the egg to further make one hole with a diameter of about 1 cm.
2. Remove all contents of the egg and wash the inside of the egg with soap and water.

3. Paint the shell using food coloring, 1 cup water, 1 tbsp. a spoonful of vinegar. Let the shell dry.
4. Fill the egg with confetti.
5. Cut a small piece of crepe paper and glue it over the hole in the shell.
If you add some details, you can get these cute crafts:


DIY Easter crafts for children: painting paper eggs

You will need:
Paper or cardboard
Simple pencil
Scissors
Cotton buds
Small plastic containers (if needed).

1. Draw some eggs on white cardstock and cut them out.

2. Start painting the cardboard eggs. You can use plastic containers as a palette to mix several colors.

DIY Easter with children: decorate cardboard eggs with colored paper

You will need:
Pencil
Scissors
Colored and/or wrapping paper (or an old glossy magazine)

1. Tear small multi-colored pieces from colored paper or an old magazine.
2. Glue all these pieces onto the cardboard as you like.

3. Turn the cardboard over, draw one or more chicken eggs on it and cut them out.
4. Make a hole in the top of each craft and thread ribbon through it so the ornament can be hung.

Crafts for Easter in kindergarten: eggs decorated with melted wax crayons

You will need:
Hot boiled eggs
Wax crayons
Towel
Packaging for eggs.
1. Boil eggs. Place them in water and cook with the lid closed for about 3 minutes. Remove from heat and let them soak in hot water for about 10 minutes.
2. Drain the hot water and use a towel to transfer the hot eggs into the carton.

3. Be careful - the eggs are hot. Children can color them under the guidance of adults. You just need to touch the eggs with wax crayons, and the crayons will begin to melt, leaving bright marks. This way you can color Easter eggs.
The most difficult part will be the part where you need to turn the eggs over to color them on the other side.

Once the eggs have cooled, you will have beautiful Easter crafts.
DIY crafts for Easter with small children: we paint eggs and don’t get dirty

You will need:
Acrylic paint
Plastic bag with zipper
Boiled egg.
1. Pour a couple of colors of acrylic paint into a bag, place a boiled egg in it and close it.

2. Give a package with a boiled egg to your child so that he can “color” it with his hands.

3. When the egg has colored, carefully remove it and place it on cardboard or wax paper to dry.
*You can also add one or two small stickers to the egg before coloring. After painting, remove the stickers and you will have a beautiful design.

Good morning everyone! Just a little more and another Orthodox holiday will come, which will be celebrated by all residents of Russia, and not only. We are talking about Easter, namely about what crafts can be done together with children of preschool and school age for this day.
You can make such wonderful souvenirs and creations with your children right at home, because all you need is your desire and desire. Therefore, I suggest you think about this topic now and choose what you would like to do, and then give it to someone or simply decorate your home.

If you want to find a more complex thing, then perhaps you will like this version made from salt dough.

I also love compositions that have a lot of toys and are bright and eye-catching.

Master class on making eggs from foamiran
Are you familiar with this fabric material? I think yes, how cool it is, just like felt, I’m in love with it. I suggest making this craft in the form of a refrigerator magnet. You can, in principle, hang it on a string like a pendant.
We will need:
- Styrofoam egg - 1 pc.
- scissors
- cutter
- foamiran (1 mm) 2 colors - yellow and white
- magnet
- glue gun
- factory eyes

Stages of work:
1. Take a hairdryer and heat the fabric, and you need to do this quickly, and stretch it over the egg.

2. They pulled it like this, and then applied a hairdryer, held it for 11 seconds and that’s it, turned it off, waited until the fabric cooled down.

3. These are the blanks you will get.

4. Now, using a cutter or utility knife, cut the stencil in half.

5. First put the egg into the yellow foamiran.

6. And then cut off the excess fabric into white.

7. Then cut the white one in half, you can imitate cracks as if by cutting it in a zigzag, there are also special wavy scissors.

8. Then prepare the eyes, make the legs and beak themselves.

9. Well, now the most important thing is the assembly. Carefully glue the yellow template first.

10. Then move on to the white.

11. After starting to design the legs, eyes and mouth, glue the parts with a glue gun.

12. What a wonderful baby he turned out to be, pee-pee-pee.

13. Glue a magnet on the other side, you can take a vinyl one.

14. You get two young weirdos, you can make a boy and a girl, and pin on more bows or other patterns to your taste.

As an option, you can do something else, for example, such a charm in the form of a flower with a handle.

Original crafts for Easter for a school competition
Any student approaches this issue quite responsibly and he really wants his work to become the best. You can come up with a whole lot of options. But, of course, it will be better if you make Easter symbols. For example, these funny chickens, which are made from ordinary woolen knitting threads.
You can use this step-by-step instructions as a basis.

You can use another option. In any case, the result should please you. Here they even made a mother chicken, and also wove a stand in the form of a plate from the same threads.

You can also make Easter eggs from threads, are you surprised? But I don’t, after watching this video you will learn how to make things.
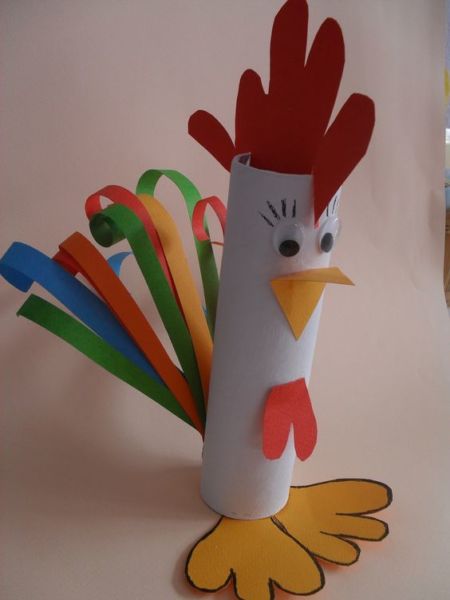
For elementary school children, you can make a mischievous cockerel, which is made from a paper cylinder.
Or I was still hooked by such a brilliant idea, to make chicks out of what they say was. And I had cases for Kinder Surprise. This is such a funny little family that turned out to be yellow))).


You can also make something like this in the form of chicks from cardboard and thread.

And if you want to make a splash on everyone, then make a product from plaster. I think that the commission and jury will definitely appreciate such a cool souvenir and reward it with a gift.
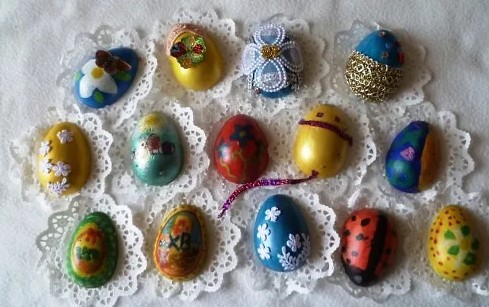
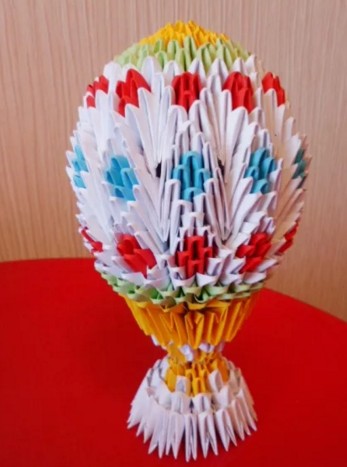
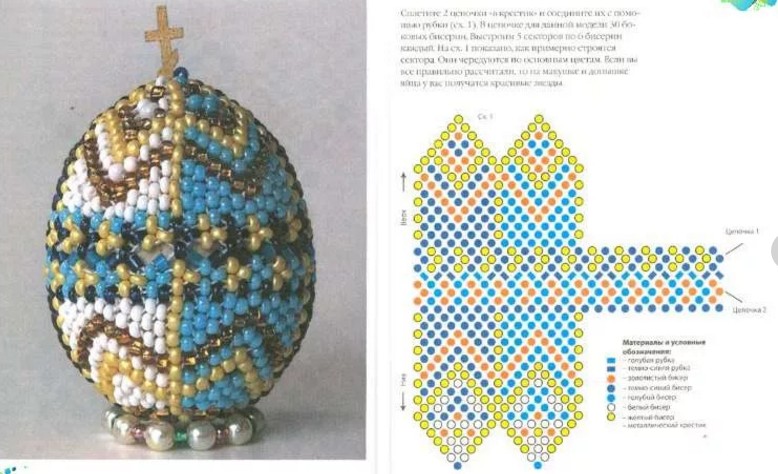
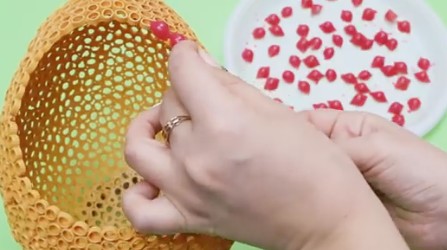
There are also ideas for souvenirs and gifts made of beads, but I will say this too, a lot of work and skill, I remember as a child I was fond of this type of activity, now I don’t have enough hands to sit down. But just for you, I found an easy way of weaving, or rather, it will be specifically for beginners, you just have to put beads or beads on a thread, and then glue the eggs onto the surface.
Of course, this will make your actions much easier. After all, you can also weave, but to do this you need to understand the diagrams and all the symbols. And here, any beginner can handle it, so catch it.

The main thing is to take a very good glue, for example PVA, and one more thought, you can not put it on the thread, but simply glue each bead separately, but this is more difficult.

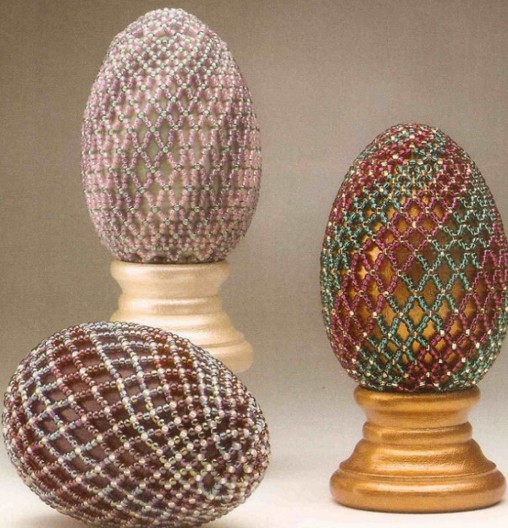
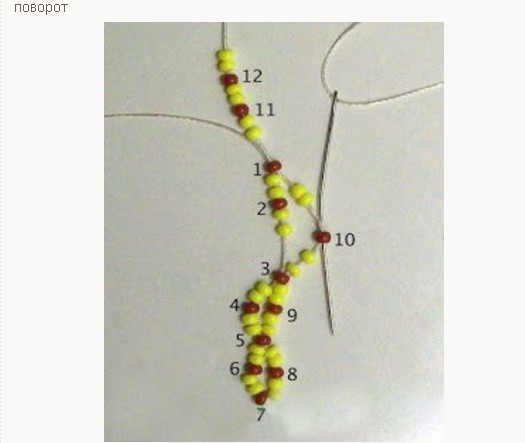
As for the patterns themselves, if you are a master and know how to weave, then I suggest making a grid like this.

It turns out just great, class!
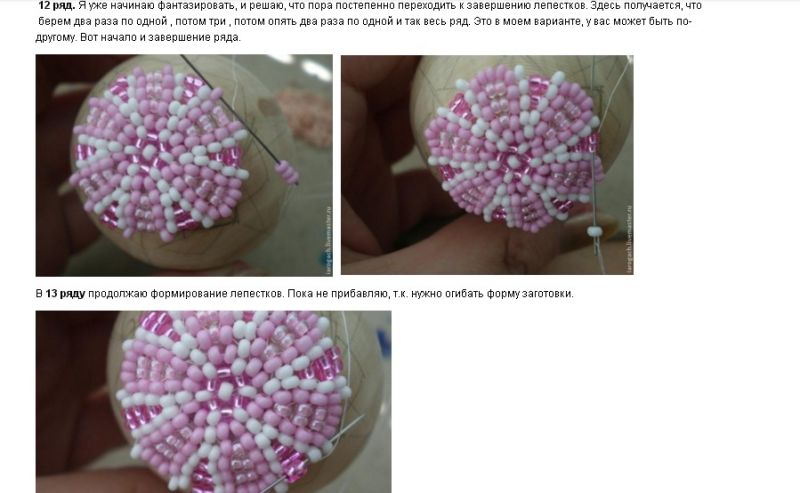
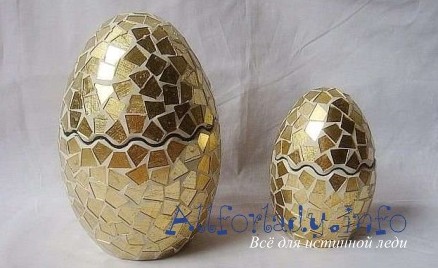
Or do you like the mosaic technique? I have a diagram from her).
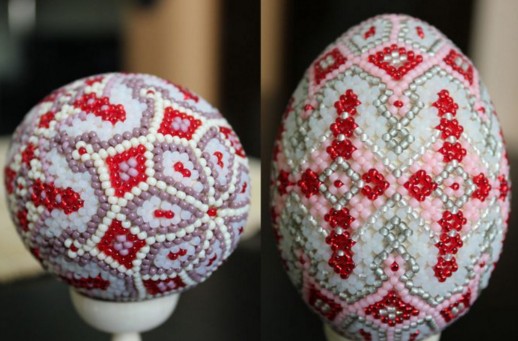
How do you like this work? Wow, it’s breathtaking.

But if you still have any questions, then it’s better to take this model and do the work together with this author of this master class.
Of course, if you are interested in needlework or knitting, then you can also make a souvenir, for example this one. If you need a diagram, I will be happy to send it to you, it was taken from one magazine. What cute and cheerful little beadies they turned out to be, or little Easter cakes for needles.

But, by the way, you can also make knitted lilies of the valley, because it already smells like spring!

If you are good at drawing, then make a picture out of paints.

Or with the help of glue and cardboard, as well as all kinds of cereals, such an Easter masterpiece.

And here’s another thought for you: if you have multi-colored pasta lying around the house, then you can also make this kind of work out of them. What a delight, isn't it?!

How to make Easter paper gifts quickly and easily
In my opinion, these are the types of works that are most popular, because these are the materials everyone has in their home. The first thing that comes to my mind is egg cups. Well, they drew it, cut it out, then gave it to the kids to color and another children’s miracle masterpiece is ready.


Make these oddballs yourself, cut out the details and paint them, if you need templates, please ask, I will send them by email for free. Not really funny little animals.


Well, as always, you can’t do without my favorite vytynanki. This is just a custom or tradition. See what Easter bunnies can come out, plus decorate them with satin ribbons, if you need a template, write at the bottom of the article, I’ll send it for free.

In general, it will be cool and cute.


You can also take any sheet, fold it and glue it into a cone and the result will be something that resembles a bird.

With our youngest kindergarten representatives, I suggest making a paper craft using a base in the form of circles.

And those who are older will like the hatched chick.

The work is also good in the form of an applique; you can do one in a labor lesson with elementary school students.


You can, of course, combine two types of activities: Art and Technology.

By the way, you can just take regular colored pencils and do this, I also have a template for this stand in my piggy bank, so if anyone needs it, write me.


You can make a product in a very original way without using glue, but instead take a stapler and fasten the parts together, see what happens.

What do you think of this idea for a stand? It looks really cool, and can you imagine how much pleasure your kids will have making it?

I can also suggest printing out such a blank template.


Or this black and white version on your printer.

A great option would be a souvenir on a stick.


Or this green meadow with birds.

I also liked such a simple idea as a refrigerator magnet that can be decorated with rhinestones or scrapbooking materials.

Well, in conclusion, I would like to show the stages of work of a three-dimensional craft.

Step-by-step instructions for creating crafts from cotton pads and sticks for Easter for children
We'll probably start creating right away a small and very charming little yellow naughty boy called Tsypa. We will need a bunch of cotton swabs, or rather their tips. You will need to paint some yellow by dipping it in gouache, and leave some white. Make this craft, that is, make the base from plasticine, and then simply stick the sticks into it.
Important! You can draw the eyes yourself or find a picture and print them out.

For the next job you will need your good mood and, of course, materials.
We will need:
- cotton pad
- disposable spoon
- colored paper
- felt-tip pen
Stages of work:
1. First of all, make the blanks, that is, cut out the beak and scallop from colored paper. In this photo everything is visible and shown.

2. Next, draw the wings and then glue them onto a cotton pad. Place a spoon in the center and cover with a second cotton pad. Draw a face and voila, such a beauty can sit in your pot with your favorite flowers and crow).
What other interesting things can you do? I had ice cream sticks lying around, so I connected them together and glued on the eyes and beak, it turned out to be a wonderful animal. By the way, don’t forget about the paws either.

The easiest option would probably be this product, which can also be made with a child of any age; you need to paint the discs with gouache or watercolors, and then build such beauty.

You can design this in the form of an applique, and using cereals, it also looks great, and it resembles the painting A bird pecking at grains.

In general, choose according to your taste and color, and do not forget to write your reviews and wishes.


Look what a baby chicken it turned out to be, though it’s white.

You can also make a picture, together with willows and also from cotton pads. Doesn't it really look cool? Yes, it’s unusual and beautiful!

Beautiful crafts for Holy Sunday for kindergarten
Of course, preschoolers need ideas for what is easier. so that the kids themselves can cope with the task and can amaze everyone.
What could be easier and faster if you teach them this funny toy, also called a walker. Once, by the way, we did it with you, remember? When it came to puppet theater, I gave you ready-made templates.


Ha, and when I saw this face, I actually blossomed, I never cease to be amazed that so many crafts have been invented from the ordinary little hands of our kids, it’s simply too many to count.

You can, together with the children in the preparatory or senior group, engage in visual arts and make just such a chicken (cockerel) that will have multi-colored wings.

And for children of the second junior and middle group, here is such a simple masterpiece. In just one thing, you can repeat what kind of bird this is, and where its eyes and other parts of the body are.

Or this funny design made from a baby’s leg and paints.

You can also make applique on regular paper plates.

Here's another unusual pencil holder.

You can even make it using the origami technique, although you only have to fold the sheet once. Just right for young talents.
And finally, this type of work such as felting or dipping anything, for example, a dish sponge or soft balls. Moreover, this can be done with an ordinary clothespin. It looks bright and stylish, simply beautiful and original.
I also liked the idea of a fun family activity that you can do with your kids as a group.

By the way, you can combine paper products with threads, or use cereals instead of threads.

I was also captivated by this work, so simple and at the same time original.

And I propose to make this beauty a common or joint activity at school or kindergarten.

Easter crafts made from felt
In general, felt toys have become in demand not only among children, but also among adults, because sewing such a gift is always easier than taking any other material; felt in this regard is an unpretentious material that is easy to work with because it does not crumble. And even beginners can make patterns.
I had a separate one on this topic, from it, if you are interested in this type of activity, you will find a lot of useful information, I am sure it will be useful to you.
In this post I will show you finished products. How do you like this family?

But, I still want to show you one master class that may be useful to you someday.
We will need:
- scissors
- needle and thread
- buttons and rhinestones
- cotton wool or padding polyester
- lace
- vinyl magnet

Stages of work:
1. Draw a sample egg, or you can print it out on a printer.

2. Then attach the stencil to the felt and outline with a pencil. Cut out the resulting parts with scissors; you need to make two eggs.

3. Then take and cut the template into three parts, as shown in this picture.

4. Place the center on the green felt and trace it, then cut it out.

5. Sew this green decoration onto the egg.

6. Sew and decorate, one might say decorate with lace or some other decor. It looks amazing right away.

7. Then draw the letters with a pencil and embroider the inscription, you can probably guess what it is, of course ХВ.

8. Then sew on buttons, sequins, or you can take beads for scrapbooking, basically whatever you have.

9. Go through the edges with a seam, but you can also put padding polyester or cotton wool inside, and then proceed to the next step.

10. Take Moment glue and glue a vinyl magnet, this will be a gift for you or your friends on the refrigerator.

Of course you can do it on sticks.

And also in the form of a pendant or keychain.

In general, such beauty will not leave anyone indifferent, that’s for sure.

Master class using improvised materials Easter tree at home
I want to tell you right away that you can make such a craft quite quickly if you use these step-by-step instructions.

In fact, the work will be quite creative and your children will also not be able to resist this task.
Just don’t forget to wash the eggs well with water and soda. For 1 liter of water, take 2 tablespoons of baking soda.

Use a toothpick for piercing and acrylic paints for coloring.


Prepare everything you need for work:

Then place the napkin in front of you and twist it into a rope in this way. Secure the middle with threads.

And then turn the product over to the opposite side.

And voila, crumple it in half.

A couple more touches and hand movements:

And you will see an animal that resembles a bunny.

Give him eyes and a tail.


And needlewomen can still sew carrots quite well.

Video on how to make an egg from pasta for a competition
I’ll tell you honestly, I was shocked when I saw this awesome video, can you imagine it’s really true, such a miracle, it’s just amazing and out of ordinary noodles. Cool! Share this information on social networks, just click on the button at the bottom of this article.
Well, in conclusion, I was about to say goodbye to you and came across such a masterpiece, which is made of papier-mâché, I was very interested in this design, I’m showing it to you.

Still, sometimes you are surprised how something like this comes out of almost nothing.

DIY egg stand made of paper and sisal
You will get a very wonderful and cute little thing if you use this MK, which is presented in pictures with a description and sequence of actions.


That's all for me, I'm ending this post. See you in the next articles. Write reviews, comment, come visit more often, a lot more interesting and completely new things await you that you have no idea about. Bye everyone!
Sincerely, Ekaterina Mantsurova
Christians all over the world are looking forward with special excitement to the brightest holiday - Easter. This holiday is celebrated by Catholics and Christians. For Easter, as for any holiday, it is worth preparing in advance. The store offers a wide variety of souvenirs. But you don't have to spend your money on purchasing them. Try to make them yourself. In this article we will talk about what Easter crafts you can make with your own hands using available materials. Here you can see the brightest ideas.
What crafts to make with your own hands for Easter Sunday
If you decide to engage in creativity, then remember that this activity can bring you positive emotions. In addition, you can make all Easter crafts from available materials. This means that you don’t have to spend a lot of money on materials for making crafts.
DIY Easter eggs.
The Easter egg is the most important symbol of Easter. Therefore, for Easter you can make a large number of different souvenir eggs with your own hands.
Easter egg made of beads.
The most common version of the Easter egg is an egg that has been braided with beads. The blank here can be an ordinary plastic egg, which can be found in Kindr Surprise. Of course, you may also need beads. Then you must decide on the design and choose the appropriate colors for it.
If you have beading skills, then you can easily cope with this task. Now we will offer you several such options. Now it’s worth talking about how to do this work. So, for this work you must prepare:
- small size beads of various colors,
- plastic base,
- glue and a thin needle,
- bright ribbons and threads.
Work progress:
- In your work you may need a long thread. You should string beads on it. To make the eggs striped, you need to change color every 10 or 15 cm.
- Now glue is applied to the egg from one edge. Glue must be used in small quantities. Form a ring from the beaded thread and press it to the top with glue.
- The next bead thread must be wound only when the previous one has dried. When working, the beads should be tightly adjacent to each other.
- After that, the pasted egg along with the beads should dry. After that, strings are attached to the craft, from which you can hang the egg.


Easter egg made of felt.
If you take bright felt, you can make an interesting Easter egg. Remember that your loved ones will appreciate such a craft. This unusual Easter egg can be a great souvenir. By the way, children can take part in making such a souvenir. However, remember that they must be careful while working with the needle.
We offer several options for these Easter eggs. As you can see, they can be very diverse.

 It is worth saying that you can put such eggs in an original basket, which is also very easy to create from felt.

Airy Easter egg.
An Easter egg doesn't have to be edible this holiday. Try making colorful eggs from beautiful thread. To make such a craft you need to prepare:
- balloon,
- PVA glue and multi-colored threads,
- various decorations and ribbons.
Making these eggs is very easy. You inflate the balloon to the desired size. After that, we impregnate the threads with glue and wrap them around the resulting balls. You should get openwork weaves. The craft should dry, and then pierce the ball with a needle.

Pasta egg.
If you use the method described above and pasta, you will also get an unusual egg. To make such an egg, first inflate a balloon and paste it with small pasta. After which, this structure is painted with silver or golden paint.

An egg that is decorated with cereal.
You can use cereal to decorate a natural egg or wooden blank. As a result, you may get an original gift souvenir.
In your work you must use, of course, cereals and PVA glue. For accuracy, use a cotton swab.
If you use grains of different textures and sizes, you can get a bizarre pattern.

Fun kids crafts for Easter.
Of course, your child will also want to take part in creating some crafts. Now we will offer just the simplest craft ideas for this occasion.
So, funny cockerels and hens can be made from egg trays.

And these little animals can be created if you use disposable tableware to create crafts. They are made very simply. 
Wreaths for the holiday - Easter.
Another traditional symbol of Easter is the Easter wreath. These products decorate the house. It is believed that these wreaths scare away evil spirits from the home. A variety of decorations are used as decoration for such wreaths, which can be:
- bird figurines,
- spring flowers,
- mini painted eggs.
To make an Easter wreath, use vine branches. It is worth saying that they are very well suited for the manufacture of such products. Decorate this wreath as you wish.


Easter craft from plastic plates.
In this article you will find interesting Easter crafts that are easy to make with your own hands. Here we offer you photos of the crafts themselves and their descriptions.
If you want to surprise your guests on Easter, then you will definitely like the following idea. Making a basket in the shape of a goose is not difficult.
- Score the disposable plate. Make holes for the fasteners.
- Now fasten the basket.
- Attach the tail and head of the goose to the resulting basket.
- For decoration, use straw and decorative eggs.
DIY Easter cake.
Creating an Easter mood in your home is very simple. Women bake Easter cakes for the holiday, and children make them from available materials. To create the Easter cake, prepare:
- walnut shells,
- plasticine,
- disposable plate and napkin,
- cardboard.
Work progress:
- Make the cake itself from brown cardboard and white paper.
- We make fancy patterns from plasticine that we use to decorate walnuts.
- The finished nuts and the cake itself must be placed on a plate.

Duck egg cockerel.
If you have a duck egg at home, you can cover it with colored paper and foil.
Then you need to make individual parts of the bird from fluffy wire.

Rabbit made from a terry towel.
Everyone knows that in Catholic countries the favorite Easter symbol is the rabbit. It is worth saying that you can make this character in a few minutes. You will need a terry towel or a square napkin for your work. You may also need:
- beads for eyes,
- cotton wool and padding polyester, which will be used for the nose and tail,
- thread with a needle and ribbon.
Work progress:
- First of all, you should fold a towel or napkin in half to form a triangle.
- Next, starting from the top of the triangle, you need to twist the towel to form a thin tube.
- We fold the resulting figure in half. Without unclenching your hands, bend its free ends towards the fold. As a result, you will get a rabbit with ears. And his body will look like the letter O.
- Now you should tie a piece of the towel with tape.
- Then sew the eyes and tail to the craft.
- That's it, the wonderful craft is ready. Remember that every child will be very happy with such a gift.

Let's sum it up
In this publication, we tried to offer you those crafts that are very easy to make for Easter, using handy materials that you will probably find in your home. In general, fantasize and actively prepare for Easter Sunday.
Well, here I am with you again, hello! Recently, you and I learned how to make and decorated them ourselves right at home. What are they for? Well, of course, for the smallest symbol of a magnificent holiday. Have you guessed it? It's Easter!
And of course, we will talk about how to make a fragile and at the same time beautiful original egg and put it in a souvenir package to give it to someone dear to your heart.
How do you like this idea? I think that you will be happy if you put together a cool souvenir from what you have on hand, because it’s so nice to give gifts and presents to your relatives and friends. Let's not waste time, let's start creating great toys.
What do you think can be used to make an egg for Easter crafts? Write your assumptions and ideas at the bottom of the article, share new ideas with me and other subscribers, if it’s not difficult for you.
Don’t forget that you can not only build an egg yourself, but also take an ordinary chicken egg and cool it
DIY Easter eggs for kindergarten and school
Well, let's start with the simplest and most uncomplicated products, because preschoolers and school-age children, especially if this is an elementary school, do not need too difficult work. They simply cannot cope with them and will be disappointed.
As a basis, you can take this beautiful masterpiece, which is made of cardboard and colored paper.
As always, plasticine will fit perfectly here, which can be decorated using quilling patterns. We'll talk about this technique in more detail below.

You can also sew an egg from fabric yourself.
Also, for variety, first cut out a shape from cardboard, and then, using smoothing it over the surface, lay it out and decorate it with any patterns.

Ball plasticine is now available for sale, you may have already heard about this one. So I propose to make such a craft out of it, using an ordinary eggshell as a basis. In this matter, you need the help of adults, so that the white and yolk come out, pierce the egg with a stick.

You can hide a note even with a message. Well, that's it, between the lines.

Well, now I actually decorated the egg with such a miracle.


In fact, you can simply decorate an egg beautifully using all sorts of decorative things, such as stickers, for example. Everyone without exception likes this kind of work.

You can use thermal stickers, but this should only be done at home and only with adults, so as not to get burned.

Secondary school students can build something more complex, for example, such a composition for an exhibition.


For this, use cardboard, scrap paper and all kinds of decors, such as openwork ribbons.


Or even in this scrapbooking technique.

Or this one made from threads and coffee beans:
And if there is something simpler and at the same time unusual, then you should like this idea. Take colored plain napkins and cut them into small rectangles, and then you have to crumple each shape in your hands.

Cut out a chicken from paper and tie a ribbon or thread around its neck and tie a bow.

Now all that remains is to connect all the parts, glue them with glue.


It will turn out fun and beautiful!

You can create a whole composition.


You can use a large kinder egg and simply cover it with paper napkins, or rather pieces, as if it were decoupage. You will need good glue - PVA.

Children will be happy to make such a souvenir.

It turned out great!

Do you need a glamorous idea for this craft? Then I am happy to offer you this option. I think you see something similar in stores, the other day I came across such a beauty in a fixed price.

How to make an egg from threads and a ball for Easter 2019?
It's very simple and easy. I think everyone has seen such a toy at least once, and maybe even made it themselves. If you want to learn this art, then read this master class.
We will need:
- foam egg
- threads
- tassel
- cling film
- liquid glass

Stages of work:
1. Prepare all materials for work, and then take the workpiece and wrap it in plastic wrap.
Important! If this is not done, the threads will stick to the foam form.
Stick the needles in this way.

2. Then start creating patterns by interweaving the threads in a random pattern. Notice that another row of needles has appeared.

3. After you have finished the work, first lubricate the threads with glue, and then go over it with liquid glass.

4. Let it dry well, and then remove the first piece - half.

5. Now build the second part in the same way; you can arrange the needles differently, depending on what you want the result to be.

Then you have to glue the two halves together or you can use adhesive tape.

Models can be completely different.

In this scheme, instead of a foam ball, an air balloon is used. Then it is simply pierced with a needle. Here you don’t need to use liquid glass; use glue.

Remember, last time we did this))).

If you inflate a small balloon, you can get something like this.

Egg using modular origami technique (step by step instructions)
Modular origami is a type of technique in which the craft is assembled from special triangles. The main thing is that no glue is used here at all.
The module is made like this.

And then you start combining them one by one, alternating colors and making imaginary patterns.

And in order for you to learn the whole technology more clearly, I suggest watching this video from the YouTube channel.
It can be a white egg, with multi-colored circles around its entire diameter.
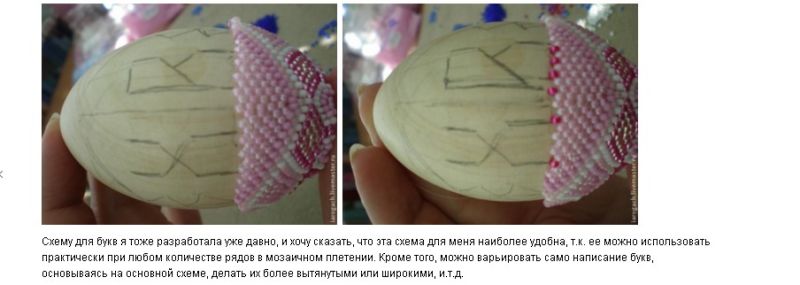
You can write letters symbolizing the holiday.

It can even be done on a stand, using the same triangular modules.

In general, you can do a lot of things, the main thing is that it will be beautiful and cool.

It will lift your spirits, and such a paper egg will definitely never go missing and will delight you on your shelf for years to come.

Beaded Easter egg with weaving pattern for beginners
It’s very cool to make such cool things and then give them away. It won’t be too difficult for beginners to master this technique, but they will need a lot of patience and perseverance. And you can easily compose a plot or composition yourself, the main thing is to think a little and everything will work out.
Take any workpiece, the main thing is that it is dense and not heavy in weight, so that it is convenient to work with. For example, you can take an oval-shaped wooden blank.

Stages of work:
Make a flower according to the pattern.


These are such cuties, bravo to the master!

The easiest option is to make it from wire; make an oval out of it and thread diagonal strips. Then use the beads.

Come up with patterns and weave. This is a children's version).

You can also make it from beads and rhinestones-sequins and a base - paralon or polystyrene foam.

Do this so that there are no empty holes.


Decorate the tray or cup as well.

Also use this step-by-step instruction if you want to master this science.


And now knowing some basics, you can use these schemes. Such a blue decor, very cute and gentle.

You can even use large beads.

Or make an egg with charms.


You can also choose an ornament scheme.

Or just do the work in a zigzag style.


In any case, you should be satisfied and so should those around you.


After all, then you can start inventing masterpieces yourself.

It's purely a matter of your imagination.

And only to your imagination.

Or set a goal and do what you like most yourself, but for this you need to find the right weaving pattern. I liked this egg chick. And I finally found knitting patterns from her.

If you also need it, write, I will send it to your email for free.
Knitted souvenir Crochet egg with pattern and pictures
If you are a fan of crocheting and knitting, then you will be able to do these product options.

Still, this one looks wonderful and divine.

Can be used as a cover or worn on an Easter egg.


You can make it in the form of a souvenir, like a ball on a string and hang it on a decorated tree.


I personally liked this weirdo that just hatched. I found his master class on the Internet for you.


Making a craft from satin ribbons in kanzashi style for a school competition
The first thing I want to show you is to watch this video.
I suggest to all those who want to learn how to work with fabric in an interesting way to master this technology - kanzashi. Also take as a basis any product with a three-dimensional shape that resembles an egg. And cut rectangular pieces from satin fabric.

2. Make a triangle out of a rectangle and stick it into the foam product with small special nails.


4. In principle, you can lay the fabric in any way, the main thing is that it looks aesthetically beautiful.

5. Take multi-colored materials, maybe with decorations and sparkles.

6. In the end, you will still reach the result you need, the style is called this artichoke.

7. What a beauty!

If you don’t understand something, take a look at this step-by-step description, maybe it will be more convenient and easier for you to understand.


You can go another way, arrange the triangles not like this, but like this, but for this the ends of the ribbon will need to be soldered a little, connected, do this with a wax candle, or rather a light.


Choose the option you like and get creative!

Create new images and motifs.

It's so fun and funny.

Even in mosaic style it looks cool too!


You can also design it in the form of a postcard; in the previous issue we did one.

Eggs using quilling technique
For this work, purchase everything you need, first of all, this is special paper in the form of strips.

Then roll the strip into a spiral onto the stick.

Glue the end with glue.

There can be any number of such patterns, here is an approximate table.

From all this you can put together a whole composition, these include flowers and all sorts of things.

And then glue it onto any egg, for example a foam one or one made from papier mache.

You can also, when you gain experience, make products without a base.

In fact, this is not difficult to do either. Make the frame out of paper, and then get to work and hit the road.

Lubricate the parts well with glue.

After all the actions you will see a creative masterpiece.

Beautiful egg made from pasta and balloon
There are now many such masterpieces on the Internet, so you can also check out one of them right now.
We will need:
- balloon - 1 pc.
- PVA glue
- spray paint
- nail polish
Stages of work:
1. Take a balloon and inflate it to the size you need.

2. Dip round rigoton pasta in PVA.

3. Draw an oval on the ball, this will be the future hole. And start laying it out carefully with tweezers, like a frame.


5. Let the product dry completely, and then deflate the balloon by piercing it with a needle.

6. Now you can start painting, spray.

7. You can paint shells with varnish - these are also noodles.

8. And then, how to make a headband by gluing it here.
9. In general, decorate as you please.


11. Well, that's all, it looks cool! Good luck!

All work, in principle, comes down to the same actions, only the images and backgrounds may be different.

Use different horns and you will definitely succeed, take several types, twisted and round, etc.


It is possible to make a special stand for such beauty, if there is a desire.

You can even lay out a brownie))).

How to draw an Easter egg + stencils for cutting and coloring
You can not only draw it yourself, but find a template and color it, plus make a chicken, cut the egg in half and another trick, it will open.

You need to color with any colored pencils or felt-tip pens. You can also use elements of gouache and watercolor.

It turned out wonderful for the students.

Now choose, take any model you like. It can be painted and decorated with anything. There are of course options for children of different ages.


R.S Well, in conclusion, it turns out they are also made from mosaics and glass.
By the way, if you like felting wool, you can take this masterpiece as a basis.

This is how the note turned out, small, but with interesting and new ideas, may everything work out for you! Good luck and patience! Thanks everyone and bye! Like and subscribe to the group in contact.
Crafts for Easter
Section dedicated to the bright spring holiday of Easter. Here are photos and step-by-step descriptions of how to make crafts for Easter with your own hands.
Master classes on painting and decorating eggs, stands and baskets, various Easter crafts for gifts to family and friends, postcards, interior decorative elements.
Everything is described in detail and step by step; it can be useful for work in kindergarten, labor lessons at school or clubs, and, of course, at home. These crafts can be made with your own hands for an exhibition, a competition, or to decorate your home.
Easter crafts from different materials - decorated eggs, decorative elements, baskets, bunnies, bunnies, sheep and much more.
Send your photos and master classes on the theme “Easter 2018” - the most beautiful and interesting postcards, crafts, gifts, wall newspapers, scenarios for festive events.
The best works will be published, and participants will receive competition diplomas.
Work requirements and submission form are here:
The hare or rabbit is a traditional symbol of Catholic Easter, which is gaining popularity in our country. In these master classes we will show you how to sew a hare with your own hands, and below you will see other options...
22. 03. 2018 03.02.2019Master class: Easter souvenir using encaustic technique (drawing with molten wax) Author: Darina Romanova, 11 years old. Head: Timofeeva Anna Fedorovna, teacher of additional education, Center...
You might also be interested in:

string(10) "error stat" string(10) "error stat" string(10) "error stat" string(10)...

The crescent moon looked to the tailor, Not to the heavenly, but to the earthly. Sew me, master, something elegant...

The lunar calendar is an excellent guide for most beauty procedures, including haircuts,...

Multiple sclerosis (MS) is most often diagnosed in women of childbearing age (between 20...

Hello. I’m 23 years old. I met a young man at a temporary job. First...

