


Purpose of the work: mastering the methods and techniques for reproducing patterns of parts sewing products and drawing up standard grading schemes for patterns.
1. Preparation of drawings of patterns of the main parts of the product.
2. Determination of the displacement values of gradation points.
3. Execution technical reproduction Patterns of the main parts according to size.
4. Drawing up standard patterns for grading patterns.
5. Analysis of work results; formulation of conclusions.
Questions to prepare for work
1. What is called gradation of patterns?
2. What methods of grading patterns do you know? Name their advantages and disadvantages.
3. What is the essence of the proportional-calculation gradation method?
4. What is the location of the original propagation axes on the main parts of the shoulder clothing?
Guides and tools: patterns of the main parts of a standard design product, paper (millimetre, tracing paper), drawing accessories.
Literature: .
Guidelines
The work is performed using the proportional-calculation gradation method.
The proportional-calculation method of grading patterns in the clothing industry has become most widespread and is used mainly for grading clothing parts of basic bases and standard designs.
With this method, the values of vertical and horizontal increments when moving nodal points are determined in proportion to the distance of the corresponding structural point relative to the gradation lines, using the values of the established initial increments along the main structural lines. The farther the constructive point is from the gradation line, the larger the increment it will move.
The magnitudes of vertical and horizontal increments are determined based on the data on the variability of dimensional characteristics and the calculation formulas of the corresponding design methodology.
An analysis of the displacement values of design points of product parts patterns for men and women of all complete groups showed that it is possible to use the same increment values:
for men, small size subgroups based on chest girth (92–108) of all fat groups;
men subgroup large sizes by chest girth (112–128) of all fat groups;
women of the small size subgroup by chest girth (88–104) of all fat groups;
women of the large size subgroup by bust girth (108–120) of all fat groups;
women of a subgroup of very large sizes according to chest girth (124–136) of all fat groups.
For children great value has age-related variability, so it is necessary to gradate by size and height for each age group separately. In total, 6 age groups are allocated for girls and boys: nursery (up to 3 years), preschool (3–6 years), junior school (7–11 years), senior school (12–15 years), teenager (15– 18 years old) with OG III = 84–92 cm and teenage (15–18 years old) with OG III = 96–108 cm.
With the proportional-calculation method of gradation, it is necessary to outline the contours of the original pattern, designate design points and select the original gradation lines - the X and Y axes, perpendicular to each other. As a rule, each part has its own gradation axes.
Main gradation points are identical to the design points of the base base, therefore their designation corresponds to the designation of the design points of the base base in the corresponding design method
Typical position of gradation axes corresponds to the construction lines defining the base grid of the design drawing.
In shoulder products with set-in sleeves:
on the back the vertical line coincides with the middle of the back or a line tangent to midline back, horizontal - with the waist line or chest line;
on the shelf the vertical line runs tangent to the armhole line or coincides with the midline of the front, the horizontal line coincides with the waist line or chest line;
on the sleeve the vertical line connects the ends of the line of the front roll or passes through the highest point of the sleeve cap, the horizontal line coincides with the line of the width of the sleeve under the armhole.
In shoulder products with one-piece sleeves:
on the back the vertical line passes through the top of the side cut of the back, the horizontal line passes through the chest line;
on the shelf the vertical line passes through the top of the side cut of the front, the horizontal line passes through the chest line.
In the collar only the length changes, so grading occurs only along the horizontal axis, which is located perpendicular to the center line of the collar and runs tangentially to the line where the collar is sewn into the neckline; the vertical axis of reproduction passes through the notch, which corresponds to the position of the shoulder seam or through the end of the collar.
In belt products:
for straight skirt vertical lines coincide with the middle line of the rear panel and the middle line of the front panel, horizontal - with the line of the hips;
for trousers the vertical lines coincide with the “arrow” line on the rear and front halves, the horizontal line coincides with the seat depth line.
The movement of points lying on the axes is carried out only in one direction along the corresponding axis - horizontally or vertically. All other design points of the contour are moved diagonally of a rectangle, the sides of which are transverse and longitudinal increments to a given part size.
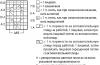
Generally sequence of work when performing gradation of patterns using a proportional-calculation method can be represented by the following diagram :
Outline the contours of the original pattern;
Mark gradation points;
Select the original gradation lines;
Determine the amount of movement of gradation points along the selected axes;
Set aside the displacement values of the gradation points along the selected axes;
Find the final value of the movement of structural points and designate it;
Outline the contours of the new pattern;
Check that the patterns are constructed correctly.
Preparation of drawings of patterns of the main parts of the product.
1. Patterns of the main parts of a typical or basic design of a product are transferred to a sheet of graph paper, placing them at a certain distance from each other, taking into account the increase in the size of the patterns as they are multiplied. The back and front patterns are positioned so that the chest line is aligned with the horizontal, and the sleeve patterns are positioned so that the sleeve width line under the armhole is aligned with the horizontal.
2. On the resulting contours of the patterns, the gradation points are indicated by the letters of the original basic design.
3. For each part, select the original gradation axes and plot them on the drawing.
Determination of the magnitude of displacements of gradation points.
1. The values of the interdimensional difference in measurements of typical figures involved in the calculations of the selected product design are drawn up in tabular form (Table 8.1).
Table 8.1
The magnitude of the interdimensional difference in measurements of typical figures
2. In accordance with the selected initial gradation axes of each part, the displacements of the gradation points are calculated using the EMKO TsOTSHL formulas. It must be remembered that points lying on the gradation axes move only along these axes. Calculations are presented in tabular form (Table 8.2).
Table 8.2
Calculation of the displacement values of points when grading patterns
|
Point designation |
Calculation of movement along the X axis |
Calculation of displacement along the Y axis |
Performing technical reproduction of patterns of main parts by size
Graduation is performed in two adjacent sizes (one size larger and one size smaller than the original).
1. The resulting values of movement of each nodal point of the patterns are sequentially laid off first in the direction of the X axis, then in the direction of the Y axis in the direction of increasing size, thus obtaining the corresponding point of the new pattern one size larger than the original one. By connecting the original gradation point with the corresponding new point with an auxiliary straight line, the direction of movement of each gradation point of the original pattern is obtained.
2. In the opposite direction, set aside the final values for moving the gradation points to obtain patterns of a smaller size.
3. Using the obtained points, outline the contours of new patterns for parts of products of adjacent sizes.
4. Check the correct construction of patterns for clothing parts of adjacent sizes using control measurements. If the obtained measurements of new parts differ from the calculated values by more than 0.2 cm, then the contours of the new patterns should be adjusted.
Drawing up standard patterns gradation schemes
Draw up gradation schemes for patterns corresponding to the standard design of the product on an A4 sheet. To do this, on the drawings of parts of a standard or basic design, made on a scale of 1:4, at the gradation points, draw horizontal and vertical arrows in the direction of increasing the gradation size and indicate next to each arrow the increment value for one size.
Analysis of work results and formulation of conclusions. At the end of the work, the student must analyze the accuracy of the resulting gradation schemes and indicate the reason for the inaccuracy, if any.
61 Rules for the design of pattern drawings. Location of the main serifs on the patterns
When constructing pattern drawings, normative and technical documentation is used, presented in the general technical specifications of industry standards for various types of products.
Initial data for the development of basic drawings of patterns for the main parts of clothing are: a technical drawing of the model design of the product, methods of technological processing, properties of the materials from which the product is planned to be made.
conjugacy and overlap connected slices. The sections are checked in a certain sequence: first, the conjugation of the sections is checked, then the overlap of the sections is checked.
Overlayability
All parts of the pattern set must show the directions of the warp threads, the lines of the middle of the parts, the lines of the chest, waist, hips, control notches for connecting the parts/
The name of the product is indicated on the back pattern. On one of the large parts there is a list ( specification) with the numbering of all parts included in this kit. The following inscriptions are placed on all parts of the pattern set:
part name; technical description number; number of details in the cut.
Assembly notches are applied to the parts patterns perpendicular to the cuts to correctly connect the parts to each other. Usually, on sections longer than 40-50 cm, at least two notches are placed at a distance of approximately 10 cm from the end of the sections. At least four notches are made on the sleeve cap and armhole. Notches are required at the points of intersection of the seam lines with adjacent parts, for example, on the sleeve cap for the shoulder seam, at the armhole for the top of the elbow seam of the sleeve, at the cut of the collar stand for the midline of the back and shoulder seam, etc.
Additionally, notches are placed for pockets and stitching individual parts and hem allowance designations. If two notches are located next to each other (one for the finishing part, the other is required), leave the notch for the finishing part.
62 Graduation of patterns. Basic methods of gradation
Grouping method comes down to obtaining patterns for clothing parts of various sizes as a result of combining two sets of patterns (medium and extreme sizes). After combining the patterns, the design points of the same name are connected by straight lines. These lines are divided into a number of parts corresponding to the number of intermediate sizes. The main disadvantage of the grouping method is that it is necessary to build drawings not for one, but for two sizes. This method is used as a starting method for finding the increment values at the main design points of typical patterns for technical reproduction of patterns used in other methods, as well as for the reproduction of patterns for clothing parts of complex models.
Essence beam method consists in drawing straight lines (rays) from a certain point (focus) through all constructive points. The increment values are plotted from the contour of the part along these rays. Using the newly found points, the contours of parts of larger and smaller sizes are drawn.
This method is the simplest, but the least accurate. Its accuracy is affected primarily by the choice of the position of the starting point (focus). At different focus positions, the direction of the rays is different, the design points of the patterns are shifted, and their contours are distorted. The beam method can be used to reproduce patterns of individual parts of headdresses and corsetry, the size increments of which occur in the radial direction.
63 Proportional-calculated method of grading patterns for clothing parts
Gradation or technical reproduction of patterns is the production of a set of patterns of all sizes and heights of the corresponding weight or age group according to the patterns of parts of a medium-sized product.
There are three known methods of technical reproduction of patterns: grouping, radial and proportional-calculated.
The most widely used design method is proportional-calculated method of reproduction of patterns. The essence of this method is that the design points of the patterns are moved horizontally and vertically, taking into account the corresponding increments of the patterns along the horizontal and vertical axes in accordance with changes in the dimensional characteristics of the human body and the position of the division lines.
The values of increments along horizontals and verticals for each constructive point of the patterns are found based on a certain position of the point relative to the original (zero) lines (axes). For the main parts of shoulder products, the following location of the original lines is accepted. On the back, the vertical line coincides with the middle of the back or a line tangent to the middle line of the back, the horizontal line with the chest line (armhole depth) or the waist line. On the shelf, the vertical line runs tangent to the armhole line, the horizontal line coincides with the chest line (armhole depth) or the waist line.
73 Methods for checking the correctness of the construction of clothing. Mating parts
The product design drawing must provide an accurate conjugacy and overlap connected slices. The sections are checked in a certain sequence: first, the conjugation of the sections is checked, then the overlap of the sections is checked.
To check conjugacy lines along mating sections, locations of control marks, templates of the main parts are made from thick paper. The cut of the template corresponds to the seam line in the finished product. Templates of adjacent parts are laid on a plane, combining sections of the same name 3–8 cm from the line being checked.
Conjugacy is checked by sections that are continuations of each other. These are cuts of the front and back neckline, a cut of the bottom of the front and back, armhole cuts, etc. The lines of mating cuts should smoothly transition from one part to another at the junction of the parts.
The back and front patterns are folded, matching the lines of the side cuts over 8 cm from the armhole. At the same time, check the alignment of the armhole line at the joints of the parts.
To check the conjugation in the neck area, combine the patterns of the back and the front along the line of the shoulder sections for 5 cm from the neck.
Checking the alignment of the edging lines, the patterns of the upper and lower halves of the sleeve are aligned along the line of the front cut for 8 cm from the upper cut. The patterns of the upper and lower halves are also aligned along the line of the elbow cuts for 8 cm from the upper cut and the alignment of the cut lines is checked.
Overlayability checked by sections that will be connected to each other in the product. These are side cuts, cuts connecting the front with the cut-off barrel, sleeve cuts, relief cuts, side and step cuts of trousers, etc.
The connected sections must be close in configuration to each other. With this configuration of connected sections, the manufacturability of the design is ensured and the aesthetics of the product is increased.
1. Determine the size and height gradation options corresponding to the given full group and size subgroup of the base option. The required size and height options for figures should be determined according to OST 17 – 325 – 81, OST 17 – 326 – 81.
For example, the development of patterns women's jacket carried out on a typical figure 158 – 96 – 104. This size is the base for the second complete group, a subgroup of small sizes, which includes typical sizes 84, 88, 92, 96, 100, 104 and typical heights 146, 152, 158, 164, 170, 176 In gradation drawings, it is necessary to construct 3 dimensions in a smaller direction and two dimensions in a larger direction. For the base size 96, you should build patterns for all the missing heights: 146, 152, 164, 170, 176.
2. Construct the contours of the basic size and height of the assembly parts. Apply gradation axes to each part.
3. Select a gradation method and scheme from those recommended (1, 2, 4...8) or those available at the enterprise.
4. Draw a diagram of the gradation of parts of the backrest assembly. On the diagram, indicate the directions and magnitudes of gradation increments at characteristic points (∆х i, ∆у i).
5. Construct gradation drawings by size, then by height. Drawings are made on graph paper in M 161.
6. Perform an analysis and clarify the gradation drawings based on the results of comparing the lengths of the same design parameters in the details of the extreme size-up options. The analyzed parameters include those controlled by the technical description table of measures. In tabular form, reflect the results of the comparison of design additions included in the controlled parameters.
Table 3.37
Analysis of changes in structural allowances during gradation
|
Name of design parameter |
Product measurement, cm |
The size of the dimensional characteristic, cm |
Size of structural increase, cm |
Conclusions about the correctness of gradation |
|||||||||
|
Back width | |||||||||||||
|
The amount of increase in the support zone is constant |
|||||||||||||
|
Shoulder width | |||||||||||||
|
The increase changes, which corresponds to the calculation system and rational configuration of the armhole |
|||||||||||||
7. Perform an analysis of the conjugation, overlap and invariance in the ratios of the lengths of the sections of the patterns of the extreme size options.
Table 3.38
Analysis of changes in the lengths of connected slices after gradation
|
Name of connected slices |
Deviation of cut lengths, cm | ||||
|
Side cut of the back |
∆ l = 0 |
||||
|
Side cut barrel | |||||
Table 3.39
Slice contingency analysis
Of course, few people can boast that they know the meaning of all the words in a language. In addition, many of them can have several meanings. In order to understand this, there are dictionaries. By the way, they help broaden your horizons.
In this article we will try to consider the meaning of the word “gradation”. As is known, it is used in different areas, most often found in literature, art, merchandising and logistics.
Origin of the term and its application in fiction
Gradation is artistic medium to enhance the imagery of speech, a unique stylistic device built on a gradual increase in the significance of an action or statement.
The word has Latin roots and can be translated as “gradual increase.” The root word is “degree”, which means a change by one step, i.e. increase or decrease.
Gradation is often found in poetry: speech becomes more expressive and expressive. It is expressed in repetitions, which allows you to focus the reader’s attention on significant actions for the narrative.
An increasing gradation is called climax, and a decreasing gradation is called anticlimax. Rising is most common in poetry. A striking example is the works of A. S. Pushkin. And a decreasing gradation can be found in love lyrics: it makes it possible to demonstrate the full depth of the lyrical hero’s experiences. With the help of this stylistic device, the work becomes expressive and expressive.

In art
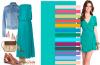
In the field of art, gradation is smooth transition from more dark shades to less saturated. With the help of this technique, the paintings acquire depth and richness. Gradation can be done not only on black and white shades, but also on other colors. It is not at all necessary to use tones of the same spectrum. An example of such gradation is a rainbow.
Transitions between shades can be either pronounced or smoother. The use of gradation allows you to use a large variety of colors to make the work of art three-dimensional and vibrant.

Importance in trade and logistics
Gradation is an important criterion in the field of commodity science and logistics. It is intended to indicate the quality characteristics of the product. The definition of product gradation is the non-conformity of a product according to certain parameters.
Products come in first, second and third gradations.
The first is products that fully comply with all requirements and quality standards.
The second is those products that need to be sold faster. That's why they are sold at a discount.
Third degree - these are goods that are disposed of in accordance with all requirements.
Because of large quantity meanings, finding synonyms for the word “gradation” is not at all difficult. This is a figure of speech or sequence, alternation, gradation.
Correct use of gradation as a stylistic device allows you to make the work more interesting and expressive. And the correct use of the word in speech will demonstrate literacy and erudition, and a rich vocabulary.
Gradation is not just an artistic technique, it is a way of influencing people by drawing attention to important things.
You might also be interested in:

Gemma is an example of miniature carving of colored stones and gems - glyptics. This view...
98/104 (110/116) 122/128 You will need Yarn (100% cotton; 125 m / 50 g) - 250 (250) 300...
Periodically replenishes its collection of publications dedicated to various colors and shades in...
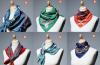
A correctly tied scarf around the neck affects the external image and characterizes the internal...

251 03/26/2019 6 min. You can wear high heels and an expensive suit, make...

