


Knitting for Easter: hats and basket for eggs, Easter egg pendant. Master classes
The bright holiday of Easter will take place very soon. I suggest that together with you we knit a nice and kind gift or an original decoration for the holiday table:
1. Egg warmer caps
2. Easter basket made of knitted yarn (detailed master class)
3. Easter egg pendant
1. Egg warmer caps
Colorful eggs are a fun alternative to the usual colored Easter eggs. And you can use them throughout the year!
Diameter of the heating pad - approx. 4 cm, height - 5 cm.
YOU WILL NEED
For each egg, 1 ball (50 g) or leftover yarn in lemon yellow, pink, lemon or freesia (approx. 133 m/50 g); 1 hook No. 3.5; for each egg, 2 black seed beads, diam. 4 mm; the remainder of orange felt 2 mm thick; suitable sewing threads.
BASIC PATTERN
Knit st. b/n (single crochet) in a circle. Every r. start with 2 replacements c. p. (chain loops) for the 1st st. b/n and end 1 connection. Art. (connecting post) knitted from the top of 2 air. n substitution.
GETTING THE WORK DONE
Dial 1 air. p. and in the 1st r. from 1 air. p. knit 7 tbsp. b/n, with the 1st tbsp. b/n replace 2 air. p., close the r. 1 connection Art.
2nd row: from each st. previous p. knit 2 sts = 14 sts. b/n.
3rd row: from every 3rd st. previous p. knit 2 tbsp. = 18 tbsp. b/n.
4th row: from every 4th st. previous p. knit 2 tbsp. = 22 tbsp. b/n.
5th row: from every 4th st. previous p. knit 2 tbsp. = 27 tbsp. b/n.
6-13 r.: knit without increases. After 13 r. cut the thread and sew it up.
The thread also began to be sewn up, while pulling and closing the small hole at the beginning of knitting.
Sew 2 small black beads in place of the eyes.
For the beak, cut out a diamond with a side of 1.5 cm from orange felt and sew it on as shown in the photo of the model.
I suggest that you and I knit together a nice and kind gift - an Easter basket, which can later be used for another purpose.
The basket is crocheted from knitted yarn, there is a removable egg mold, etc. Easter eggs will not be damaged, but will look neat and beautiful. The mold for 6 eggs can be easily removed - the basket can later be used to store any necessary small items. 
For work we will need:
Yarn;
- scissors;
- hook No. 8;
- egg cassette (6 pcs). 
Additionally upon request:
- lace;
- sewing needle and thread.
Let's start knitting a rectangular basket. Let's start knitting the bottom of the basket, which will turn from square to rectangular, thus with the help of this master class you will be able to knit not only a rectangular basket, but also a square one.
So, without letting go of the good mood, let's get started!
1. Let's make a sliding loop. To do this you need: 
Place the short tip on your palm. 
Turn the long end of the thread and place it on top. 
It looks like a ring. 
Insert a hook into the loop formed and grab the working thread. 
Remove the hook with the thread and grab the working thread again. 
Pull out the thread, t.s. knitting a single crochet.
Secure the loop. Thus, we got a sliding loop.
2. Let's start knitting the bottom of the basket (square)
We will knit 8 single crochets into a sliding loop (hereinafter referred to as sc). 
As usual, grab the working thread with a hook and pull it into the loop, knitting a sc. 
In order not to hide the long tip in the future, you can place the tip close to the loop and knit stitches, grabbing both threads. 
When 8 stitches are knitted, you need to pull the tip and pull the loop into a tight ring. 
We connect the first and last loop of the circle with a connecting post (hereinafter SS). 
For clarity, you can take markers and use them to mark the future corners of our basket; to do this, you need to mark every second column. Instead of markers, you can use contrasting threads or count the required number of columns.
In each loop with a marker we will knit 3 sc (for convenience, having previously removed the marker), in the rest - one at a time.
2nd row: 
For the lifting loop, you need to knit a chain loop (hereinafter referred to as VP), thread a hook into the same column of the previous row and knit 3 RLS. 
Mark the middle of the knitted stitches with a marker. 
In the third loop of the first row, marked with a marker, knit 3 sc (after removing the marker), mark the middle stitch with a marker. 
Thus, we continue to knit until the end of the row. 
To complete the row, insert the hook into the lifting loop and knit a connecting stitch. 
We have formed 4 corners of our future basket bottom.
According to how we knitted the 2nd row, we knit the 3rd: in the unmarked columns of the previous row, knit 1 sc, in the marked columns of the previous row, knit 3 sc, etc. Finish the row with a connecting column. 
Let's try the bottom on our egg mold; the width of the square corresponds to what is needed.
Now we will knit a rectangle from a square. So that the square we knit is in the middle of the bottom of the basket, we will knit a rectangle from the square in both directions. 
Schematic description of the location of the square, indicating the direction of knitting. 
Cut the thread. 
Pull the tip through the loop. 
Pull the tip tighter and pull it back. 
Hide the thread: insert a hook through the back wall of the post and grab the cut end and pull it out. 
Continue to hide the thread, it is advisable to perform at least three turns.
We hide the thread in such a way that everything on the back side looks as beautiful as on the front side.
Side A. 
To continue knitting, you need to insert a hook into the corner (marked column) and pass the working thread. 
Knit a stitch and pull the end of the thread back as much as possible. 
To hide the tip of the thread in advance, you can knit stitches by threading the hook not only through the upper loops of the stitch of the previous row, but also through the cut thread. 
Knit one sc into each column of the previous row - continue knitting until the end of the row (marked column). 
In the marked column, having removed the marker, we knit a sc - the last one in this row. 
To knit the next row, make an air loop for lifting. 
Having unrolled the knitting, knit a sc into the next column of the previous row, continue knitting to the end of the row. 
Let's pay attention to the last column of the previous row. To ensure that the edge of our bottom of the basket is as smooth as possible, you should carefully pick up two loops from the previous row and knit a sc. 
Check that the edge is even, try it on an egg mold 
Cut the thread and pass the cut end into the loop. 
As described earlier, carefully hide the tip of the thread on the wrong side of the basket. 
Work an additional two rows towards B, starting with the stitch marked with a green marker and finishing with a yellow marker.
Knit side B in the same way as side A. 
Having finished side B, let's try on what we got again.
As you can see in the photo, the edges are not so even, and when knitting the walls along this bottom, the egg mold can turn out to be quite large - it can be difficult to insert and remove from the basket. However, it is more convenient when the egg shape is placed more freely in the basket. Due to these two factors, we will knit another row around the perimeter of the bottom.
Thus, to level and increase the bottom of the basket, you need the following: 
Mark the corners with markers; we will knit 3 sc into these marked columns, forming the corners of the bottom of the basket. 
Make an air lifting loop and, without turning the knitting over, continue knitting along the front side - knit 1 sc in each column of the previous row. 
Having reached the marker, remove it and tie 3 sc into the previously marked column to form an angle. 
Continue knitting 1 sc to the end of the row, knitting 3 sc in the marked column and so on around the entire perimeter of the bottom of the basket. 
Using SS we finish knitting the bottom and see what happens. 
The smooth, neat bottom of the basket is ready.
Now you can start knitting the walls.
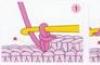
We will knit, capturing not 2 loops of the previous row, but only the back loop(only in this row). Thus, we will create a “side”, and the walls will stand perpendicular to the bottom of the basket. There is no need to double or triple anything.
1 row of walls: 
Make an air loop for lifting, knit 1 sc behind the back wall of the next column of the previous row. 
Until the end of the first row, knit 1 sc in each loop. 
Make a connecting column and complete 1 row of walls.
2nd row of walls:
Starting from the second row of basket walls, we will use a “tick” pattern.
And I will tell you about this pattern and the continuation of knitting the basket in the next part of my master class, if you want, of course. Shall we continue knitting an Easter basket?!
In the event that you decide to knit a square basket, you will need to knit the bottom of the basket of the required size using the method described above, adding the required number of rows. As soon as the bottom size is reached, you can begin knitting the walls of the square basket.
So, in the first part of the master class we stopped at knitting the first row of walls of our basket. I propose to knit the second row of walls with a “tick” pattern.
A little about the “tick” drawing: 
When knitting a “tick” pattern, we knit the same single crochet (SC). The only difference is where we place the hook when knitting a stitch. In this case, we insert the hook into the “core” of the column of the previous row.
In other words, we put the hook inside the check mark. You need to put in more effort, it turns out tighter than usual.
Advantages of the “tick” pattern from knitting RLS in the usual way:
- the knitting becomes denser, the basket holds its shape better;
- unusual, original appearance;
- knitted no more difficult than the usual method.
So let's continue.
2nd row of walls: 
Knit a chain lifting loop and insert a hook into the place indicated by the yellow marker, 
Knit a regular sc, etc. Knit with a tick pattern to the end of the row. 
Let's pay attention to the connecting post. In order to most effectively “hide” the inevitable seam, when knitting the walls, you can knit the connecting column in a slightly different way. 
When knitting using a different method, insert the hook in the direction “towards you”, and not “from you”. 
Grab the working thread with a hook 
And pull it through the loop. 
When knitting using this method, the connecting seam looks more neat and smooth.
Continue knitting the walls of the basket, each time starting with a lifting air loop, knit the 3rd and 4th rows with a “tick” pattern. 


As we can see, these 4 rows slightly cover the shape of the eggs. We knit the fifth row in the manner described above. 

The 6th row can be knitted with half-columns, but capturing the back wall of the column of the previous row.
* To knit half-columns, you need to knit the RLS not completely, i.e. without a second hook of the leading thread.
** It is advisable to knit half-columns loosely so as not to pull the walls of the basket towards the center. 
Thus, the basket on top will look more complete and will visually hide the free space between the basket and the egg mold. 


Having completed the knitting with a connecting stitch, you can ceremoniously cut the thread and carefully hide its tip on the inside of the basket. 


Congratulations, the basket is almost ready!
Now the most interesting thing remains - its decoration. At this stage of work, give free rein to your imagination - sew an original bow, an applique made of felt, attach a button, a bow, a knitted flower, or, as in our case, sew on your favorite lace...
The decorative tape took approx. 55-57 cm.
* It’s better not to cut the lace in advance, but rather baste it by unwinding the main skein of lace.
Without pulling the lace, we quietly baste it to the basket. 
We begin to baste the inward folded edge of the lace to the basket, using thread to match the lace, and continue to sew small stitches around the entire basket. 
Having reached the end, leave about 1 cm of excess lace length, 
Fold it inward and butt stitch it to the beginning of the lace on the basket. 

Of course, you can paint the egg mold and varnish it, but that’s a completely different “story” :) 
That's all, now you can fill the basket with eggs, your Easter basket is ready, congratulations! 
I hope you enjoyed this master class and that you were able to easily knit a wonderful Easter basket with me! 
3. Easter egg pendant
This Easter egg is knitted on double needles in two steps - from the middle to the bottom, and then from the middle to the top. 
YOU WILL NEED
A little yarn in the desired color(s); knitting needles of suitable size (knitting needles No. 3 were used for this master class) and a hook; needle with a blunt end; stuffing for soft toys.
ATTENTION!
The egg is knitted in two steps: first from the middle down, and then again from the middle to the top. 
Cast on 36 stitches and distribute them onto 3 double needles (= 12 stitches on each needle). Knit 5 rows in stockinette stitch, strictly observing the number of stitches.
Knit 2 more rows.
Knit 1 more row.

Cut the end of the thread about 20 cm long, thread the end of the thread through the needle and pull the thread through all the remaining loops. Pull them tightly and pull the needle and thread to the wrong side of the work through the center. 
Fasten the thread. Now you have the first half of the egg ready. 
Using three double needles, cast on 12 stitches on each needle along the cast-on row (you will get the same distribution of stitches as at the beginning of the work). Work 2 round rows using stockinette stitch. 
In the next circular row, knit *4 sts, then knit 2 sts together*, repeat from * to * = 30 sts on knitting needles.
Knit 2 more rows.
In the next circular row, knit *3 stitches, then knit 2 stitches together*, repeat from * to * = 24 stitches on knitting needles.
Knit 2 more rows.
In the next circular row, knit *2 sts, then knit 2 sts together*, repeat from * to * = 18 sts on knitting needles.
Knit 2 more rows.
In the next circular row, knit *1 stitch, then knit 2 stitches together*, repeat from * to * = 12 stitches on knitting needles.
Cut the end of the thread about 50 cm long, thread the end of the thread through the needle and pull the thread through all the remaining loops. Do not tighten the loops yet. 
Turn the egg inside out, carefully fasten all ends except the last one by passing them through the knitted loops, then turn the egg right side out again and stuff it with filling, giving it the desired shape. Then tighten the end tightly. 
Using a small hook, pull a loop through the very top of the egg (you will need the remaining end of the thread for this). 
Tie a chain of 20 chain stitches and use a connecting post to attach it to the top of the egg. 
Thread the thread through the needle again, carefully fasten the resulting ch. loop, then pass the needle through the egg and cut the thread. 
Your Easter egg is ready! If you wish, you can decorate it with embroidery along the loops.
Egg caps are a great idea for an Easter present and a functional little thing that will come in handy for those families where children often have boiled eggs for breakfast, but do not always promptly respond to their mother’s call to the table. This is where our cap comes in handy: it will definitely keep the egg from getting cold! And it knits very simply and very quickly.
These hats are made in the shape of carrots: the Easter Bunny will surely love them, so we advise you to take note of this idea.
To knit egg caps you will need:
acrylic yarn (100 g - 350 m) in two colors: orange and green;
hook 3 mm;
sewing thread to match the green yarn;
Crochet hat for eggs: description of work
We start knitting with orange yarn from the top of our hat. If desired, each row can be ended with a blind loop: then the rows will not go in a spiral. A row of blind loops will be visible on the finished hat. If each row is not closed with a blind loop, the knitting will go in a spiral, and the last row will have a barely noticeable step, although we, of course, will definitely close it with a blind loop.
1 row. Around the amigurumi ring - 6 tbsp. without a crochet.

2nd row. 2 tbsp. Single crochet in each stitch of the previous row. You will get 12 columns.

3rd row. Row of single crochets - 12 pcs.

4 row. 2 single crochets in each stitch of the previous row. You will get 24 columns.

5 row. A row of single crochets - 24 pcs.

6th row. We continue to knit with single crochets, while making an increase in every fourth loop, i.e. 24+6=30 columns.

Rows 7-10. Row of single crochets - 30 pcs.

We try on the still unknitted cap on the egg. Please do not judge us harshly: at first the fittings were carried out on a real raw chicken egg, but later it suffered and was replaced with a wooden analogue of the same size - this egg appears in the final photos. So, if the hat is good and doesn’t feel too tight, we knit two more rows without increases. If it requires expansion, we knit according to the following description.
11 row. We knit with single crochet stitches, making an increase in every tenth loop: 30+3=33 stitches.

12 row. A row of single crochets - 33 pcs.

The base of the egg cap is ready.


Now we knit the tops.
Around the amigurumi ring - 6 tbsp. without crochet; close the row with a blind loop.


Three picots from 6 ch. (6 ch, blind loop in first ch).


Blind loop in the eighth ch. of this sheet, 8 vp, art. single crochet into the next single crochet of the first row.

We continue to knit leaves - you will get 6 such leaves in total.

We cut the thread and fasten it.
We place the tops on top of the cap, face up, and stitch around the perimeter of the initial circle of 6 tbsp. without a crochet. After this, we hide all the remaining tails. If necessary, so that the tops stand better, they can be gathered into a bundle and wrapped with the same yarn that was used to knit the tops themselves. In our case, the knitting was quite dense, and the tops themselves are not bad, so we did without this measure.

The egg cap is ready! You can knit several of them together to make a fun little set. Happy creativity!


It’s even tastier to serve eggs in special knitted ones.
Eva Casio specially for the site
At Easter it is customary to paint eggs and decorate them in every possible way. And there are many options for this. For example, you can knit beautiful covers and egg cups. And besides them, crocheted ones look very interesting. They are knitted quickly using a crochet hook. We will not knit simple hats, but hats with bunny ears. After all, we have all heard about the Easter Bunny. Eggs in such hats will be a great gift for Easter.
To make the hats neat and beautiful, it is important to choose the right yarn for them. Very thick yarn will not work here. For such hats it is better to take 100% acrylic. For example, a child’s whim or a child’s novelty will come in handy here.
To knit hats for Easter eggs we will need:
- Hook;
- Yarn of any two colors;
- Needle.
Abbreviations used in the text:
- senior biological sciences – single crochet;
- p.st.s.n. – half double crochet;
- senior senior scientist – double crochet.
How to crochet Easter egg caps with ears?
You can knit hats using both single crochet stitches (hereinafter referred to as double crochet stitches) and half double crochet stitches (hereinafter referred to as double crochet stitches).
Our hats will be knitted p.st.s.n. Firstly, knit p.st.s.n. faster, and secondly, the hats will turn out somewhat more magnificent.
For one hat you need only two colors of yarn. And you need very little of it. Therefore, you can knit these Easter egg caps from leftover yarn.
First we make a sliding loop. And we will start the first row in it.

Let's knit six p.st.s.n. Instead of the first one, we will knit two air loops. Be sure to connect the beginning of the row with its end. Let's tighten the sliding loop well.

Now we will make additions for the cap. Here the additions are made as if we were knitting a simple circle. In the new row, in each of the loops of the underlying row, we will knit two d.c.s. And so, having knitted the entire row, we should get twelve crochet stitches.
And so we get eighteen loops.
Now we will knit a new row. We knit one d.c.s.n., then again one st.d.c.n. And in the next loop two d.c.s.n.
So, having knitted this row, we have formed twenty-four st.s.s.n.
Then we will knit another row. And in it we knit one p.st.s.n., then again one p.st.s.n. and once again one p.st.s.n. And in the next loop we knit two double stitches. This will already be quite enough for the bottom of the hat. You can try knitting on an egg to be sure. And if necessary, you can knit another row with increases. Here the number of rows depends on the chosen yarn.

We will knit two more circular rows.

And then change the thread to a thread of a different color. Now we need to knit just one row and the hat itself will be knitted.

Using a hook or needle, immediately hide the excess threads inside the knitting loops so that they do not stick out.
Let's move on to knitting bunny ears with which we will decorate the hat. We knit thirteen chain stitches. And we will knit them with the color of thread that was used in the last row of the hat.

After this we knit two double stitches. Now let's tie three p.st.s.n. in a row. Next, let's do six dc. In the last loop we will tie five dc.


Souvenir idea for February 14th:
Let's knit another ear. Be sure to leave threads for sewing. The bottom of the ears can be slightly pulled down. To do this, just make a couple of stitches. That is, we fold the eyelet in half and sew it from the bottom.

We sew the ears to the hat and hide the excess threads in the knitting. It is advisable to sew the ears tighter.
Crochet hats for Easter eggs are ready! Happy Easter celebration to you! And don’t forget to share interesting master classes with your friends on your favorite social networks!
The bright holiday of Easter will take place very soon. I suggest that together with you we knit a nice and kind gift or an original decoration for the holiday table:
1. Egg warmer caps
2. Easter basket made of knitted yarn (detailed master class)
3. Easter egg pendant
1. Egg warmer caps
Colorful eggs are a fun alternative to the usual colored Easter eggs. And you can use them throughout the year!
Diameter of the heating pad - approx. 4 cm, height - 5 cm.
YOU WILL NEED
For each egg, 1 ball (50 g) or leftover yarn in lemon yellow, pink, lemon or freesia (approx. 133 m/50 g); 1 hook No. 3.5; for each egg, 2 black seed beads, diam. 4 mm; the remainder of orange felt 2 mm thick; suitable sewing threads.
BASIC PATTERN
Knit st. b/n (single crochet) in a circle. Every r. start with 2 replacements c. p. (chain loops) for the 1st st. b/n and end 1 connection. Art. (connecting post) knitted from the top of 2 air. n substitution.
GETTING THE WORK DONE
Dial 1 air. p. and in the 1st r. from 1 air. p. knit 7 tbsp. b/n, with the 1st tbsp. b/n replace 2 air. p., close the r. 1 connection Art.
2nd row: from each st. previous p. knit 2 sts = 14 sts. b/n.
3rd row: from every 3rd st. previous p. knit 2 tbsp. = 18 tbsp. b/n.
4th row: from every 4th st. previous p. knit 2 tbsp. = 22 tbsp. b/n.
5th row: from every 4th st. previous p. knit 2 tbsp. = 27 tbsp. b/n.
6-13 r.: knit without increases. After 13 r. cut the thread and sew it up.
The thread also began to be sewn up, while pulling and closing the small hole at the beginning of knitting.
Sew 2 small black beads in place of the eyes.
For the beak, cut out a diamond with a side of 1.5 cm from orange felt and sew it on as shown in the photo of the model.
I suggest that you and I knit together a nice and kind gift - an Easter basket, which can later be used for another purpose.
The basket is crocheted from knitted yarn, there is a removable egg mold, etc. Easter eggs will not be damaged, but will look neat and beautiful. The mold for 6 eggs can be easily removed - the basket can later be used to store any necessary small items.
For work we will need:
Yarn;
- scissors;
- hook No. 8;
- egg cassette (6 pcs).
Additionally upon request:
- lace;
- sewing needle and thread.
Let's start knitting a rectangular basket. Let's start knitting the bottom of the basket, which will turn from square to rectangular, thus with the help of this master class you will be able to knit not only a rectangular basket, but also a square one.
So, without letting go of the good mood, let's get started!
1. Let's make a sliding loop. To do this you need: 
Place the short tip on your palm. 
Turn the long end of the thread and place it on top.
It looks like a ring. 
Insert a hook into the loop formed and grab the working thread.
Remove the hook with the thread and grab the working thread again. 
Pull out the thread, t.s. knitting a single crochet.
Secure the loop. Thus, we got a sliding loop.
2. Let's start knitting the bottom of the basket (square)
We will knit 8 single crochets into a sliding loop (hereinafter referred to as sc). 
As usual, grab the working thread with a hook and pull it into the loop, knitting a sc. 
In order not to hide the long tip in the future, you can place the tip close to the loop and knit stitches, grabbing both threads. 
When 8 stitches are knitted, you need to pull the tip and pull the loop into a tight ring. 
We connect the first and last loop of the circle with a connecting post (hereinafter SS). 
For clarity, you can take markers and use them to mark the future corners of our basket; to do this, you need to mark every second column. Instead of markers, you can use contrasting threads or count the required number of columns.
In each loop with a marker we will knit 3 sc (for convenience, having previously removed the marker), in the rest - one at a time.
2nd row: 
For the lifting loop, you need to knit a chain loop (hereinafter referred to as VP), thread a hook into the same column of the previous row and knit 3 RLS. 
Mark the middle of the knitted stitches with a marker. 
In the third loop of the first row, marked with a marker, knit 3 sc (after removing the marker), mark the middle stitch with a marker.
Thus, we continue to knit until the end of the row. 
To complete the row, insert the hook into the lifting loop and knit a connecting stitch.
We have formed 4 corners of our future basket bottom.
According to how we knitted the 2nd row, we knit the 3rd: in the unmarked columns of the previous row, knit 1 sc, in the marked columns of the previous row, knit 3 sc, etc. Finish the row with a connecting column. 
Let's try the bottom on our egg mold; the width of the square corresponds to what is needed.
Now we will knit a rectangle from a square. So that the square we knit is in the middle of the bottom of the basket, we will knit a rectangle from the square in both directions.
Schematic description of the location of the square, indicating the direction of knitting. 
Cut the thread. 
Pull the tip through the loop. 
Pull the tip tighter and pull it back.
Hide the thread: insert a hook through the back wall of the post and grab the cut end and pull it out.
Continue to hide the thread, it is advisable to perform at least three turns.
We hide the thread in such a way that everything on the back side looks as beautiful as on the front side.
Side A. 
To continue knitting, you need to insert a hook into the corner (marked column) and pass the working thread. 
Knit a stitch and pull the end of the thread back as much as possible.
To hide the tip of the thread in advance, you can knit stitches by threading the hook not only through the upper loops of the stitch of the previous row, but also through the cut thread.
Knit one sc into each column of the previous row - continue knitting until the end of the row (marked column). 
In the marked column, having removed the marker, we knit a sc - the last one in this row.
To knit the next row, make an air loop for lifting.
Having unrolled the knitting, knit a sc into the next column of the previous row, continue knitting to the end of the row. 
Let's pay attention to the last column of the previous row. To ensure that the edge of our bottom of the basket is as smooth as possible, you should carefully pick up two loops from the previous row and knit a sc. 
Check that the edge is even, try it on an egg mold 
Cut the thread and pass the cut end into the loop. 
As described earlier, carefully hide the tip of the thread on the wrong side of the basket. 
Work an additional two rows towards B, starting with the stitch marked with a green marker and finishing with a yellow marker.
Knit side B in the same way as side A. 
Having finished side B, let's try on what we got again.
As you can see in the photo, the edges are not so even, and when knitting the walls along this bottom, the egg mold can turn out to be quite large - it can be difficult to insert and remove from the basket. However, it is more convenient when the egg shape is placed more freely in the basket. Due to these two factors, we will knit another row around the perimeter of the bottom.
Thus, to level and increase the bottom of the basket, you need the following:
Mark the corners with markers; we will knit 3 sc into these marked columns, forming the corners of the bottom of the basket. 
Make an air lifting loop and, without turning the knitting over, continue knitting along the front side - knit 1 sc in each column of the previous row.
Having reached the marker, remove it and tie 3 sc into the previously marked column to form an angle. 
Continue knitting 1 sc to the end of the row, knitting 3 sc in the marked column and so on around the entire perimeter of the bottom of the basket. 
Using SS we finish knitting the bottom and see what happens.
The smooth, neat bottom of the basket is ready.
Now you can start knitting the walls.
We will knit, capturing not 2 loops of the previous row, but only the back loop(only in this row). Thus, we will create a “side”, and the walls will stand perpendicular to the bottom of the basket. There is no need to double or triple anything.
1 row of walls: 
Make an air loop for lifting, knit 1 sc behind the back wall of the next column of the previous row.
Until the end of the first row, knit 1 sc in each loop.
Make a connecting column and complete 1 row of walls.
2nd row of walls:
Starting from the second row of basket walls, we will use a “tick” pattern.
And I will tell you about this pattern and the continuation of knitting the basket in the next part of my master class, if you want, of course. Shall we continue knitting an Easter basket?!
In the event that you decide to knit a square basket, you will need to knit the bottom of the basket of the required size using the method described above, adding the required number of rows. As soon as the bottom size is reached, you can begin knitting the walls of the square basket.
So, in the first part of the master class we stopped at knitting the first row of walls of our basket. I propose to knit the second row of walls with a “tick” pattern.
A little about the “tick” drawing:
When knitting a “tick” pattern, we knit the same single crochet (SC). The only difference is where we place the hook when knitting a stitch. In this case, we insert the hook into the “core” of the column of the previous row.
In other words, we put the hook inside the check mark. You need to put in more effort, it turns out tighter than usual.
Advantages of the “tick” pattern from knitting RLS in the usual way:
- the knitting becomes denser, the basket holds its shape better;
- unusual, original appearance;
- knitted no more difficult than the usual method.
So let's continue.
2nd row of walls:
Knit a chain lifting loop and insert a hook into the place indicated by the yellow marker, 
Knit a regular sc, etc. Knit with a tick pattern to the end of the row.
Let's pay attention to the connecting post. In order to most effectively “hide” the inevitable seam, when knitting the walls, you can knit the connecting column in a slightly different way. 
When knitting using a different method, insert the hook in the direction “towards you”, and not “from you”.
Grab the working thread with a hook 
And pull it through the loop. 
When knitting using this method, the connecting seam looks more neat and smooth.
Continue knitting the walls of the basket, each time starting with a lifting air loop, knit the 3rd and 4th rows with a “tick” pattern. 

As we can see, these 4 rows slightly cover the shape of the eggs. We knit the fifth row in the manner described above.
The 6th row can be knitted with half-columns, but capturing the back wall of the column of the previous row.
* To knit half-columns, you need to knit the RLS not completely, i.e. without a second hook of the leading thread.
** It is advisable to knit half-columns loosely so as not to pull the walls of the basket towards the center. 
Thus, the basket on top will look more complete and will visually hide the free space between the basket and the egg mold. 
Having completed the knitting with a connecting stitch, you can ceremoniously cut the thread and carefully hide its tip on the inside of the basket. 


Congratulations, the basket is almost ready!
Now the most interesting thing remains - its decoration. At this stage of work, give free rein to your imagination - sew an original bow, an applique made of felt, attach a button, a bow, a knitted flower, or, as in our case, sew on your favorite lace...
The decorative tape took approx. 55-57 cm.
* It’s better not to cut the lace in advance, but rather baste it by unwinding the main skein of lace.
Without pulling the lace, we quietly baste it to the basket.
We begin to baste the inward folded edge of the lace to the basket, using thread to match the lace, and continue to sew small stitches around the entire basket. 
Having reached the end, leave about 1 cm of excess lace length,
Fold it inward and butt stitch it to the beginning of the lace on the basket. 
Of course, you can paint the egg mold and varnish it, but that’s a completely different “story” :) 
That's all, now you can fill the basket with eggs, your Easter basket is ready, congratulations!
I hope you enjoyed this master class and that you were able to easily knit a wonderful Easter basket with me! 
3. Easter egg pendant
This Easter egg is knitted on double needles in two steps - from the middle to the bottom, and then from the middle to the top. 
YOU WILL NEED
A little yarn in the desired color(s); knitting needles of suitable size (knitting needles No. 3 were used for this master class) and a hook; needle with a blunt end; stuffing for soft toys.
ATTENTION!
The egg is knitted in two steps: first from the middle down, and then again from the middle to the top. 
Cast on 36 stitches and distribute them onto 3 double needles (= 12 stitches on each needle). Knit 5 rows in stockinette stitch, strictly observing the number of stitches.
Knit 2 more rows.
Knit 1 more row.
Cut the end of the thread about 20 cm long, thread the end of the thread through the needle and pull the thread through all the remaining loops. Pull them tightly and pull the needle and thread to the wrong side of the work through the center. 
Fasten the thread. Now you have the first half of the egg ready. 
Using three double needles, cast on 12 stitches on each needle along the cast-on row (you will get the same distribution of stitches as at the beginning of the work). Work 2 round rows using stockinette stitch. 
In the next circular row, knit *4 sts, then knit 2 sts together*, repeat from * to * = 30 sts on knitting needles.
Knit 2 more rows.
In the next circular row, knit *3 stitches, then knit 2 stitches together*, repeat from * to * = 24 stitches on knitting needles.
Knit 2 more rows.
In the next circular row, knit *2 sts, then knit 2 sts together*, repeat from * to * = 18 sts on knitting needles.
Knit 2 more rows.
In the next circular row, knit *1 stitch, then knit 2 stitches together*, repeat from * to * = 12 stitches on knitting needles.
Cut the end of the thread about 50 cm long, thread the end of the thread through the needle and pull the thread through all the remaining loops. Do not tighten the loops yet.
Turn the egg inside out, carefully fasten all ends except the last one by passing them through the knitted loops, then turn the egg right side out again and stuff it with filling, giving it the desired shape. Then tighten the end tightly.
Using a small hook, pull a loop through the very top of the egg (you will need the remaining end of the thread for this). 
Tie a chain of 20 chain stitches and use a connecting post to attach it to the top of the egg. 
Thread the thread through the needle again, carefully fasten the resulting ch. loop, then pass the needle through the egg and cut the thread.
Your Easter egg is ready! If you wish, you can decorate it with embroidery along the loops.
You might also be interested in:

- Lord, how I want chocolate! These were the words the border guard greeted us at the airport...

HOW TO SEW LEATHER BY HAND USING TOOLS AND ON A SEWING MACHINE? Products made from natural...

Good luck to everyone! I think that you’ve already been waiting for me, I promised and I still can’t...
Knitting amigurumi toys is a very exciting activity that both adults enjoy...
Nowadays people have become interested in handicrafts. Many have forgotten what a hook is...

