


Sewing a bag from genuine leather with your own hands is quite difficult. Therefore, for beginners, I recommend that you first sew a bag from artificial leather. The technology for sewing it is not very different from sewing a bag made of fabric or jeans, with the exception of finishing front seams.

A leather bag always looks elegant and fashionable and the price of a genuine leather bag is always high. Maybe that's why many people try to sew a bag or purse, but, as a rule, they fail. The fact is that sewing bags and leather haberdashery is a separate direction in the sewing business, much like sewing shoes, so it is not surprising that many people are unable to sew a bag with their own hands.
In this article I will not explain how to sew a bag step by step. There are thousands of models of bags and it is impossible to make a universal video or master class in the form of a photo. But you can give universal advice on how to make a pattern for a bag model you like, perform one or another technological operation, how to install accessories with your own hands, etc.
How to sew a women's bag from genuine leather. Bag with lining and zip fastening. You will learn many useful tips on how to work with natural leather.

It is difficult to sew any products made of genuine leather, especially bags with a rigid frame. And this is due primarily to the special technology of sewing genuine leather, the presence of special tools and a sewing machine, the use of special applied materials, and, of course, the presence of experience.

First of all, you will need a sewing machine capable of sewing leather. Modern models of sewing machines cannot be used for sewing rough materials such as leather; read the instructions carefully. The only option is to find an old Podolsk-type machine from friends or relatives, maybe even with a manual drive. By the way, you can even buy it from an advertisement, but not more than 1000 rubles.


A construction knife with a replaceable blade can also be used for cutting leather. Do not forget that the blade of such a knife is not only replaceable, but segmented. Using pliers, carefully break off the dull part of the blade, and it will become sharp.
Paired with such a knife, you will also need a piece of plywood or board on which you will cut out the leather parts of the bag.

If your bag model has a lot of metal fittings, buy a punch like this in the store right away. Using it, it will be easy to make a neat hole for buttons, rivets and other accessories.

Instead of leather glue, you can use this adhesive tape.
This is not the entire list of tools necessary for working with genuine leather, but the most important ones. Without them, you will not be able to sew a high-quality leather bag. In addition, look at the general photo, you will need a special hammer, awl, thread, sewing needles, etc.

In addition to the main parts for the bag, you will also need many small elements, which are quite difficult to take into account at once. I will explain everything in detail as I assemble the bag. For now, just keep in mind that all skin scraps, even small ones, need to be saved; they may be useful to us in the future.

Make patterns for any parts of the bag immediately with allowances. Leather is quite an expensive material to forget about allowances when cutting and make other mistakes.
Seam allowances 0.7-1.0 cm.

The remaining parts have a rectangular shape and it is not necessary to make a pattern, at least use graph paper for them. However, perhaps you will decide to sew just such a model from fabric in the future, then ready-made patterns will make your work easier.
Two options for soft shaped bag patterns

It is not necessary to create a pattern for a bag from paper, but it won’t hurt to make a pattern of the main parts. The fact is that it is almost impossible to determine the size and shape of a bag using a paper pattern. When sewn, the bag acquires volume and, therefore, changes its calculated dimensions and shape. Therefore, make paper patterns of the main parts of the bag, pin or glue them and make sure that the shape and size of the bag suits you. If not, feel free to adjust the pattern and try it on again.

The consumption of genuine leather for sewing a bag must be calculated accurately. Moreover, you always need to buy more leather, since sometimes you have to “work around” various defects in the leather (crumpled areas, holes, abrasions, etc.)
But on average, to sew a genuine leather bag you will need a skin measuring 100-120 square decimeters or approximately 1.0-1.2 square meter.
Depending on the model, the presence of finishing elements, pockets and other details, and most importantly the size of the bag, you can keep within 180-100 dm/sq. But in any case, you need to lay out the details of the cut, since leather is often sold with defects (stains, holes, folds, dents, etc.)
Don't forget about the finishing details of the bag. Because if you don’t have enough of a small piece of leather, you won’t be able to buy a small piece. Genuine leather is sold only as whole skins. By the way, sometimes it is the size of the skin that determines the model and size of the bag.
If you don't have enough experience, don't start sewing a bag from new leather right away. Find an old raincoat or jacket in your wardrobe. Take it apart and try to match the remaining areas of leather for parts of your bag. As a last resort, such leather can be combined with pieces of artificial leather or fabric, such as corduroy.

The connecting seams are sewn down with allowances of 0.7-1.0 cm. Do not forget to check the degree of pressure of the presser foot on the fabric and the height of the rack. Leather is a fairly dense and rough material, and in order to avoid damage to a household sewing machine, it is better to sew it on an industrial machine or an old manual sewing machine such as Podolsk, Singer.
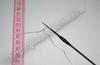
To make it easier to pierce several layers of leather, you can buy special sewing needles for leather at a sewing supply store. They have a special blade shape and such a needle does not pierce the skin, but cuts it.

Not always, but often, the seam allowances of the stitched parts of a leather bag need to be glued. For this operation, you can use regular rubber glue and a brush. But it is better and more careful to glue the allowances using adhesive double-sided tape.

Tear off the paper protective strip and press the seam allowance.

To ensure that the seams on the front of the bag look even and smooth, you will need a hammer. Tap lightly along the seam with a hammer or the handles of heavy metal tailor's scissors.

It is very difficult to make finishing stitches on leather, since a regular presser foot will “slow down” the top layer of leather, the stitch will be “shallow” and even a tear in the leather may form due to frequent piercing with a needle. This is a responsible operation; treat it as responsibly as possible, since the skin cannot be stitched twice. You must do the finishing stitch the first time without mistakes or rework.
Therefore, be sure to change your regular foot to a Teflon-coated foot. There are a number of other devices for sewing leather, but this Teflon foot is the simplest and most inexpensive way.

And if you also play it safe and rub the seams with moistened soap, the seam will be flawless.
See Decorative stitching on a tricky area.

After the base of the leather bag is assembled along with pockets and other finishing elements, begin making the belt. Determine what type of clasp you will use, what hardware, and how you will attach the strap to the bag.

Do not use accessories that are too expensive and difficult to install. Metal zippers, metal rings, rivets, zippers, and buttons are easy to install with your own hands. And they definitely need to be used when decorating a leather bag. Metal gives natural leather greater solidity and attractiveness, emphasizing the noble properties of natural material.

And to install the fittings you will need this kind of punch No. 3 or No. 4. You can even buy a set of these punches if you regularly sew leather items, especially bags.
When punching a hole in the leather, place a thick wooden spacer on the back side. You cannot punch holes on a metal surface; the punch blade will quickly become dull. And make sure that other parts of the bag do not accidentally fall under the punch.
You will need:
Faux leather with crocodile embossing 0.70 m wide 135 cm; lining fabric 0.40 m wide 140 cm; rigid pad S 520 1.15 m wide 45 cm; 1 metal zipper, 20 cm long; 1 punching block with a diameter of 11 mm; 1 carabiner hook 3 cm long; non-woven formband; buttonhole thread for finishing stitches; "magic" tailor's chalk.Paper pattern:
Using the silk paper measurements below, make life-size paper pattern pieces or trace the pieces directly onto the front side of the faux leather/lining fabric using a tailor's chalk and ruler.Bag size 43 x 36 x 12 cm
Clutch size 22 x 16 cm
Allowances:
The dimensions of all parts include allowances of 1 cm wide. Cut out the gasket parts without allowances.Cut:
Layout plans show the most efficient way to arrange pattern pieces on faux leather/fabric. Please ensure that the grain direction lines drawn on the paper pattern pieces are parallel to the edge/fold of the fabric.
Faux leather with crocodile embossing:
a) 2 bag parts, 53.5 cm long and 38 cm wide, including allowances;c) the bottom of the bag is 14 cm long and 38 cm wide, including allowances;
f) clutch detail 32 cm long and 22 cm wide, including allowances;
f) internal pocket (back side) 12 cm long and 18 cm wide, including allowances;
g) internal pocket (front side) 10.5 cm long and 18 cm wide, including allowances;
i) 2 ribbons for attaching a clutch, 35.5 cm long and 1 cm wide, including allowances;
j) zipper tape 6 cm long and 1 cm wide, including allowances;
k) 2 facings 4 cm long and 1.5 cm wide,
including allowances.
From lining fabric:
d) 2 bag parts, 36.5 cm long and 38 cm wide, including allowances;b) 2 side parts of the bag, 36.5 cm long and 14 cm wide, including allowances;
c) the bottom of the bag is 14 cm long and 38 cm wide, including allowances.
Lining:
a) 2 lining pieces 43 cm long and 36 cm wide;b) 2 side parts of the lining, 34.5 cm long and 12 cm wide;
c) the bottom of the lining is 12 cm long and 36 cm wide.
Sewing:
When basting and stitching, fold the cut parts with the right side inward. Backtack at the beginning and end of each seam. To make seams, use regular sewing threads and a sewing machine needle that matches the thickness of the leather. To secure seams and cuts, you can use pins only for artificial leather, which does not leave marks. For tough leather or leather that shows pin marks, use paper clips. Faux leather cut parts should not be basted, and seams should not be ripped out, as needle marks will remain. Use medium sized stitches as stitches that are too small can perforate the leather. To ensure that your sewing machine feeds leather well and produces even stitches, use a Teflon foot. Or sew stitches through silk paper, which will then need to be removed. Artificial leather should only be ironed using a dry iron without steam, having first tried it on an unnecessary piece of paper.Non-woven formband

At a distance of 9.5 cm from one short cut of each part of the bag (a), use tailor's chalk to draw a fold line for the facing (1).

Iron the interlining formband from the wrong side of parts a, b and g: to the parts, and iron the interlining formband so that the chain seam on the interlining is aligned with the marked fold line of the facing (1a), to parts b - respectively, along one short cut = upper cut bags, to part g - along one longitudinal section = the upper edge of the pocket (entrance to the pocket).
Iron the rigid pad

On the wrong side of the bag parts (a) (only up to the fold lines of the facings), the side parts of the bag (b) and the bottom of the bag © iron the corresponding lining parts. The allowances remain not duplicated by the spacer (2). Important: Before gluing the gasket, pay attention to the manufacturer's recommendations. First try on an unnecessary piece of artificial leather.
Side details of the bag

Iron the seam allowance of one short section of each side piece of the bag (b) to the wrong side and pin. Place the side parts of the bag on one bag part (a) face to face, aligning the bottom cuts and one short cut of each side part with the longitudinal cut of the bag part. Sew the side parts of the bag along the longitudinal sections with allowances 1 cm wide (3). Sew the other part of the bag (a) in the same way as the other longitudinal sections of the side parts (b). Turn the seam allowances on the top side edges to the wrong side and pin. Turn the seam allowances for attaching the side parts onto the bag parts (a) and iron them. The details of the bag (a) are sewn with buttonhole thread along the seams from the upper edges of the side parts of the bag (b) with straight stitches (stitch length - 4-5 mm) close to the seams. Do not cut the stitch threads short, bring them to the wrong side and tie them to the bottom threads of the stitches.

Unscrew the bag (3a).
Sew the bottom of the bag

Pin one longitudinal section of the bottom of the bag © to the bottom section of one part of the bag (a), right side to front side, with the allowances on the short sections of the bottom of the bag protruding. Sew the bottom of the bag, starting/ending the stitching exactly at the corner (4). Turn the bag inside out. Sew another longitudinal section of the bag in the same way to the bottom section of the other bag part (a).

Cut the allowances along the lower edges of the side parts of the bag (b) exactly at the seams to a length of 1 cm (4a). Pin short sections of the bottom of the bag to the side parts of the bag.

Sew, starting/ending lines exactly at the corners (4b). Turn the bag inside out.
Inner pocket
Iron the longitudinal section of the front part of the inner pocket (g) duplicated with the interlining onto the wrong side to a width of 1.5 cm; on the front side, stitch the top edge of the pocket at a distance of 1 cm = entry into the pocket. Place the front pocket piece on the back pocket piece (f), wrong side to right side, aligning the bottom and side edges.
Sew the front part of the pocket along the side and bottom edges to the edge (5).
Clutch strap

Fold the tapes (i) wrong sides together, stitch the longitudinal sections to the edge. Thread one end of the tape into the half-ring of the carabiner clasp, stitch the end of the tape (6).
Lining
Place the side pieces of the lining (b) on one piece of the lining (a) right side to right side, aligning the bottom sections and one longitudinal section of each side piece (b) with the longitudinal cut of the lining piece (a). Sew the side parts of the lining, starting at the bottom of the stitching at a distance of 1 cm from the cuts. The other lining piece (a) is similarly stitched to the other longitudinal sections of the side pieces (b). Press seam allowances. Stitch the bottom of the lining as described in steps 4, 4a and 4b, without notching the seam allowances. Iron the top edge of the lining to the wrong side to a width of 1 cm.Sew on the lining

Along the upper sections of the bag parts (a) at a distance of 9.5 m from the sections, use tailor’s or “magic” tailor’s chalk to draw fold lines for facings and allowances (7). On one part of the lining (a) and on the inner pocket on the upper edges, place center marks with pins. Place the inner pocket on the lining piece, aligning the marks and the top cuts. Pin. Pin the lining piece (a) with the inner pocket to the top cut of one bag piece (a) with the wrong side facing the right side, aligning the top pressed cut of the lining with the marked seam line.

Sew the lining piece with the inner pocket to the edge, and make bartacks at the beginning and end of the seam (7a). Similarly, stitch the lining to the inner edge of the facing of the other part of the bag (a). Place the lining in the bag, wrong side to wrong side.

Turn the one-piece facings of the upper sections of the bag parts (a) along the fold lines to the wrong side and pin (8). Pin the free end of the fastening tape exactly in the middle of one side part of the bag (b) and stitch.

Pin the upper edges of the side parts of the bag and the lining and stitch them together with buttonhole thread (8a). Topstitch the top and side edges of the bag parts. Do not cut the stitching threads short, but insert the needle to the wrong side and secure.
Pens

Iron the longitudinal sections of the handles on the wrong side to a width of 1 cm. Fold the handles in half lengthwise, right side out, aligning the ironed edges. Sew the handles along the contours to the edge, grinding the longitudinal edges (9).

Pin the ends of each handle to the bag part (a) at a distance of 8 cm from the side parts, 5 cm from the top edge and sew by hand with buttonhole thread (10) or stitch on a sewing machine.
Clutch

Pin the facings (k) to the ends of the zipper, right side to right side, and stitch to the edge with buttonhole thread (11). Pin one short section of the clutch (e) to one zipper band with the wrong side facing the front side at a distance of 3 mm from the teeth.

Sew the clutch detail to the edge (12). Sew another short section of the clutch in the same way to the other zipper band; to do this, fold the clutch with the right side inward.

Pin the side sections of the clutch together with the wrong sides and sew them together with thread for sewing loops into the edge (13). Thread the zipper strip (j) into the zipper puller.

Stitch the ends of the tape, while turning the slider to the side (14). Sew the ribbon on the runner by hand. Place a block in the corner at the end of the zipper on the clutch, capturing all layers. Secure the clutch to the bag using a carabiner clasp.

Photo: Burda 12/2015
Material prepared by Yulia Dekanova
Leather accessories have always been very popular. A high-quality watch, wallet, or shoes speak about the owner’s taste and status. The most common and popular attribute is a leather bag.
Men's and women's leather bags can be casual, business, with a shoulder strap or a handle for carrying in the hands. Big and small, they always store the necessary things of their owner.
Bag models
The variety is amazing. You can choose for every taste and for any situation. They can be hard, soft, semi-soft, frame, totes, backpacks, shoppers, clutches, hobos, messengers, weekenders, baguette bags - each shape, when properly tailored and selected to suit the needs, best suits the requirements and needs of its owner.
It is worth considering that bag models need to be selected not only according to the outfit, situation or weather. The figure of the owner also plays a big role in creating the image. A large bag in the hands of a fragile lady will look advantageous only in the right ensemble.
Sewing a bag with your own hands
Leatherwork was valued in ancient times, and craftsmen were worth their weight in gold. Modern technologies have made great strides forward, and there is no need to go through the long procedure of preparing the material and sewing it yourself. It is much easier to buy a finished product by choosing from the huge assortment that is offered to the consumer.
However, creativity often requires implementation. Therefore, you can sew a bag yourself. To work, you need to prepare tools and carefully familiarize yourself with the theory. You can start practicing by completing all of the above steps.
Material selection
The choice of material for sewing a bag is important. Leather is divided into:
- saddle cloth is thick, made from the skin of cattle;
- yuft is soft, thin leather (about 2 mm);
- crust is thick and dense leather. Its surface is smooth and has a natural texture. Well suited for making bracelets, cases or sheaths.
Different craftsmen use different leathers. Some people like deer leather, some prefer pork, some prefer crocodile. There are many varieties of material, each with its own unique properties, pros and cons.
Tools
- punch (or awl and hammer);
- needles (2 pcs., always with a wide eye and a blunt end);
- thread;
- compass (or special gears);
- leather scissors;
- rolling and finishing tools (optional);
- vice.
This is the minimum set of materials needed to sew a bag using a simple pattern. The simplest pattern for a leather bag is a long rectangle, cut in such a way that the front flap and side walls, as well as the back and front parts, form a single whole. Use these materials and you can easily create a leather crossbody bag. Patterns for leather bags always contain instructions on the number of parts needed.
Constructing a pattern
The patterns of men's leather bags are no different from women's at the initial stage. The classic one for men and women is cut out according to the same patterns, only with different sizes.
First, when starting work, you need to make sure that the leather is ready for cutting.
A piece of leather laid out on a smooth surface is positioned in such a way that the material can be used as efficiently as possible.
The pattern is transferred to the skin from the wrong side using a pencil or chalk. The dimensions of the finished product will correspond to A4 format; accordingly, the dimensions of the drawing should have an allowance of +1 cm. For the convenience of transferring the drawing to a pattern, you can select the pattern model you like, print it on a sheet of the required format and transfer it to the material.
Accessories and additional elements are cut out from the remnants of leather - a flap (its dimensions are equal to the parameters of the back wall of the bag - 210 mm by 297 mm, for convenience they take 21 cm by 30 cm). A leather shoulder bag can be made if you cut out a strap 4 cm wide and a length equal to the length of the body from waist to shoulder, multiplied by 2. You can use braid; it must be thrown over the shoulder so that its level corresponds to the future position of the bag. The length of the braid is measured with a centimeter, and the size is used to create a pattern.

Assembly of elements
When all the parts are cut out, they begin to assemble the future bag.
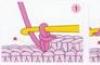
The first thing to do is to mark the locations of future seams. If sewing will be done manually, then a compass or a special wheel is used for marking. Often leather bag patterns contain dotted lines along which this wheel should go. Using the selected tool, the line on which the seam will be located is rolled or carefully scratched. Next, using a punch (a special toothed fork) or an awl and a hammer, holes are pierced into which the needle will be inserted.
How to sew a leather bag from ready-made parts? The parts of the bag are sewn together using a special stitch called “saddle stitch”. Unlike machine made, it is more durable and of higher quality.
The seam is formed using two needles. The thread is fixed in the needle. To do this, the tip of the needle pierces the thread in the middle, and the free tip is threaded into the resulting loop and carefully tightened.
During work, the needles are inserted towards each other. If you imagine a seam in cross-section, you get an interlacing of the letters “P”. After each stitch the thread is slightly tightened. This is done to ensure that the seam is strong, without gaps or gaps between the skin.

Bag made from an old coat
How to sew a leather bag with your own hands, patterns from what material to use? After all, there are never too many bags. Even better, good bags. Using simple leather bag patterns, you can simultaneously get an interesting design solution and a new accessory. You can use an old coat as material.

The easiest option is to cut the bag out of the sleeve.
Before starting work, you need to prepare the skin. To do this, the sleeves are first ripped off. If there is a lining, then it must be carefully torn off without cutting the seams. If the lining is intact, you can use it without cutting it. The sleeve is turned outward with the lining.
On one side, the lining and leather are carefully ripped apart, and a zipper is sewn into this place. The length of the zipper should match the length of the opening.
Now you need to cut 2 circles from the second sleeve, the diameter of which will be equal to the width of the sleeve + a 7 mm seam allowance. A strip 3 cm wide and 70 cm long is also cut out. This is the future handle of the bag.
Using a sewing machine, a leather circle is sewn on each side to the tube from the sleeve so that the handle is on top, strictly opposite the zipper. The leather for the handle is sewn in while sewing on the circles, placing it between layers of leather. This way, when you turn the bag inside out, the handle will be on the outside rather than sewn inside.
The result is an interesting tube bag, reminiscent of a baguette model.
Using various cutting methods, finding a use for old pockets, belts, hems, you can sew any option for a laptop or a bucket bag.
Patterns of leather bags from an old coat differ only in the work with the material; the shape of the product can be any.
Bag made of patches
How to sew a leather bag from scraps of leather? It's easy to do. At the beginning of work, it is necessary to prepare the material. It is better to sew the leather pieces together using a sewing machine using a special zigzag stitch. It is durable and does not allow the edges of the leather to fray. The same seam can be repeated by hand, but it is important to monitor the thread tension, otherwise the fabric will pull to the sides and the finished bag will look untidy.

The pattern of the bag model is applied to the leather from the wrong side and outlined with chalk. A seam allowance is made - approximately 0.5 cm.
It is advisable to make a lining for a bag from scraps. The lining is cut out according to the pattern of the central part of the bag. It is not needed for handles. For the lining, durable satin is used, preferably a special durable lining fabric.
The stitched leather pieces and lining are put together and stitched again along the top seam.
Craftsmen often wonder how to sew a leather bag from parts of leather of different types. It is better to conduct such experiments after getting your hands on working with a material of the same strength and density.
Combination bags, however, are a popular and sought-after accessory.
For example, the stitched leather leather suggested above will look great with sides or handles made from leather of a different color, or from a different texture of leather (for example, a combination of ostrich leather and calf leather).

Unisex patterns
The world of leather goods is changing as quickly as the world of fashion. Bags are no longer divided so much into men's and women's, and the materials have become more diverse. Using the same patterns, you can sew a bag for both men and women.
For example, the patterns in the photo, cut on high-quality leather, will allow you to sew bags that can be used by both men and women.
To more clearly indicate that an accessory belongs to a specific gender, you can use decorative elements. To make leather handles shorter or longer, so that you can hang it on your shoulder using two handles. For men's - make one wide strap. A long shoulder handle will make the bag universal; such models are especially popular among young people and students.
In addition, such models allow you to easily vary in size. Bags based on these patterns can be easily adjusted to fit either an A5 notebook format or made more spacious so that an A3 folder fits.
To increase or decrease the pattern, it is convenient to use printed versions of the pattern. When printing, the pattern will be divided into several sheets. It will be necessary to cut it out, assemble it and transfer it to life-size on the skin. The second option is to draw the bag onto paper manually. In this case, it is necessary to work carefully; errors can ruin the entire work in the future.
Practicality has long ceased to be the main requirement that a woman’s bag must meet. The right accessory should not only be spacious, but also aesthetically pleasing. The ideal handbag should attract attention, while harmoniously combining with the rest of the outfit. Leather remains the most popular material for making bags, because things made from it are beautiful and easy to care for. However, prices for leather accessories are rising every day, and you always want to be stylish and attractive. That is why more and more fashionistas are wondering how to sew a bag with their own hands, and the leather version will look even better.
Leather is a little more difficult to work with than other materials. Leather is a dense and capricious raw material, which makes the sewing process labor-intensive. But the result obtained will far exceed all expectations, so the work is worth it. Let's try to take a closer look at the creation process and understand how to sew a bag with your own hands from leather or dermantine.
What might you need for a leather bag?
Let's figure out how to sew a bag, especially if you plan to make it from leather. The main thing to do before starting work is to evaluate the capabilities of your sewing machine. The device must be able to stitch through thick leather, sometimes folded into several layers. Particular attention should be paid to the choice of needle, both in the machine and in ordinary darning. The needle must be sharp and strong, otherwise it may simply break during sewing.
For working with leather materials it is better to choose threads made of nylon, silk or nylon. Simple sewing threads will not work, because such seams will quickly come apart. When sewing individual parts, it is better to do two or three lines instead of one, this will eliminate the possibility of holes appearing.
For the main part, it is better to take high-quality leather or dermantin, made as a whole cloth. But for some models, a patchwork technique is used, when many pieces of leather of different colors and sizes are sewn together before starting work. You can also make original decorations from unnecessary scraps to decorate your bag. You should stock up on rivets, zippers, braid and chains from a sewing accessories store. If desired, the bag can be decorated with rhinestones, beads and sequins.
You definitely need to prepare paper for making a pattern; you will need a measuring tape, scissors, pins and a knife for cutting leather.
Making a bag with your own hands from leather
Let's look at an example of making a leather bag. The principle of making different handmade models is the same, only the pattern of the bag will differ. Let's consider the simplest leather option, from which you can build on in the future. We draw a pattern on a regular newspaper or special paper according to the following scheme:

In the corners of the base we draw as follows if we want to achieve rounded edges.

The bottom of the bag is cut exactly according to these details. Calculate the length using the formula: add its height to the length of the base and multiply by two. It is better to make indents for seams when transferring from paper to skin, adding one and a half to two centimeters around the perimeter.

To make the handles, you need to sew two rectangles, folding them in half. Do not forget about a reserve of three to four centimeters for sewing to the bag.

Using the same pattern we make the lining for the bag. You can achieve an interesting effect by using a contrasting color material for lining, for example, as in the photo below.

Let's move on to assembling the product
Once the cutting is completed, you can proceed to assembly. It is necessary to assemble the product and pin it with pins. To make stitching easier, it is better to tap the folds with a hammer.

It is better to sew with special ribbed needles. After assembly, you can sew on the zippers and start decorating.

This way you can create a wide variety of models. It’s worth looking through fashion magazines, choosing the appropriate option and starting cutting.

Often, to give the desired shape, thick cardboard or a special seal is sewn between the lining and the base.
With a little practice, you can easily reproduce any pattern yourself. When transferring to the skin, every millimeter must be carefully measured, otherwise the final result will be skewed.

Using a special sealant is convenient because an adhesive layer is already applied to it.

But an additional layer of thick cardboard should be attached to the bottom of the bag.

The seams from the inside must be carefully glued with glue to avoid fraying.

It is better to glue the zipper first and tap it with a hammer, and then stitch it.
Julia WeberFaux leather bag: sewing master class

It’s actually not that difficult to sew such a stylish faux leather bag with your own hands. You can wear it to work (of course, if your skin color is discreet), it will complement your everyday look, and even an evening one.
The finished bag measures approximately 33cm wide and 22cm high excluding handles.
If this is your first time working with faux leather, check out sewing faux leather.
Materials:
- faux leather
- lining fabric
- threads of a color suitable for both leather and lining
- threads in a shade darker than the leather color for stitching
- rectangular plastic handles
- magnetic lock
- transparent ruler
- fabric marker or chalk, pencil
- circular cutter (and special mat) or scissors
- sewing pins
- clamps

Calculate how much artificial leather and lining fabric you will need based on the size of the parts that need to be cut and the width of the leather and lining.
Choose a dense fabric for the lining; it will last longer. Choose a color that matches the color of the artificial leather.
This bag is soft. If you want the canvas of the bag to be rigid and hold its shape, then you will additionally need dublerin for leather, which will need to be used to glue the parts of the canvas of the faux leather bag.
Cutting out the details of the bag
From faux leather, cut out:
- two rectangles 30 cm high and 43 cm wide for the bag canvas
From the lining fabric, cut:
- two rectangles 30 cm high and 43 cm wide for lining
- two rectangles 12 cm high and 10 cm wide for handles
- two rectangles 28 cm high and 21 cm wide for pockets
If the lining fabric has a pattern, for example, like here, with stripes, then cut out the parts so that the stripes are in a horizontal direction.
Internal pockets
Fold each pocket rectangle in half to create two pieces that are 14cm high and 21cm wide.
Sew along the sides. Trim the bottom corners as shown in the photo. Iron.

Turn it right out. Press out the corners so that they are even, using, for example, a knitting needle. Iron again.
Markings on the lining of the lower corners and pocket locations
Place one piece of lining fabric measuring 30cm high by 43cm wide on your work surface, wrong side up.
Find the center point along the width (21.5 cm from each edge). Mark several such points. Draw a vertical line through these points using chalk or pencil. Make a small triangular cutout in the center top.
On the sides and bottom sides from the edge, mark 1.5 centimeters and draw lines. So there are 4 intersecting lines.
From the line drawn below, measure 3.5 centimeters and draw a parallel horizontal line.
From this line, measure 10 centimeters on the central vertical line. Draw a horizontal line parallel to the bottom through this point. The length of this line should be 38 centimeters, that is, 19 centimeters to the left and to the right of the central vertical line. This is the line for the bottom side of the pocket.

At each bottom corner, using a ruler, draw two squares: one measuring 5x5 centimeters and the other measuring 3.5x3.5 centimeters. Between the squares, draw a diagonal line connecting their corners.

Do the same on the other piece for the lining.
Sewing pockets
On the wrong side of the lining piece, sew along the line marked for the bottom of the pocket with a thread that will be clearly visible on the front side. This will allow you to sew the pocket evenly.
On the front side, attach the pocket with the bottom raw edge along the stitched line. Sew along the edge with a 1.5 centimeter allowance. You can lay two lines on top of each other for strength. Trim the corners.

Turn the pocket over so the raw side is inside and stitch close to the edge. Sew along the sides of the pocket. At the ends of the seams, secure with a stitch back and forth. Repeat the same for the other pocket on the second part of the lining.

You can sew vertical stitches in the middle of each pocket from bottom to top, so that there are two small compartments instead of one. You can leave the pockets wide or make even narrower compartments for your phone and pens.
Sewing the lining
Place the lining pieces right sides together, aligning all edges evenly. Sew stitches along the sides and bottom. At the corners, underfinish to the sides of the small square as shown in the photo.

Cut out a small square and cut along a diagonal line between the squares at each corner.

With both hands, take the places of the cut diagonal lines and move them in different directions. Align the front and back seam lines exactly and stitch along the marked line.


Repeat the same for the other corner. Set the finished lining aside.
Pen Tabs
Take two pieces of lining fabric and 2 pieces of faux leather for the handles. Place them in pairs with right sides facing in: one lining piece along with one leather piece. Sew along the sides 12 centimeters long with an allowance of 1.5 centimeters. Turn it right side out, straighten the seams and topstitch along the stitched edges at a distance of approximately 0.5 centimeters from the edge.

Sewing the outside of a leather bag
Fold the pieces for the fabric of the faux leather bag with the right sides inward and stitch along the side edges (30 centimeters long) with an allowance of 1.5 centimeters. Turn it right out.

Set the thread darker than the leather color. Increase the stitch length to the maximum and stitch along both sides of each seam, approximately 1 centimeter apart. This will be decorative stitching on the front of the bag, so be careful and stitch straight.

Turn the fabric inside out and line up the seams so they are centered on the front and back sides. Secure the bottom edges with clamps. Make markings similar to those on the lining.

Set aside 1.5 centimeters from the bottom edge and draw a horizontal line. Then draw two rectangles at each corner. The outer rectangle should be 5 centimeters high and 3 centimeters wide. The inner rectangle should be 3 centimeters high and 2.5 centimeters wide. Draw a diagonal line connecting the two inner corners.
Sew along the marked bottom line, starting and ending at the line of the smaller rectangle. Cut out the inner rectangle and cut along the diagonal line. Save the cut out small pieces of faux leather; we will use them to strengthen the fastener.

Turn the fabric right side out and stitch the seam in the same way as the central one.

Turn it inside out again, turn the corners and sew along the lines, just like on the lining.

Turn the fabric inside out.

Place the handle piece on the top edge of the faux leather bag canvas, with the lining fabric side facing up. The middle of the part should coincide with the middle of the central seam, the edge - with the edge of the fabric. Sew the piece with an allowance of 1 centimeter. Also sew a second tab for the handle on the other side of the bag canvas.

Installing the magnetic clasp
Fold the top edge of the lining around the entire perimeter 1.5 centimeters to the wrong side and iron it.

In the center, where small triangles were previously cut out, under the hem, place small pieces of faux leather that remained from cutting the corners. They must be located exactly in the center. Stitch around the entire perimeter. Mark dots in the center of the stitched rectangles and pierce all layers. Insert the magnetic clasp halves into each facing side of the pad. On the wrong side, put on the stoppers and bend the ends to the sides.

Top edge trim
Insert the lining into the fabric of the faux leather bag, right sides together. Align the magnetic clasps on the lining with the center front and back seams on the leather. Fold the top edge of the leather fabric around the entire perimeter 1.5 centimeters to the wrong side and fasten it to the lining at some distance using clamps.

You might also be interested in:

Good luck to everyone! I think that you’ve already been waiting for me, I promised and I still can’t...
Knitting amigurumi toys is a very exciting activity that both adults enjoy...
Nowadays people have become interested in handicrafts. Many have forgotten what a hook is...

simply necessary in families with small children. Such masks will also come in handy on New Year's...

Christening is an important family and spiritual event. And despite the fact that in my life...

