


The night bird with big eyes is a very fashionable symbol; its images can be found on clothing, accessories, jewelry and even in the interior. Perhaps this popularity is explained by the appearance in 2012 of a clothing collection with the image of an owl, or the world-famous books and films about the young wizard played a role. But be that as it may, the owl is at the peak of fashion, which means you need to create your own collection of knitted owls.
Knitting an owl toy
For kids and adults, a toy in the shape of an owl, knitted with knitting needles, will be an excellent gift. Even novice craftswomen can cope with creating a bird; the main thing is to choose the right pattern. Owl toys are:
- simple, square-shaped;
- more complex, with separately knitted body parts.
You can knit a toy using a different number of knitting needles, it all depends on the pattern and skills of the needlewoman. The knitting should be as tight as possible so that the owl holds its shape and the filling does not come out of the loops.
interesting selection for the site 22 models only for girlsToy height: 21 cm.
You will need: 100 g white, 50 g gray and a little black; 5 knitting needles No. 3.5; hook No. 3.5; 2 buttons for the eyes, synthetic cotton wool for stuffing and an embroidery needle.
Basic pattern, knitting needles No. 3.5: stockinette stitch: knit. rows - persons. loops; purl rows - purl. loops; When knitting in the round, knit only faces. loops.

Knitted toy “Scientist Owl” with knitting needles
For knitting you will need yarn, knitting needles No. 3, padding polyester and cardboard.
Owl pattern with knitting needles, how to knit and patterns
You can decorate almost any knitted product with a pattern in the form of an owl; such a pattern is quite simple to make, if you know how to knit front and back loops and make braids. The owl pattern made with knitting needles is perfect for decoration:
- hats;
- mittens;
- sweaters;
- costume jewelry
You can knit either one large image or a whole string of small owls that form an ornament; the owl figurine is voluminous thanks to the knitting technique. You can choose beads to decorate the eyes, and make tassels for the ears.
Yarn for hand knitting Nako Alaska. Soft, slightly fluffy yarn with camel hair in its composition is suitable for knitting by both adults and children.
Skein weight: 100 g
Thread length: 204 m
Composition: 15% camel hair, 25% wool, 60% acrylic
Manufacturer: Türkiye
Brand: Nako


Mittens with “Owls”. The mittens are knitted from yarn from Troitsk “Simple” (wool blend-200m/100g) white in one fold - the main background. Ornament - “owl” - pure wool - 50g/200m - Vita crown (Germany), sectional dyeing - in two folds. I knitted “Owl” only on the front side of the palm, on the back side there was a simple ornament - small

Hello! My name is Tatyana. I live in Veliky Novgorod. I knit and crochet. I knitted these mittens with owls from Camtex yarn (Argentine wool). I wish all needlewomen easy stitches!!! For a detailed description, see the link. Knitting pattern for mittens:
Owl Mittens – the work of Lyudmila Anisimova

Mittens size: 2 years, palm girth 13 cm, thumb length – 2.5 cm, length from wrist to index finger – 10.5 cm. Yarn Lana Gold Plus blue 100g/140cm – 1 skein, hook of any size, stocking needles No. 4. 1. Dial
Children's mittens knitted with an Owl pattern, master class!
The owl pattern is very beautiful. Many people think that knitting is difficult. I thought so too at first)) It turned out that everything is easy and simple, if at least in principle you can imagine how a simple rope is knitted on knitting needles.
I present to your attention children's mittens with an “owl” pattern. You can also knit adults using their pattern!
Knitted hat and mittens with an owl

Owl family. Hat and mittens for 1-1.5 years. Knitted from Baby Wool yarn - BABY WOOL, skein weight 50 grams, skein length 175 meters in two threads. In terms of consumption, it took 2.5 skeins. Hat description The hat is knitted at 80
The hat has the shape of a square; when put on the head, the corners become like ears. It is knitted on 4 needles without increasing or decreasing. Measure the volume of your head and calculate the number of loops and knit in the round. I knitted an “owl” pattern in the middle. After closing the loops, the crown of the hat is sewn together with a knitted seam along with the inside.

The cold weather is approaching... More and more often there is a desire to wrap yourself in a warm blanket, hugging a purring cat and a mug of warming tea or coffee. I want everything around me to be warm and fuzzy, so why not knit a cover
A hat with a relief image of an owl, knitted, can decorate both women's and children's wardrobes. Triangular ears with tassels will only add charm. The owl hat is knitted with five knitting needles from wool or wool blend yarn. The yarn can be selected as a single color or combined colors, highlighting the owl figurine in a contrasting color.
The owl pattern can be used when knitting children's and adult accessories, such as hats or scarves, snoods and mittens.
We found several models of owl hats with diagrams.
Owl cap pattern
Hat with owls from Tatyana Vladimirova
Hat with a lapel, knitted from ANGORA RAM yarn in two folds. Knitting needles No. 3.

Do you want to knit an original item for a child? Then you have come to the right address! We dedicate this master class to an extremely popular accessory in the coming season - an owl hat, a knitting diagram with a description will help you bring an unusual idea to life! Stylish, bright and warm, a knitted hat is ideal for the cold season.
Owl hat for baby
Ideal for cool autumn! Such a funny, voluminous, brightly colored hat will inevitably attract the attention of others. It is not only beautiful, but also practical - depending on the yarn you choose, it is suitable for the off-season or extreme cold.
We will need:
- yarn (100% medium wool, or at least 50% wool, 50% acrylic) – 1 skein;
- circular sp. No. 5, length 40 cm;
- markers;
- two buttons.
The hat is designed for a head circumference of 44-46 cm.
As a basis, we take the purl stitch with the “Owl” pattern (the diagram is below, read it from right to left). 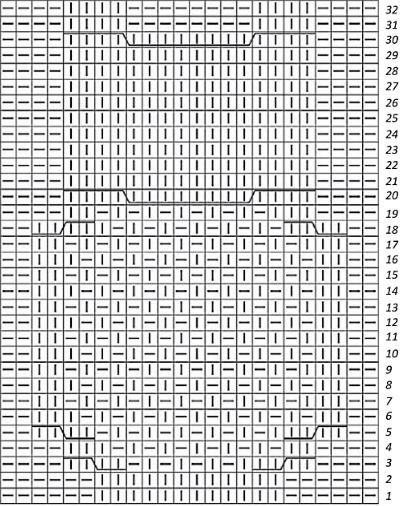
Description
We start knitting with a set of knitting needles 82 sts per crochet. sp., then place a marker at the beginning of the r. and connect them in a circle. Then, 6 cr. – l. p., after – 24 and. p., marker, 24 p. pattern according to diagram, marker, etc. p. until the end of the cr. r..
We continue knitting according to cx. (all 32 rubles), and then - 12 rubles. purl loops. Without closing them, we fold the knitting so that the pattern (owl) is in the center, transfer the loops equally across two stitches, turn the product inside out and close the loops of the additional stitch.
Then we proceed to the “tassels” - we cut the yarn 10 cm long, form tassels and sew them into the corners, sew on button eyes and our Sew buttons like owl eyes. Your exclusive DIY hat is ready!
Owl hat for a newborn
 This hat looks very bright, it is warm and has great stretch! If your baby is born during the cold season, a hat knitted with love will come in handy more than ever.
We will need:
- yarn (100% wool, 135 m. per 50 g.) – 1 skein;
- sp. No. 2.
The product is designed for a circumference of 36 cm.
The edges will be knitted using the puffy rib technique. At first it may seem to you that the product will be small, but this is not at all the case - the hat is suitable even for a two-year-old child!  Description
We cast on with knitting needles 37 sts + 2 cr. p.. Next - according to the instructions.
1st r.: i. p..
2 rubles: remove the cr. p, 2 i.p., then we use knitting needles to make the so-called “braid of 6 loops”: remove 3 sts for additional. sp., next 3 stitches, then - 3 stitches. with additional sp.;
Next is the “elastic band”: 2 and. p., 2l. p., 2 i. p..
– “9-point braid”: 9 l. p..
– “elastic band”: 2 i. p., 2 l. p., 2 i. p.,
- “braid of 6 points”: sn. 3 p. for extra. sp. at work, follow. Knit 3, then knit 3. with additional sp., 3 i. p..
3 p.: according to the drawing.
4 r.: remove with knitting needles. p, 2 i. p.. “Braid of 6 p.”: 6 l. p., “elastic band”: 2 i. p., 2 l. p., 2 i. p., “braid of 9 p.”: sn. 3 p. for extra. sp. before work, next 3 stitches, then 3 stitches. with additional sp., 3 l. p.. Then “rubber band”: 2 and. p., 2 l. p., 2 i. p., “braid of 6 p.”: 6 l. p., 3 i. p.
5 rubles: according to the drawing.
6 rubles: as 2nd rub.
7 rubles: according to the drawing.
8 rubles: remove the cr. p., 2 i. p., "k. from 6 p.”: 6 l. p. “Elastic band”: 2 i. p., 2 l. p., 2 i. p..
"TO. from 9 p.”: 3 l. p., remove 3 p. for extra. sp. at work, follow. Knit 3, then knit 3. with additional sp.. Again “elastic band”: 2 and. p., 2 l. p., 2 i. p.. “K. from 6 p": 6 l. p., 3 i. p..
9 rubles: according to the drawing.
Etc., repeat from the second row. When knitting, we see that the braids are braided one by one.
We make the side parts with a “lush elastic” pattern: we collect 2 stitches in each edge along the edges of the “pattern with braids”. p. to the middle of the strip. In the upper part of the highway, in the 5th last. chrome p. cast on 3 p. in each, then 2x2 elastic band and “lush”: i. n. – purl., faces. p. – l. n. sp. insert into the st next below and pull out a new st, discarding the top one.
To keep the ears closed, you can add 4 cm using the diagram.
Knitted owl hat
 Simple to make, but no less original, this hat is suitable for children from two to ten years old. Ideal for beginner craftswomen.
We will need:
- red yarn (50% polyamide, 25% worsted wool, 25% acrylic, 66 m per 50 g) – 2-3 skeins;
- brown yarn - 1 skein;
- some red yarn for the beak;
- sp. No. 3.5, No. 3 and No. 4;
- hook number 4.
Sizes: a) 2 years, b) 4-6 years, c) 8-10 years.
Knitting is done using stockinette stitch and garter stitch.
Decrease 1 p. from the edge (on sheet of work)
Right: 1 stitch and make 1 simple stitch with knitting needles. (sn. 1 st. l., next st. l.., throw the removed st. onto the knitted st.).
Left: all points except. last 3, do 2 sts. persons and last n. persons
Double decrease l..: n. 1 p.l., knitting 2 next p.vm. persons and transfer the removed st to the received st.
Decrease 1 st from the edge (on the front side of the work).
Right: c. knitting 1 st and make 1 simple knit stitch. (slip 1 stitch, knit the next stitch, transfer the removed stitch to the knitted stitch).
Left: knit all stitches except the last 3, knit 2 stitches together. and the last p. persons.
Double decrease l: remove 1 p. l., 2 next. p. vm l. and transfer the removed st to the received st.
Embroidery with eyelet stitch and chain stitch.
10 cm l.. Ch., sp. No. 4 = 19 p. and 28 r.
10 cm boards. uz, sp. No. 3.5 = 21 p. and 40 r.
Description
Front part: cast on a) 44 sts, b) 46 sts, c) 48 sts on sp. No. 4, red color, working l. gl..
At a height of a) 17 cm (48 r.), b) 18 cm (50 r.), c) 20 cm (58 r.) from the beginning, close all st..
Back: cast on a) 44 p., b) 46 p., c) 48 p. on sp. No. 4, red color, l.. ch..
At a height of a) 17 cm (48 r.), b) 18 cm (50 r.), c) 21 cm (58 r.) from the beginning, close the center. a) 26 p., b) 28 p., c) 30 p., then end. each side separately.
We knit directly on 9 sts on the left, 26 p. high, then close on both sides in each 2 p.: 3 times 1 p. and close the remaining 3 sts. Do the same with 9 sts on the right.
Let's grab the wings. We dial 20 p. on sp. No. 3.5, handkerchief..
At a height of 3 cm (14 p.) from the beginning, close on both sides: 1 time for 1 p., then in each 6 p.: 3 times for 1 p., in each 4 p.: 2 times for 1 p. , in each 2 p.: 1 time for 1 p. and 1 time for 2 p.
At a height of 11 cm (46 r.) from the beginning, closed. the remaining 2 sts. We do the second wing in the same way.
Making a beak: cast on 15 stitches on the sp. No. 3, l. Ch., doing on both sides 1 st from the edge in each 2 rows: 5 times, 1 decrease. We have 5 points left...
1 rub.: 1 l. p., 1 double broach l., 1 l. p.. Then 1 r. and., before closing the remaining 3 sts. Cast on 15 sts on the dial. and work in the same way for the second part of the beak.
Assembly
We make seams on the sides and top of the product, leaving free corners - we will tie them. Next 1 rub. Sc with crochet number 4, around the base. We do the embroidery in gray or black using a loop stitch and a chain stitch on the front part, 4 cm from the bottom. Sew the wings on the side seams, placing them 2 cm from the bottom of the w. and typesetting r. beak to the cap 2.5 cm from the bottom.
Double hat with a pompom with an owl pattern: video master class
Happy knitting and smooth stitches to you!
Women's mittens knitted "Owls"
These knitted mittens are one of the first to be inhabited by “owls”.
Now the owl pattern has become so fashionable that it can be found on any knitted clothing.
Size: female.
Materials: skein of yarn The Fiber Company Canopy Worsted (50% alpaca, 30% merino, 205 viscose, 50 g/182 m), 4 buttons, mittens are knitted with knitting needles, sharp on both sides, 4.0 and 5.0 mm.
Knitting density: 16 p.*23 r. = 10*10 cm in stockinette stitch using large knitting needles.
C4B: remove 2 loops on an additional needle and leave them at work, k2, then knit 2 knits. with an additional knitting needle.
C4F: remove 2 loops on an additional needle and leave them before work, k2, then knit 2 knits. with an additional knitting needle.
C4Bp: remove 2 loops on an additional needle and leave them at work, k2, then knit 2 purl. with an additional knitting needle.
C4Fp: remove 2 loops on an additional needle and leave them before work, k2, then knit 2 purls. with an additional knitting needle.
Knit a loop twice: knit a trace knit/purl loop first. behind the front wall, then face/purl. behind the back - a loop was added.
Decrease to the left: slip 2 stitches onto the right needle, thread the stitches with the left needle from left to right and knit together. behind the back wall.
How to knit mittens with knitting needles:
Cast on 36 stitches using smaller double-sided needles and join into a round.
Knit with rib knit 2, purl 2, knit in the round – 24 rounds.
Switch to large knitting needles.
Rows 1-3: knit stitches.
4th row: k26, p2, k8.
FOR LEFT MILTE ONLY:
1st row: knit 5, knit a loop twice, knit 19, purl 4, knit 7. = 37 p.
2nd row: knit 6, knit a loop twice, knit 18, purl 6, knit 6. = 38 p.
3rd row: knit 7, knit a loop twice, knit 17, purl 8, knit 5. = 39 p.
4th row: k8, knit a loop twice, k16, p10, k4. = 40 p.
5th row: knit 9, knit a loop twice, knit 15, purl 12, knit 3. = 41 p.
Row 6: K10, knit a loop twice, k14, p14, k2. = 42 p.
8th row: k12, knit a loop twice, knit 13, p4, k8, p4, k1. = 44 p.
9th row: k13, knit a loop twice, k13, p4, k8, p4, k1. = 45 p.
10th row: k14, knit a loop twice, knit 13, p4, k8, p4, k1. = 46 p.
11th row: k15, knit a loop twice, knit 13, p4, k8, p4, k1. = 47 p.
Row 12: K16, knit stitch twice, k13, p4, C4B, C4F, p4, k1. = 48 p.
15th row (thumb): K18, move next. 12 loops per extra knitting needle (do not knit them), k1, p4, k8, p4, k1. = 36 p.
FOR RIGHT MILT ONLY:
Row 1: K11, knit a loop twice, k13, p4, k7. = 37 p.
2nd row: k11, knit a loop twice, k13, p6, k6. = 38 p.
3rd row: knit 11, knit stitch twice, knit 13, purl 8, knit 5. = 39 p.
4th row: k11, knit a loop twice, k13, p10, k4. = 40 p.
Row 5: K11, knit a loop twice, k13, p12, k3. = 41 p.
Row 6: K11, knit a loop twice, k13, p14, k2. = 42 p.
Row 7: K11, knit a loop twice, k13, p16, k1. = 43 p.
Row 8: K11, knit a loop twice, k14, p4, k8, p4, k1. = 44 p.
Row 9: K11, knit a loop twice, k15, p4, k8, p4, k1. = 45 p.
10th row: k11, knit a loop twice, knit 16, p4, k8, p4, k1. = 46 p.
Row 11: K11, knit a loop twice, k17, p4, k8, p4, k1. = 47 p.
Row 12: K11, knit stitch twice, k17, p4, C4B, C4F, p4, k1. = 48 p.
Rows 13 and 14: k31, p4, k8, p4, k1.
15th row (thumb): transfer the trace. 12 loops per extra knitting needle (do not knit them), k19, p4, k8, p4, k1. = 36 p.
FOR BOTH MITTENS:
Rows 16-22: k19, p4, k8, p4, k1.
Row 23: K19, p4, C4B, C4F, p4, k1.
Rows 24-27: k19, p4, k8, p4, k1.
Row 28: K19, P4, C4Bp, C4Fp, P4, K1.
Row 29: k19, p4, k2, p4, k2, p4, k1.
Row 30: k19, purl 4, purl 2 together, purl the loop twice, purl 1, purl the loop twice, purl 1, decrease to the left, purl 4, knit 1.
Rows 31-39: k19, purl 16, k1.
Next we perform decreases for the fingers:
Row 40: decrease to the left, k14, k2tog, decrease to the left, purl 14, k2tog. = 32 p.
41st row: decrease to the left, k12, k2tog, decrease to the left, purl 12, k2tog. = 28 p.
Row 42: decrease to the left, k10, k2tog, decrease to the left, purl 10, k2tog. = 24 p.
Row 43: decrease to the left, k8, k2tog, decrease to the left, purl 8, k2tog. = 20 p.
Row 44: decrease to the left, knit 6, k2tog, decrease to the left, purl 6, k2tog. = 16 p.
Row 45: decrease to the left, k4, k2tog, decrease to the left, purl 4, k2tog. = 12 p.
Row 46: decrease to the left, k2, k2tog, decrease to the left, purl 2, k2tog. = 8 p.
47th row: decrease to the left, k2 together, decrease to the left, k2 together. = 4 p.
Trim the yarn, pull it through the last 4 stitches, pull tight and fasten.
Thumb: distribute 12 reserved thumb stitches onto 3 large double-sided needles, pick up 2 stitches = 14 sts. knit in the round
1st row: faces. p.
2nd row: k10, k2tog, k2tog. = 12 p.
Knit 9 rows with knit stitches.
Next we perform decreases for the thumb:
1st row: k2 together. – around = 6 p.
2nd row: knit 2 together. – around = 3 p.
Trim the yarn, pull it through the last 3 stitches, pull tight and fasten.
Sew buttons in place of the eyes according to the pattern.


Children's mittens with an "Owl" pattern.
March 27th, 2013 admin

Children's mittens with pattern " Owls"knitted with wool yarn.
Mittens size
: 1.5 - 2.5 years (hand girth -14 cm, hand height -10 cm).Will be required:
- Gray yarn (I knitted from Alize Cashmere yarn, 100% wool, 100 g/300m);
- Auxiliary thread;
- Knitting needles No. 2.5 and No. 3 (5 pieces each);
- "Iris" threads for embroidering eyes and beak (black and pink);
- Thick needle for stitching;
- Hook.
Pattern: When knitting mittens, the “Owl” pattern is used. Description of it
Set of loops and knitting elastic.
Cast on 21 stitches on two needles No. 2.5 with an auxiliary thread. Close the knitting in a circle, swapping the first and last loops. Change the thread to the main thread (gray).
Row 1: *Knit 1, yarn over*, repeat from * to * until the end of the round (40 sts on needles).
Row 2: Remove the knit stitches without knitting, the thread is BEHIND the work, and knit the yarn overs with purl loops.
Row 3: Knit the knit stitches with the knit stitches, and remove the purl stitches without knitting, the thread being located BEFORE the work.
Row 4: Purl the knit stitches, remove the knit stitches without knitting, thread BEHIND the work. Casting on stitches this way produces a beautiful, elastic cast-on edge.


The auxiliary thread can be carefully removed.

Knitting the main part.
The first 6 circular rows are knitted like this:
22 knit, 16 purl, 2 knit.

The outer side of the mitten.
From the seventh row, start knitting the “Owl” pattern on 16 middle loops, where the purl loops are. Knit the remaining stitches.
Description of the pattern " Owl" for circular rows (knitting on 16 loops):
Row 1: P4, K8, P4;
2nd row: purl 4, remove 2 stitches for additional stitches. knitting needle at work, knit 2 knits, then knit 2 knits. with additional knitting needles, remove 2 loops for extra. knitting needle before work, knit 2 knits, then knit 2 loops with extra. knitting needles, purl 4;
Rows 3, 4, 5, 6, 7, 8, 9: p4, k8, p4;
10th row: knit as 2nd row;
Rows 11, 12, 13: P4, K8, P4;
Row 14: knit as row 2;
Row 15: P4, k2, p4, k2, p4;
Purl all the next rows on 16 loops.

When 12 rows of elastic are knitted, you need to set aside 7 thumb loops. Knit a row in this way: knit 2, slip 7 loops onto a contrasting thread or onto a pin, cast on 7 loops from the main thread again, and then continue knitting according to the pattern.
For the right mittens remove the loops on the right, stepping back 2 loops from the edge, and for the left - on the left, also stepping back 2 loops from the edge.

For the left mitten
Knit another 12 rows according to the pattern. Start decreasing stitches.
You need to knit 2 knit stitches together at the beginning of the 1st knitting needle, then at the end of the 2nd knitting needle, again at the beginning of the 3rd knitting needle and at the end of the 4th knitting needle. Continue decreasing stitches in this way until 1 stitch remains on each needle. In total, 4 loops are decreased in each row.
Slip the remaining 4 loops onto the thread and pull them off. Hide the end of the thread inside the mitten.
If you like to do handicrafts, namely knitting, then read the article on how you can knit mittens, mittens, and scratches of various designs for children.
In the cold winter season, children cannot do without warm mittens. Kids love outdoor games: throwing snowballs or making a snow woman. Sometimes it happens that a child doesn’t even have enough two pairs of mittens for one walk because they get wet to the thread.
Buying mittens is not a problem now, but it is much more pleasant if a caring craftswoman mother knits warm, beautiful mittens for her beloved child herself. However, not all mothers know how to tie them. More on this below.
How to knit warm double mittens for boys and girls from 1 to 11 years old?
Double mittens will keep your little ones' hands warm even in severe frosts.
In order to link them, you will need:
- Knitting needles - 5 pieces
- Threads for the product
- Pins - 2 pieces
- Hook

Work progress:
- Decide on . To do this, measure the widest point on your hand (near the thumb).
- Dial a certain amount loops. Distribute them evenly on the knitting needles for knitting socks, and use the heel to knit the elastic in the round.
- Way knitting elastic bands choose according to your taste: two loops - knit, two - purl, or one - purl, one - front, etc.
- Height of the elastic band You can also knit whatever you want: 3-6 cm. It all depends on how long the mitten you want to make.
- Next, proceed to the main drawing of the product. And where the thumb will be leave the loops on the pin, without knitting.
- Make a small hole for your finger. After knit mitten straight to the tip of the little finger.
- Then start remove loops on both sides evenly to form the top in the form of an isosceles triangle.
- Tie using knitting needles, crochet separately thumb.
- Crochet dial on the elastic band of the finished mitten loops for internal parts products.
- Place the stitches on four needles and tie the same twin mitten, which you will then tuck inside the mitten.
- According to the same description tie And second glove.
How to knit owl mittens for girls: diagram with description
Knit mittens with a pattern Owl Beginner needlewomen can do it too. The main thing is to master the technique of knitting the mittens themselves on circular knitting needles. And creating a pattern is not difficult if you follow the pattern.

Gray mittens for girls with a pattern - Owl
So, to get these mittens, do the following:
- Dial certain number of loops, distribute their four-spoke.
- Fifth spoke knit an elastic band(first row: two loops - facial, two — purl, second row and all subsequent ones: according to the picture).
- Knit with an elastic band 25-30 rows. On the front of the mitten start knitting a pattern, as in the diagram below. Where: × - means cross the loops; – front loop; ǀ — purl loop.
- Make the owl's eyes from beads or buttons.

Knitting pattern - Owl
IMPORTANT: When knitting, try to keep the loops the same size.
How to knit mittens with braids for girls?
Stylish pattern braids will decorate the girl’s mittens and make them more voluminous. And if you line these mittens with beads, your little one will feel like a princess.

Delicate white mittens with braids
- For a simple braid you should use twelve loops.
- First three knit purl stitch, then six knit stitches And purl three.
- Knit the next row according to the pattern, until the stitches cross. knit six rows.
- The image below shows how to cross the loops to create a braid.
- For this three loops of the right harness move on pin or extra knitting needle. Afterwards knit knit three loops left tourniquet.
- Then knit three facials from the pin And knit remaining purl loops.

How to knit braids yourself?
How to knit mittens with an ornament for girls and boys: pattern diagram with description
For older children, mittens with bright patterns are good. Moreover, you can combine mittens with different tones of threads. Use two, three, four shades of yarn to create a fancy pattern. There are many patterns for knitting these patterns online. We will consider norwegian ornament.

- It is not at all difficult to connect such a star. It is enough to cross the threads on the back of the mittens and not confuse where to knit white and where to knit red.
- Warp fits(in satin stitch) white yarn. A star — red threads.
- To create an ornament you need to calculate repeat of 23 loops in the center of the front side of the mitten so that the pattern is beautifully located on the product.
- First tie an elastic band.
- And then knit according to the pattern, as in the image below.

Knitting pattern for mittens with a pattern for children
How to knit fingerless mittens with knitting needles for a girl and a boy: description
Mitts for a child are easier to knit than mittens. Such products are just perfect for mothers who are just starting to master the knitting process.

How to knit mittens without fingers?
- Decide on the size of the product. To do this, measure three sizes: hand circumference at the thumb, distance to the base of the finger and distance to the base of the other four fingers.
- Cast on ten stitches and knit a row or two to find out how many stitches there are per 1 cm.
- Next, based on the data obtained, cast on a certain number of loops for the mitts on circular knitting needles, tie regular elastic band(2 purl loops, 2 knit stitches).
- Then choose the pattern you like, knit according to the pattern to the place where the thumb will be. Leave a few loops on a pin.
- Knit several rows and make a hole for it.
- Tie the top mitt and edge decorate with an elastic band.
- At the end, tie the thumb only without the top.
Transformable mittens with folding top knitting for girls and boys: diagram with description
The mitts are convenient because the fingers are free and nothing hinders their movement at all. However, in severe frosts, you also need to hide your fingers so that they do not freeze. For this, resourceful needlewomen came up with transformable mittens.

The sequence of knitting them is almost the same as for mitts. You just have to knit one more piece - the top.
How to knit the top part of the transformers mittens?
- Start with an elastic band. Knit two centimeters in the usual pattern: two knit stitches, two purl stitches.
- Tie top part any pattern you like to match the main one.
- Top smoothly round, gradually reducing the number of loops in the row.
- Sew on the top of the mittens mitts to the elastic band.
Knitted mittens for newborns: description
Mittens for newborns are knitted quickly, because the baby still has very small hands, and there is no need to knit the thumb. Because putting mittens knitted with thick threads on your finger will be problematic. The baby will not like the discomfort.

How to knit mittens for babies?
- Dial 28 loops on circular knitting needles. Tie three rows with knit stitches.
- Then knit six to seven rows rubber band.
- Then continue to knit row after row, without changing the number of loops, all the time with facial loops. Until you knit the product to the tip of the little finger of the crumb.
- After which you can gradually decrease the loops so that the mittens are round in shape.
- Decorate mittens are possible applique, embroidery. Down insert tape so that the mittens do not fall off tiny hands.

Video: Knitted scratching mittens for newborns with description
Knitted mouse mittens made from grass for kids: diagram with description
These cute mittens should be knitted using two types of yarn. Use grass for the back of the hedgehog, and regular blue yarn for the main part.

Work progress:
- Tie ordinary mittens on knitting needles of the required size
- Separately knit from grass knitting needles rectangle
- Sew him to the mitten
- With black threads embroider the mouse's eyes, And spout
Knitted hedgehog mittens made from grass for kids: description
For these children's mittens, choose threads in gray tones. For the base - regular yarn, for the spines - gray grass. Decorate the hedgehog's eyes in the form of buttons or beads, and instead of the nose, sew a black bead.

Work progress:
- Tie from dark threads mittens on circular knitting needles
- Crochet dial on the back of a hedgehog loops And move their on the knitting needles
- Knit regular knit needles until you have tied the entire back
- Close the loops And sew the edges.
How to knit children's mittens with cones for a girl aged 1 - 11 years: diagram, description
If you like voluminous patterns, you can knit these mittens with cones. To do this, take 100 grams of yarn, knitting needles, a hook and start the process.

How to knit mittens yourself with knitting needles with a pattern - cones
Work progress:
- First, cast on the loops, knit the usual one for mittens.
- Main drawing do it according to the plan as below in the picture.
- Having reached the base of the thumb, leave the loops on the pin and continue knitting to the end.
- After which reduce the number of loops on both sides to form a triangle at the top of the mitten.
- Knit the finger using satin stitch.

Pattern diagram and description of the knitting sequence - Cones
How to knit Minions mittens with knitting needles for a boy aged 1 - 11 years?
For these fun Minion mittens, prepare bright yellow yarn and black and blue threads. Also, to knit large glasses, take white or gray yarn. Make the eyes from black buttons.

DIY mittens – Minions
All that remains is to knit the combined mittens with an elastic band and make glasses. Then sew them to the mittens.
Two-color knitted mittens for girls and boys: diagram with description
If you have bright yarn of two colors, then you can knit beautiful mittens for your baby by combining them in the same way as in the picture below.

Knitted mittens for babies - two-color

How to knit baby kitten mittens with knitting needles: diagram, description
We invite you to knit cheerful, striped kittens in the form of mittens. For these mittens, prepare:
- Light gray threads, dark yarn
- Knitting needles
- Pin, scissors

Cute baby mittens - kittens
Work progress:
- Dark yarn tie an elastic band for mittens
- Next, knit two rows of light threads
- Knit dark yarn two rows
- Leave loops For thumb on a pin
- Knit the mitten further along the pattern until you reach the kitten's head
- head do in light colors
- When you start closing the loops, leave place for ears
- Make them from dark threads
- At the end embroider threads eyes, antennae, nose
How to knit baby chanterelle mittens with knitting needles: diagram, description
- These are the red foxes that can be made from 80 grams of orange yarn.
- For the nose you will need very little white thread. We knit the ears like we did the thumb (only in smaller sizes), after we finish with the main part of the mitten.
- Embroider the eyes and nose with black thread. . Sew the paws separately, after crocheting them with red threads.
- White yarn, and red, black, green, gray threads
- Knitting needles, scissors, hook
How to knit children's mittens with bullfinches: diagram, description
Any mother can knit very beautiful bright mittens with white bells for her child. All you need is patience and time and prepare the material for the mittens.
You will need:

White mittens with patch – Bullfinches
Work progress:
- Using white threads, start knitting with an elastic band
- Then move on to the main part of the mitten
- Tie a bullfinch on the outer half, as in the diagram below
- Knit a mitten and don’t forget to make a place for your thumb
- Then finish your work

What mittens to knit for a teenage girl and boy with knitting needles
For young men, it is better to knit mittens with ornaments or without any patterns at all. For girls, you can choose many options for mittens: openwork knitted, with a voluminous pattern, bright patterns, appliqués, etc. You can see patterns and useful tips on knitting
You might also be interested in:
In cold weather, needlewomen and creative people intensify their desire to create...

Goal: to develop perception of the surrounding world. We develop the ability to hold your gaze on...

AT AN APPOINTMENT WITH A NEUROLOGIST from 1 to 12 months Quite often, young parents are not completely...

Any woman knows: morning nausea, dizziness and missed periods are the first signs...

The process of making clothes is fascinating, and each of us can find a lot in it...

