


The eternal beauty of shibori
This method of coloring fabrics is for those who consider themselves to be no longer artists! The fabric is wrinkled, twisted, tied with various strands, and then immersed in paint. It dries, straightens, and you can gasp in surprise - how beautiful! A piece of thin fabric is like a field for experimentation. The results are impossible to predict, but they are invariably beautiful. Moreover, it’s not difficult at all, it’s easier than ever. You can create clothes - scarves, stoles, T-shirts, T-shirts, skirts. And all kinds of things for your home - curtains, tablecloths, panels, cushion covers.

Half an hour of great pleasure, several hours of waiting, and a sea of joy from man-made beauty! The most important thing in this matter is not to stain everything around with paint. Therefore, it is best to create in nature in the summer so that annoying splashes do not spoil the holiday. This is the most difficult thing, the rest will certainly work out!
Ingredients for batik shibori
Well, if you're interested, then let's go! We purchase all the necessary components for batik shibori. We actually need textile. It should be light, plain and clean. All types of fine cotton and silk fabrics are suitable. They are the easiest to crumple. Synthetics are unpredictable in their behavior, I can’t answer for them. And dense fabric is difficult to deform, and delicate colors do not look very good on it.
Next we prepare threads and ropes, of course, natural. After all, they will absorb some of the paint, creating a pattern on the fabric. Dyes for each type of fabric - its own. The cheapest aniline dyes are powdered; you need to add a little vinegar to them. But this is a nineteenth-century technology, because the product then needs to be cooked for a long time and tediously in a saucepan, and breathe in vinegar fumes. A little more expensive and a great place to start is “gamma” for fabric. It attaches wonderfully with an iron. And you can use the microwave - a couple of minutes and you're done.


Please note - this is acrylic, not aniline. Buy the freshest paints. If the expiration date is running out, the color will wash off from the fabric, no matter how much you take care of it! And don't buy Decola for shibori. If you want very high-quality paint, then this is, of course, “Yavana”. And “Gamma” is best suited for the first experiments.
Large ones needed flute brushes or foam sponges for applying paint. Have you forgotten that when working with acrylic, brushes need to be washed immediately in order to keep them in working condition? Cooking capacity, where your happiness will be stored while painting. An ordinary plastic bottle is very suitable for this if you cut off its wall.
Pattern schemes and painting
Now all the simple devices are there, you can start. If we create in the house, we cover the entire table with oilcloth. A piece of fabric, washed and dried, moisturize with water from a spray bottle evenly. The fabric must be just damp, not damp or dry, so that the paint is distributed evenly. Now take a thread and a needle and flashing small stitches in any direction, or according to the pattern. Then we tighten the threads to form folds, and we tie the already assembled fabric with ropes. In the photo below there are several schemes that you can try:


You see many proven schemes in front of you. Choose one of them and get to work. First we sew it with threads, then we pull it together and twist it. We place the twisted fabric in a form for painting. Pour the paint into a container, dilute it with water to the desired shade of lightness, and apply it evenly onto a damp cloth with a flute or foam rubber. Hands, of course, are gloved, unless you plan to master painting leather at the same time.


This sequence must always be followed: we go from the lightest color to the darkest. There is no need to use more than three colors at a time - there is a high probability of getting a too “dirty” shade. Wash your brushes immediately after use. Leave the fabric to dry at natural temperature for a day. You can “salt” the work, that is, sprinkle it with coarse salt to create an even more interesting effect. For one day we forget the nagging desire to unfold it and see what happens there! There is no need to do this, because the paint will simply spread wherever it wants, and the whole work will be ruined. After a day, unroll the fabric. If the fabric is still a little damp, carefully straighten it and let's finish drying already deployed.

Then we fix the resulting pattern. To do this, we lay an old soft sheet or old newspapers on top and bottom (so that the printing ink does not imprint on the fabric), and iron it. First with steam, then dry, cotton in the cotton mode, silk in the delicate mode. If you bought paints that were not iron-on, you need to soak them in hot steam.
We build a water bath. Wrap the fabric, not yet unrolled, in soft paper, which will absorb excess paint, secure with threads above the water, and let the water boil, turning the tourniquet to ensure uniform fixation. Or place it in a plastic container with a little water at the bottom. And put it in the microwave, turn it on for a few minutes, take it out, iron it. Amazing things can be created if you choose colors with taste. In the photo below are masterpieces of knotted batik:


There are many more ways. You can tie various beads into the fabric. You will get “suns”.


Features of the shibori-spiral technique
Another very beautiful technique - shibori spiral, You can also try. Very fast technique, so the fabric is clean and damp. Spread it on the table and straighten it out. Place any round stick like a pencil in the center. Press firmly and twist the fabric onto the pencil in a spiral. When the entire flap has been wound, we secure it with threads. In this case, you can use nylon ones so that the paint floats under them. We take out the pencil - here you have a blank. Then we tighten our roll with threads.


And we paint it in the way described above. We try to choose a harmonious color scheme. Tormented by curiosity, we leave our treasure for a day. Then we process it as usual: with an iron or steam, depending on the type of paint. When you feel comfortable with this technique, you can complement it with the cold batik method. Then things will become even more mysterious.
I can talk endlessly. The main thing has already been said, the horizons have been opened. Before you is a huge field for creativity; with the help of batik shibori, transform your wardrobe and interior. And not only yours, go for it! Transform the world with beauty.
Shibori (shibori, Japanese batik) is working with fabric before dyeing. From the Japanese verb "shiboru" - to twist, compress, squeeze. In Japan, this technique has a long history and has found a response all over the world: in Africa, China, Europe, India, Indonesia and many others.
Initially, the ancient Japanese used pegs for work. Fabric was pulled over them, tightly wrapped with thread, and then dyed.
Shibori in ancient Japan
In ancient Japan, the shibori technique adorned the emperor's robes and the costumes of his subjects. Later, clothes made using this technique became available to other segments of the population, but they were made from cotton and hemp, and silk remained a privilege of the upper class.
Shibori is coloring
Speaking about shibori, it must be emphasized that here we are talking about coloring. When painting, unlike painting from a sketch, the final result often remains a mystery until the last moment. When dyeing, you can get a pattern that resembles an ornament rather than clearly defined forms as in painting.
Types of Shibori
Shibori has a huge number of varieties and now we will talk about how to make work using the shibori technique.

Knot technique
This technique has become widespread and we will talk about it in a separate article dedicated to knotted batik.
Quilting technique (Nui shibori)
The principle of this technique is to lay basting stitches (needle forward), and then pull these seams together until tight folds form. Seams can intersect and form complex patterns, and the material can be stitched in one or two folds or laid in identical folds. In addition, the stitches affect the pattern - the shorter and tighter they are (for example, machine stitching), the smoother and clearer the uncolored line will be on the finished work.
After laying the stitches and tightening, work with the dye begins. The workpiece is immersed in paint, but it does not penetrate into those areas where the seams pass and dense folds have formed.
Types of patterns in shibori quilting technique
Thus, parallel stitches create a pattern reminiscent of tree bark (mokume shibori).
Using templates also helps create patterns. For example, using semicircular templates you can create a “Japanese lark” (kuramatsu shibori) pattern. This pattern consists of circles arranged in a checkerboard pattern, or of wavy lines, which are obtained by moving a semicircle on one side of the folded fabric.
The ori nui shibori pattern is formed by basting stitches placed at a short distance from the fold during double folding.
The maki nui shibori pattern is formed according to the same principle as the previous one, but the seam is looped (over the edge).
All quilting techniques can be combined with knotting. You can see examples of this technique in the following photos:


Arashi shibori
In this technique, matter is wrapped around a cylindrical tube. It can be wrapped randomly with uneven folds, and the main principle here is improvisation. After which it is fixed with a tourniquet or threads and then painted. The rope or threads can also be wound in any direction.
Arashi shibori with diagonal stripes
You can also create a pattern with diagonal stripes. To do this, narrow strips approximately 20 cm wide are wound onto the tube in a spiral without overlap, and the rope is wound horizontally at equal intervals in the opposite direction.
An acute angle is formed between the direction of the grain of the cut material and the strand, which is why diagonal stripes are obtained. The width of the folds will be equal to the distance between the turns. After the strand is wound to a height of 10 cm, the fabric is pulled down, as if pressing, to fix the folds. If necessary, tighten the tourniquet so that the tension does not weaken. The tourniquet is wound in this way along its entire length.


Arashi shibori with horizontal stripes
Horizontal stripes can be created in the same way, the main difference will be in the method of winding the rope. For horizontal stripes, the direction of the grain or weft thread should be parallel to the tube, and the strand will run perpendicularly. The cut can even be sewn along the long side. Batik shibori arashi can be combined with quilting techniques.
Folding and securing with clips (Itajime shibori)
Initially, the dyed cloth or silk was folded in several layers in a certain way. For example, in the shape of a square, triangle or rectangle. Then it was clamped between two wooden blocks with special notches for a fastening thread, and then painted.
The shapes of the boards determined the pattern, and the compression force influenced the degree of paint penetration.
These days, templates and paper clips are used instead of wooden boards.


Corrugating and tying (Tesuji shibori)
This is another Japanese technique called shibori, a special way of dyeing. The folds are laid to form an accordion. Then it is wrapped with cord or thread, maintaining the interval between turns and tension. After wrapping, the workpiece is painted.


Single-color and multi-color dyeing
The art of shibori is dyeing using a special method, which most often involves immersion in a dye solution. With this method, coloring can be single-color or multi-color.
Of course, the method of tying affects how the multi-color dyeing will be done. So, for example, in the knotted batik technique, each knot can be painted in different colors, and in the arashi and tesuji shibori technique, the coloring will be more uniform, since the areas to be painted are not isolated from each other.
As for the color scheme, it is better to choose a harmonious one, since the shibori technique assumes that colors can be mixed. You should also take into account that a large number of colors can lead to the formation of “dirty” color spots.

Experimental shibori techniques
When working in the shibori technique, you can use not only known techniques, but also experiment. Very interesting results can be obtained using polypropylene mesh, which is usually used for packaging fruits or vegetables.
To achieve a marble effect, a piece of silk is placed inside the mesh, pulled tightly, and then dyed. The main thing is to make sure that the mesh really tightens the silk, otherwise the dyeing will be continuous.
Where is Shibori used?
Today, the Shibori style is widely used in clothing production. Leading designers often use in their collections either fabrics dyed using the shibori technique or a print reminiscent of a pattern characteristic of this technique. Japanese batik is often used in the interior for wall panels, curtains, tablecloths and napkins. You can also find examples of patchwork sewing where this technique is actively used.
It is also perfect for beginners, because... Making shibori with your own hands is not at all difficult. To do this, you don’t need to be able to draw; you just need to practice a few times and you can get an excellent result.
Master class: making ribbons using the shibori technique with your own hands. Recently, the ability to make something with your own hands has become increasingly popular. And this is not surprising. After all, what else can surprise our largely sophisticated consumer if not with beautiful handmade crafts. Today, the shibori felting technique is especially popular.
The shibori felting technique allows you to create original fabric products. Shibori fabric strips are dyed using the batik technique. The painting scheme is quite simple. Even an inexperienced needlewoman can easily master the batik technique. Products made from shibori strips are very popular; creative and leisure centers often host workshops on felting and dyeing long pieces of fabric, from which colored shibori strips are then made.
Fabric products dyed by experienced craftsmen using the batik technique are unique: each shibori ribbon has its own unique color. This is due to the fact that before dyeing the fabric using the batik technique, craftsmen tie and twist the material in a variety of ways. As a result, the color of the fabric is heterogeneous and quite variegated.
Corrugated pieces of fabric dyed using the batik technique can be purchased at specialized craft stores. But you can also make them yourself from ordinary silk ribbons. The batik technique is well suited for dyeing fabric at home.. An experienced craftsman can easily cope with the work, and before making it, novice needlewomen are recommended to hone the technique of dyeing fabric on small scraps of those that lie idle in a craft box.
In order to better understand the basic principle, methods and techniques of making shibori ribbons from silk pieces of fabric of various lengths, beginning craftswomen are recommended to attend a master class on working with fabric. Experienced craftsmen will be happy to share their secrets. If you cannot attend the master class in person, you can watch the training video.
In order to make shibori jewelry yourself from scrap materials, a novice master will need:

Having prepared everything necessary, the master can begin to work. Experienced needlewomen can immediately begin coloring pre-prepared strips. Masters who are still comfortable with batik should first practice on simple scraps.
Gallery: ribbons using the shibori technique (25 photos)


DIY shibori master class: general description of the process
 First of all, you need to take a pre-prepared piece of corrugated silk fabric and lightly wet it. After this, the piece of fabric to be dyed is folded into a screw or spiral and then wound around a wide stick made of plastic or wood. Attention: it is strictly forbidden to use a metal stick to dye fabric., because the metal, interacting with water and dye, oxidizes. The desired color will not come out and the work will be ruined.
The shibori ribbon itself is already colored, so The needlewoman’s task is to make sure that only the edge of her fold is painted. In this case, the original color of the ribbon and the desired color must be in harmony with each other, only in this case the finished product will look beautiful. To ensure that only the edges on the folds are painted, and the color of the tape itself remains unchanged, it is recommended to use a sponge or a wide paint brush.
After the colored piece of corrugated silk has been dyed to the end, it remains hanging on the stick. In order not to splatter the paint while the tape is still wet, the stick can be left above the basin in which the painting took place. Attention: there should be no direct sunlight or electric heaters near the painted tapes that are drying.
When the piece of fabric is completely dry, you need to iron it along the fold lines. Then, using old newspaper, the tape is rolled into a tight roll and sealed in plastic wrap. To finally fix the paint, the finished roll is sent to a water bath for an hour and a half. The final stage is to iron the tape along the folds one last time.. Now you can make original crafts from these ribbons.
 In order for shibori ribbons made by yourself to last a long time, and for crafts made from them to please the eyes of others, the following practical recommendations must be observed:
- To prevent the edges of the finished tape from fraying, before using the tape you need to scorch its edges over a fire using a lighter.
- The more you twist the tape before painting, the more colorful and original the coloring will be.
- In order for shibori ribbons to please the eye for a long time, they must be stored in airtight packaging. After the silk ribbon craft is ready, the remaining material must be packed again and stored in a dark place. If you store them without packaging, the ribbons will quickly fade and lose their beautiful appearance.
- If a novice craftswoman does not know the batik technique, or if for some reason it is impossible to properly organize the dyeing process at home, it is better to use ready-made shibori ribbons to make crafts. They are freely sold in art and craft stores.
- Dyeing ribbons is not the best option for children's creativity, because working with dyes can provoke allergic reactions.
Products made from shibori ribbons have recently become very popular. From variegated, originally colored ribbons, you can make original flowers, earrings, and decorative panels. Making shibori ribbons with your own hands is very simple, the main thing is patience and desire. Products made from these silk ribbons will serve as an original gift. Dyeing corrugated silk ribbons at home will help develop artistic taste and creativity. This is a beautiful and relatively simple type of needlework.
Fabric paintingKnotted batik (aka shibori, aka tie-dye) as the most beautiful way to get dirty :))
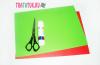
We will need: fabric (preferably natural silk or thin cotton), paints for silk (described in more detail below), a brush or cotton swab, or a syringe for applying paint, threads, elastic bands, auxiliary containers (to dry, for water, for paint, etc.) etc.), and means of high-speed cleaning and protection (napkins, oilcloths, etc.)
At the end of the process, of course, an iron, and, if the paints are fixed with steam, a tank-paper-thread-plate. But more on that later.
First of all, wash the fabric (here the silk is cream-colored).
And prepare the work surface.
We protect the table with oilcloth, or use improvised means. I cut the bottles lengthwise. I will paint them and dry them.
Very convenient, by the way. It takes a long time to dry, if you need to move it from place to place around the house, it’s easy to do, and also, if it were a conventional tray, it can’t be placed everywhere, and narrow bottles can’t be placed on any windowsill or shelf.
Then you need to fold or knit the fabric.
I have four pieces approximately 50*50 cm.
The first one is folded simply “in half and in half and in half”, and tied with threads (second from the left in the photo).
The second one is tied with knots from the corner (third from the left in the photo)
The third one is knitted like this - folded a little obliquely, wrapped around a tin can, which is wrapped in a plastic bag, and on top, elastic bands are stretched quite tightly, but you can also use threads, you can use laces - experiments are everything.
The fourth (first on the left in the photo) is tied with knots - knots in the corners and one knot from the middle of the scarf.

The paint will not penetrate into the folds, under tight elastic threads, and you will get chic, unpredictable patterns.
And by folding you can roughly “position” these patterns in the desired direction.
In one MK they advised to wipe the rope with a candle before tying it - this is logical, since the fabric will not stain under such a rope, but sometimes a tightly tied thread is enough.
After the silk is knitted, soak it in water (completely) and wring it out.
And we begin coloring.
First scarf.
Dyes for steaming. The paint is quite concentrated, I dilute it a little with water.
The first "layer" is yellow. 
The second one is orange. 
The third one is brown. 
Second scarf.
The dyes are the same.
First yellow, then a little green. 

Third scarf.
First yellow-green, then turquoise, blue. 

Fourth scarf.
Dyes that are fixed with an iron.
If you apply such paint very thickly, and without diluting it with water, the fabric will have unpleasant “seals”, and, as a rule, it will be sharply darker or more saturated in color. 

The first "layer" is beige, and the second is brown.
WE ALWAYS PAIN IN THE SUCH SEQUENCE: first a lighter color, later, on a smaller surface, darker colors. 
Now add salt. Whether with a salt shaker or a pinch, there shouldn’t be too much of it. 
And without unwrapping, leave it for about a day until it dries completely. 
If the fabric is a little dry, unroll it, hang it by the corners and let it dry in its unfolded form. If you unroll the fabric while it is still wet, the paint may spread and all the beauty will float away.
Iron it with an iron. 
For fixing paints that are fixed with an iron (fourth scarf), this is quite enough. Iron fairly thoroughly and can be washed (hand wash in warm water without bleaches, and do not rub too hard)
To smooth out small wrinkles after washing, iron the scarf while the fabric is still damp. 
As for paints that are fixed with steam.
Of course, you can experiment - do not wash, or wash without fixing (something will remain), but it is best to fix over steam.

And this is what ended up happening:
First scarf: 
Second scarf: 
Third scarf: 
Fourth scarf. 
Compare the patterns obtained with different dyes. With heat-set ones (for ironing) - smaller, marbled, the salt effect is more noticeable, although the knots were the same size, and so was the fabric.
With active dyes (which are fixed with steam) - smooth color transitions, the paint flows better where the ropes are tied.
Well here they are:
Now you can enjoy not only the process, but also the result.
There are many handicraft techniques, having mastered which, we acquire skills that allow us to expand the boundaries of our knowledge about fabrics, outfits, the history of costume and other wonderful things. The history of batik goes back more than one thousand years, and it must be said that having mastered this art, you can not only become the owner of the most original things that you can wear and give as a gift.
Among the many styles of batik, shibori (or the more familiar ear, although somewhat erroneous - shibori) stands out especially. It was invented by the Japanese, whose art of working with textiles is well known.
It is believed that batik came to Japan much later than, for example, to China, but despite this, it was the Japanese who managed to so perfect this technique of applying designs to fabric.
The first method was called "rokechi" - waxing. Melted wax was applied to the fabric in the form of a pattern, and after that the fabric was dyed. All areas that were protected with wax remained unpainted. The second method was called "Kyokechi", which meant folding dyeing. This was one of the options for coloring fabrics using stencils. And the third method was called “kokechi” and it was this method that became a kind of prototype of shibori. Areas of fabric that were to remain undyed were protected by tying or wrapping with thread. This method of dyeing fabrics is considered the most ancient.
You can master the shibori technique on your own; fortunately, there are quite a few experts in this type of fabric dyeing. Despite the fact that you have to tie a very large number of knots, it is a very exciting process. In the classic version of shibori, a special stand with a metal fastening loop is used to tighten knots; this device allows you to make tightening quickly and accurately.
After the dyeing and drying process is completed, the knots are dissolved. If they are made according to all the rules, they almost bloom on their own; the main thing is to know which thread to pull. The pattern obtained as a result of these manipulations will be completely unique and will remain intact even after numerous washes. Stoles, scarves, panels, dresses, skirts and blouses, even bed linen can be dyed using the shibori technique.
You might also be interested in:

The 26th week of pregnancy is the end of the 6th month or the end of the 2nd trimester. The 26th week of pregnancy...
You are an enviable needlewoman, you know how to use knitting needles, crochet, your family and friends...
Don't know how to make a paper tulip in the easiest way? Check out the step by step...

Photos of plump Amur tigers from the Chinese nature park of Harbin province...
Only long and thick eyelashes can highlight a captivating look full of depth...

