


Perhaps this is the most “feminine” of the master classes dedicated to making a New Year tree. You don't need any construction tools at all - just a set that is in the arsenal of any self-respecting seamstress. A solution for owners of small apartments and adherents of minimalism: I propose to make an unusual aerial Christmas tree decoration yourself.
So, in this material you will learn how to make a Christmas tree out of balls with your own hands. 
Materials and tools
Hoop with clamp.
Textile.
Compass.
Fishing line.
Soft meter or tape measure.
Needle and beads.
Christmas balls. 
Step 1. Decide on sizes
First, you have to figure out the size and required number of Christmas tree balls. To do this, simply lay them out on the floor or table.
I initially decided that I wanted a tree 120 cm high (not counting 20 cm to the base) and with a space of 20 cm between each row. At the same time, in order to get a fairly elegant shape, I took a hoop with a not very large circumference (30 cm), which became the maximum diameter.
Next, I settled on six circles, and on each of them the number of balls increased by two. In the end, I needed 49 balls, including the central one: the result was a tree of medium height and not very dense - definitely, it’s worth experimenting and deciding which sizes are best suited in your room. 
Step 2: Prepare the base
As a base to which the airy tree is attached, I used fabric stretched tightly between hoops - this method is the most visual and economical. You can, however, find other options - a metal barbecue grate, a flat sieve without a handle, or something else of a suitable size.
If you follow my path, try to find the most elegant and, moreover, dense fabric.
After pulling it as tight as possible, find the center of the circle and mark the planned number of circles using a compass. Keep in mind that when the base is hung, the marks should face the ceiling and therefore be on the back of the stretched fabric. 
Step 3. Determine the design of the future Christmas tree
Several options are possible.
Christmas tree "levels". In this case, each new row of balls is hung exactly, at a certain distance from the previous one.
Christmas tree in a spiral. Here, inside each row there is an indentation between the balls, and they are hung sequentially in a circle.
Christmas tree classic- as similar in shape as possible to the real one, where the balls are at different heights. 
I hung the balls on loops, cutting off twice as much fishing line and folding it in half, due to which for each hanging ball I had only one knot - on top in the base, which made the tree neater (there is no fishing line sticking out anywhere), and the work was easier ( knitting extra knots from almost transparent dense thread is an activity only for the most patient). 
To speed up the process of measuring fishing line, you can assemble a simple device from an office clamp attached to the surface and a soft meter. 
After attaching the ball to the fishing line, thread its second tip through the needle and pass it through the base fabric. Now put a bead on it and tie a knot.
Firstly, a thin knot made from fishing line alone can easily fall out of fabric that is not thick enough, such as linen, as in my case.
Secondly, it will be much easier to make changes to an already assembled tree. Surely, when you finish, you will want to tighten or change something. With beads, you don’t have to search for the right ball blindly. 
Advice: It is best to immediately assemble the tree in the place where it will hang, and not carry it ready, so that the fishing lines do not get tangled (and they do this quickly and mercilessly). So this version of the Christmas tree is not suitable for rooms with curious animals or children; it cannot be mounted near the balcony door. If possible, pin the base in place once you have stretched the fabric over the hoop (step 2).
Agree, it is impossible to imagine the New Year without a Christmas tree, especially if there are small children in your house who are most looking forward to gifts and miracles from this holiday. Today, many craftsmen and designers offer a lot of different solutions on how you can place a Christmas tree in your home without the use of live or even artificial wood.

- Creating a Christmas tree from Christmas and unusual balloons;
- Making a conical or even floating Christmas tree using a frame or without it.

Wall mounted tree using Christmas balls
You should approach the process of creating a wall-mounted Christmas tree as responsibly as possible, with imagination and creativity. To work you will need:
- Garlands and others;
- Christmas balls;
- Fishing line;
- Frame (wooden sticks will do).

It is worth noting that the color scheme and sizes of decorations for the Christmas tree should be thought out in advance!
The first step is to create a frame, on top of which the balls will later be placed. As an idea, you can make a triangle, in the shape of a spruce tree, or in several horizontal levels, where each upper segment will be shorter in length, decreasing to nothing. The frame is attached to the wall using nails.

Further design of the wall tree depends entirely on you and your imagination: arrange New Year's toys and decorations as you wish, place the balls, tying them with fishing line to the wooden frame. Below are some ideas for successful design.


Floating Christmas tree
This option is perhaps the most unusual of all that you can think of to decorate your home for the New Year. The finished result should look like the tree is floating in the air, as in the photo below.

If there are small children in the house, then for greater safety you can place the New Year's decoration at a higher height.
In addition to the hearth, a floating tree can become an original decoration, for example, for a kindergarten or school during festive events.


To work you will need:
- A mesh for steam cooking, which will act as a basis for fixing the balls;
- Thick line;
- Chains for hanging the finished structure;
- Wire cutters;
- Christmas balls;
- A large number of carbines;
- Line clips;
- Hooks.
The number of the latter depends on the number of carbines!
The chain is cut into equal fragments using wire cutters, and later the finished structure will be hung on them. Hooks are necessary for fixing the chain in the net, as well as for connecting carabiners to their ends.

As you can already guess, the balls will be suspended on a fishing line. To do this, the latter must be cut into pieces of various lengths. Each piece of fishing line is completed with a loop at the end, which can be done simply by tying the fishing line in a knot or using a special clamp.
Install the base in the position in which the finished structure will remain for the rest of the time. The silhouette of a Christmas tree is much easier to form in weight. Place balls with long fishing line at the edges, with short fishing line - in the center!

To beautifully and gracefully decorate an aerial Christmas tree, you will need imaginative and spatial thinking. You may not get the final result on the first try, but it will be worth it. A beautiful spruce will help you maintain a festive mood throughout the weekend, delighting you and impressing your guests.
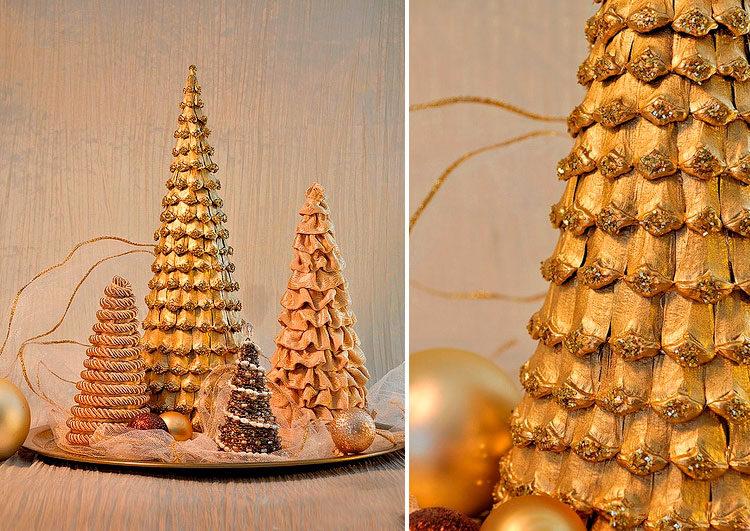
Cone tree made of Christmas balls
To create a Christmas tree from balls with your own hands, you will need the following components:
- Wooden skewer;
- A bow, snowflake, tip, star or any other item that will decorate the top of the tree;
- Foam cone. The dimensions of the finished product will depend on its dimensions, so be sure to correctly focus on the dimensions of the cone;
- Organza, ribbons, etc.;
- New Year's balls;

It is worth thinking about the color scheme for the Christmas tree in advance, choosing the appropriate balls. Alternatively, you can use completely different colors without choosing any particular combination.
- Scissors;
- High-quality quick-setting adhesive or.

Work order:
- First of all, the foam cone is decorated with balls, and this should be done from the bottom up!
- Using a glue gun, the balls are attached to the base. Moreover, the second row should be placed above the first so that the balls on top are placed between the balls of the first row;


When choosing any color pattern, you should follow it to the end, correctly alternating the balls with each other!
- The cone is filled to the top. It makes sense to use smaller diameter balls at the top;
- The top is formed;
- The voids formed between the balls can be easily filled with beads or organza. In the latter case, it is recommended to cut the organza into small square pieces. Use glue and a wooden block to attach a couple of squares. The finished decoration is installed in an empty space. Alternatively, you can use tinsel.

You can make a cone-shaped Christmas tree even more festive and bright if you place a garland around the perimeter of the structure.
Every family celebrates the New Year every year, making this holiday a real tradition! Everyone approaches the preparation of the festival in their own way, the main thing is to use creativity, imagination and creativity, and then you will spend the holiday as bright and colorful as possible. We hope our tips helped you in preparing for the New Year.
With the onset of the New Year holidays, each of us thinks about the Christmas tree. You can buy a green beauty and bring it into the house and dress it up. Or you can do it yourself. In the latter case, there are many options for a flight of fancy: the tree can be paper, wire, made of rain or sewn from fabric. We offer you another very unusual version of the New Year tree - this is a floating tree made of balls. It’s not that difficult to make, but it will amaze the guests and be remembered for a long time. After the holiday, it can be easily disassembled and stored until next year.
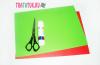
Let's see what we need to make such an original New Year's miracle. Required materials and tools:
round grate (an old grill grate will do);
New Year's Christmas balls;
Reliable wire;
Pliers and wire cutters;
About 2 chains;
Fasteners and clamps.

Photo 1 – Necessary material and tools
When everything you need has been found, you can get to work. We start with the base; to do this, we securely fasten the wire in several places on the lattice so that small loops are formed. It is imperative to ensure that the wire fastenings are symmetrical, otherwise the grille will tilt. We divide the chain into 4 equal parts and attach it to the wire using carabiners. We fasten the free ends of the chains together at one point and also attach them to the carabiner.

Photo 2 – Base for a hanging Christmas tree
Now that our base is ready, we cut the fishing line for hanging the balls into pieces. It is better to make several types of blanks from fishing line of different lengths. We make loops at the ends of the fishing line that can be securely fastened with clamps. Then we hang the balls on a fishing line on the grill using hooks. If you don't have any hooks, you can use unfolded paper clips.

Photo 3 – This is what the intermediate option should look like
In order for the composition of balloons to turn out beautiful and harmonious, do not hang the balloons randomly. Experiment and choose a pattern according to which you want to hang the balls.

Photo 4 – This tree looks good from all sides. Even from below
That's all, our original hanging Christmas tree is ready. For it, you can use either identical balls of the same color, or Christmas tree decorations that are completely different in color and shape. If you want to use different Christmas tree decorations, then it is advisable that there are only 2-3 different types. Such an interesting composition can not only replace a natural winter guest, but also become an addition to it. In addition, this is a suitable option not only for an apartment or house, but even for an office or other work space.

Photo 5 – Your beauty will delight you no less than a real Christmas tree
A Christmas tree made from New Year's balls is a real find for those who like to make simple, but very effective crafts.
It will decorate any holiday, wherever it is held.
To create one you will need:
- unbreakable Christmas balls of different sizes and colors;
- beautiful satin ribbon;
- a disposable cup (the size of the Christmas tree will depend on its size, as well as the number of balls that will go into making it);
- a charged glue gun or polymer glue, which is used for finishing work. You can use regular superglue or Moment glue.

Before you make balls, you need to think about how you will place them on the tree.
If monochromatic balls are used, this question disappears by itself. But if balls of two or more colors are used as a basis, imagine what your New Year’s beauty should look like. You can lay out balls of the same color in one horizontal row, or you can make vertical or diagonal rows. Well, if multi-colored balls are used, the result will be motley; maintaining order in this case does not make sense.

Having thought through all the nuances, we proceed to the actual creation. We lay out the first, bottom row of the largest balls. The tops of the balls, to which the pendant loops are attached, are directed upward.

We immediately begin laying the second row. We use smaller balls and glue them between the tops of the balls below.

We make the third row large again, the same as the first.
And the fourth one is small. You can deviate from this principle and gradually reduce the size of the balls, approaching the top of the Christmas tree.
We put the most beautiful ball on top.

And we decorate it with a lush bow, which we tie from a ribbon prepared in advance.
Well, our Christmas tree is ready! It turned out to be not complicated at all, and you can’t take your eyes off the finished craft!

If desired, you can sprinkle the Christmas tree with artificial snow or decorate it with separate ones. You can use serpentine or confetti - everything that can be seen on a real green beauty. Even a miniature garland will find its place on such an original Christmas tree!
Not a single New Year passes without a green beauty. It fits perfectly into holiday decor and is a wonderful winter gift. In this article we will look at how to make a Christmas tree for the New Year in various creative ways with your own hands.
You will need: copper tubes or wooden smooth sticks, green fringe 15 cm wide, thin wire, paper, a garland of pompoms, ruler, pliers, a hacksaw with a thin blade, a glue gun, scissors.
Master Class
- Cut the fringe into 5 pieces of the following sizes: 45 cm, 35 cm, 25 cm, 15 cm and 5 cm. Cut copper tubes with a hacksaw, the same size as the fringe.

- Glue the fringe to the tubes.
- Prepare a long piece of thin wire and thread it into a 45 cm tube in such a way that both ends of the wire are the same.

- Pass the ends of the wire through the 35 cm tube so that the right end of the wire is on the left and the left end is on the right. Thread the remaining fringed tubes onto the wire in the same way.

- Glue on a pompom garland.

- Make a star this way: prepare 2 squares with sides of 10 cm, fold them like an accordion, glue the top edges of each piece, then glue the 2 pieces together to form a circle.

- Glue the star to the top of the tree, attach a wire hook and hang the tree.
The fringe tree is ready!
You will need: ice cream sticks, ruler, scissors, paints, glue gun, string, decorative elements - stars, rhinestones, pompoms, tinsel.
Master Class

Christmas trees made from ice cream sticks are ready!
You will need: Christmas tree balls with fastening in the form of loops, fishing line, scissors, pliers, chain, metal lattice, carabiner (connecting link for hanging the tree).
Master Class

Creative Christmas tree
You will need: toilet paper or paper towel rolls, scissors, glue gun, paint, sponge, decorative elements - shiny ribbon, rhinestones, sequins...
Master Class

The Christmas tree made from bushings is ready!
You will need: thick shiny green paper, pencil, hole punch, ruler, decorative elements - star, rhinestones, beads, thick thread...
Master Class

The Christmas tree box is ready!
You will need: thick cardboard, scissors, wrapping paper, double-sided tape, various decorations - beads, bows, stars.
Master Class

You will need: scrapbooking paper, compasses, scissors, wooden sticks, glue, candlesticks and caps, white paint.
Master Class

The original Christmas tree is ready!
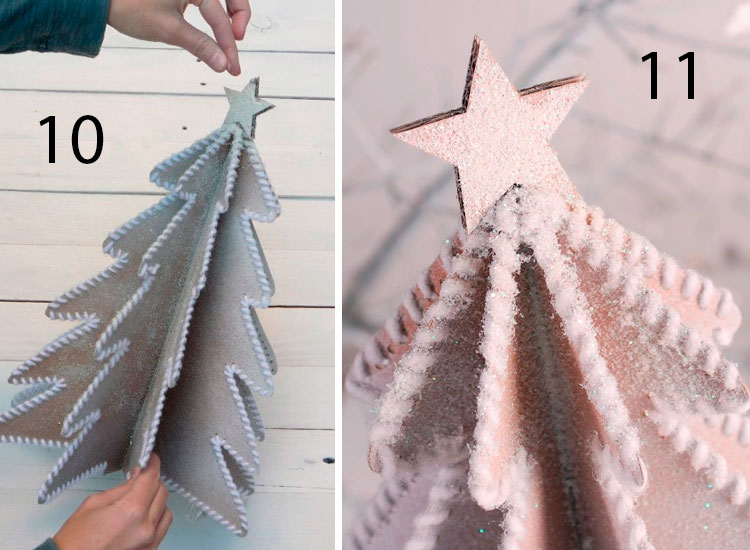
You will need: cardboard, scissors, hole punch, glue, yarn, needle, pencil, ruler, spray snow and glitter (optional).
Master Class
- Print out the Christmas tree template and cut out 8 pieces from cardboard.

- Fold each piece in half and punch holes along the edge of each piece with a hole punch.

- Glue 8 blanks together to form a Christmas tree.

- Decorate the Christmas tree with snow.
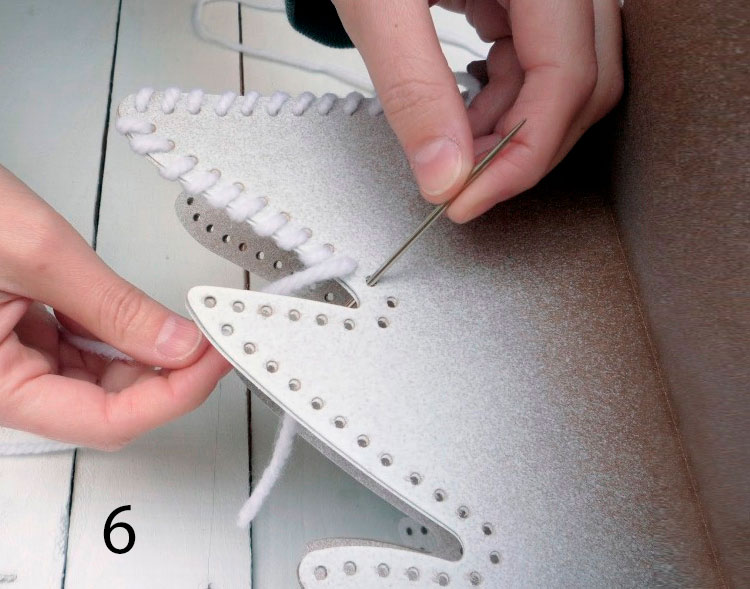
- Sew yarn around the edges of the tree as shown in the image.

- Cut out a star from cardboard, decorate it with glitter and attach it to the top of the tree.
You will need: green felt, foam cone, glue gun, scissors, pencil, star.
Master Class
The felt Christmas tree is ready!
You will need: paper, stationery knife, scissors, hole punch, thread, template.
Master Class

Hanging Christmas tree
You will need: colored paper, saucepan lid, pencil, scissors, tape, thread, needle.
Master Class
- Trace the lid on a piece of paper.
- Cut out the circle.
- Cut a quarter of the circle, then tape the edges together.
- Make 3 blanks this way.
- Thread the pieces onto a thread, forming a Christmas tree, and secure each piece with a knot.
The hanging Christmas tree is ready!
You will need: magazine, decoration elements - stars, rain...
Master Class

The Christmas tree from the magazine is ready!
You will need: cardboard, strawberries, chocolate.
Master Class
- Make a cone out of cardboard.
- Melt the chocolate in a water bath.
- Attach the strawberry to the cone using hot chocolate as glue.
- Draw a star with chocolate, wait until it hardens and decorate the top of the strawberry Christmas tree.
Strawberry Christmas tree is ready!
You will need: scrapbooking paper, a white sheet of cardboard, twine, glue, decorative elements - buttons, stars.
Master Class
- Roll up tubes of scrap paper.
- Adjust the length of each tube and lay out the Christmas tree.
- Glue the tubes.
- Make a Christmas tree leg from twine.
- Glue buttons and a star as decoration.
You will need: foam cone, red and green ribbons, safety pins, scissors, felt, glue, golden bow.
Master Class
- Cut a circle of felt the size of the diameter of the base of the cone, then glue it on.
- Prepare pieces of ribbon of the same size.
- Form a loop from a piece of ribbon, threaded onto a safety pin. Repeat the same process with all the segments.
- Secure eyelet pins into the foam cone, placing them in circles, alternating colors.
- Attach a bow to the top of the tree.
The ribbon tree is ready!
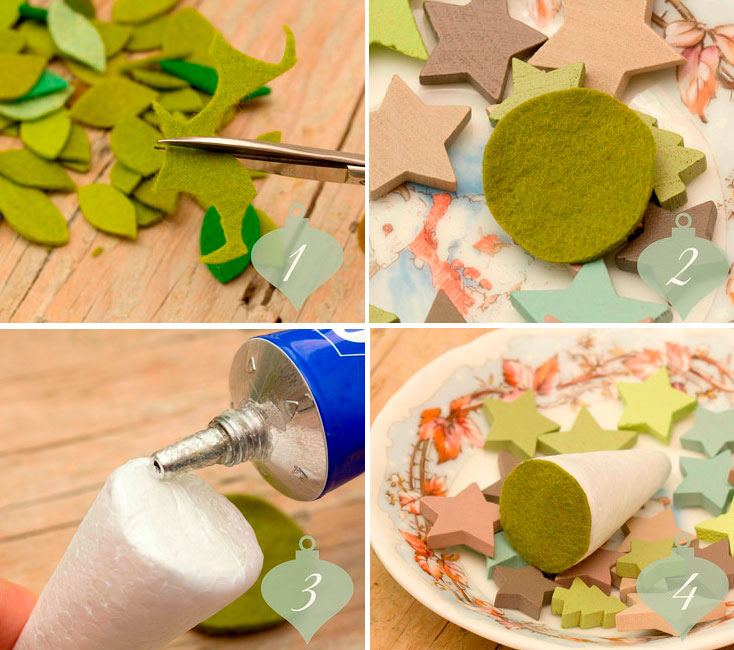
You will need: green and brown felt, yellow floss thread, needle, ruler, scissors, pencil, small star.
Master Class
- Cut out 25 squares from green felt (5 squares each with sides of 1,2,3,4 and 5 cm).
- Cut 5 small circles from brown felt.
- Prepare a thread with a needle and tie a knot at the end.
- String the circles as a tree trunk.
- String the squares, starting with the largest and ending with the smallest.
- Decorate the top with a star.
The felt mini-Christmas tree is ready!
You will need: 3 Whatman paper, tape measure, tape, glue, scissors, green and brown corrugated paper, decoration.
Master Class
- Connect 2 whole Whatman paper and half of the third using tape.
- Draw a triangle 180 cm high as shown in the image.
- Cut it out.
- Prepare strips of corrugated paper 20 cm wide, then make a fringe.
- Cover the entire triangle with stripes, starting from the bottom and working your way up.
- Cut a rectangle for the trunk and cover it with brown fringe.
- Attach the Christmas tree to the wall and decorate it to your liking.
You might also be interested in:

The 26th week of pregnancy is the end of the 6th month or the end of the 2nd trimester. The 26th week of pregnancy...

You are an enviable needlewoman, you know how to use knitting needles, crochet, your family and friends...
Don't know how to make a paper tulip in the easiest way? Check out the step by step...

Photos of fattened Amur tigers from the Chinese Nature Park of Harbin Province...
Only long and thick eyelashes can highlight a captivating look full of depth...

