


A beaded greeting card is a wonderful holiday souvenir, especially if you make it yourself. The main thing is that you have all the necessary materials and some free time at hand. And then you will be able to congratulate each of your close friends, even if he is very far from you. And we will help you with this and in our master class we will tell you how to make a postcard from beads.
Tools and materials Time: 30 minutes Difficulty: 3/10
- base for making a postcard (or just a small piece of coated cardboard);
- beads;
- needle;
- threads to match the color of the beads (or fishing line);
- a simple pencil;
- ruler, pen.
Step-by-step master class

Materials you will need:

Step 1: draw a triangle
First, we need to draw a triangle in the central part of the future postcard. This is exactly what a simple pencil with a ruler will come in handy for.

Step 2: string beads
Then we fix the thread in the lower right corner of the Christmas tree and string beads on it.
The number of beads depends on the size of the Christmas tree. They should be enough to completely cover the side line of the triangle.


Step 3: embroider the Christmas tree
Then we send the needle to the lower left corner (we do this from the wrong side so that the thread does not catch the eye), and make exactly the same stitch.

We continue to move in this way, gradually reducing the number of beads for each row.

Gradually our Christmas tree is completely filled with beads.
All that remains is to remove the lines drawn with a simple pencil using an eraser. And attach a bright star to the top of the Christmas tree. To do this, you can use regular glue and a suitable sequin.

Your handmade beaded postcard is ready. Now you can carefully sign it using a beautiful pen. And it is better to decorate the reverse side (wrong side) using velvet paper or regular colored paper so that the seam is not noticeable.

Now you know how to make a card from beads. Such an original message can be signed and sent to a friend by mail. Today such a congratulation will be very exotic and unusual, since for the most part we are accustomed to using, if not personal meetings, then Internet correspondence for congratulations.
Guys, we put our soul into the site. Thank you for that
that you are discovering this beauty. Thanks for the inspiration and goosebumps.
Join us on Facebook And In contact with
In stores today you can find New Year's cards for every taste. But the editors website believes that homemade ones are much warmer. After all, when we make something for someone with our own hands, we put our love into it.
Below we have collected ideas for beautiful, original and, most importantly, “quick” New Year’s cards, the creation of which does not require any rare materials - beautiful paper, cardboard, and colorful ribbons and buttons lying around the house.
Volumetric Christmas trees
Volumetric Christmas trees made of white and colored paper are so simple to make that you can make them at the last moment. Read more on the Bog&ide blog.
Making 3D Christmas trees even faster. All you need is a ruler, sharp scissors and cardboard. This blog shows you how to cut them.
Penguin
We really liked this penguin, well thought out. You will need black and white cardstock (or white paper), an orange paper triangle, and 2 miniature snowflakes, which we all know how to cut out. The eyes are, of course, the highlight of the postcard, and you will have to look for them at a hobby store (or tear them off from an unnecessary children's toy, with the consent of the children, of course).
Gifts
This cute and simple card requires 2 sheets of cardstock, a ruler, scissors and glue. And also pieces of wrapping paper that you have left over from gift wrapping, ribbon and ribbon. The manufacturing principle is very simple, but for those who want more details, we recommend taking a look at this blog.
Santa Claus
A friendly Father Frost (or Santa Claus) can be made in just half an hour. The red hat and pink face are strips of paper pasted onto a card or gift bag. The fur of the hat and the beard are obtained like this: you need to take drawing paper and simply tear off strips of the desired shape to get uneven edges. Place on the card over the red and pink stripes. And then draw two squiggles - a mouth and a nose - and two dots - eyes.
Simple drawings
An irresistible idea in its elegance is to draw Christmas balls with patterns with a black gel pen. The main thing here is to draw the correct circles and mark the lines for the patterns. Everything else won't be difficult - stripes and squiggles that you draw when you're bored.
The same principle that underlies the postcard with black and white balloons. Simple silhouettes, painted with simple patterns, this time in color - best done with felt-tip pens. Warm and very cute.
Many, many different Christmas trees
A couple more ideas from the Bog&ide blog. For the first, you will need decorative tape or colored cardboard (with or without glitter - now you can easily buy these at an office supply store or in hobby stores). For the second - elegant straws for drinks and good glue.
This is where patterned paper or cardboard left over from children's crafts or wrapping paper for gifts will come in handy. The Christmas trees are sewn in the center - this is not at all necessary, you can glue them on. But if you really want to, you first need to make holes with a thick needle along a ruler, and then sew with thread in 2 rows - up and down, so that there are no gaps left. Draw a snowball with white gouache.
A laconic and stylish idea is a grove of Christmas trees, one of which is glued to foam double-sided tape (and therefore rises above the rest) and decorated with a star.
This card requires 4 or 3 layers of cardboard (you can do without the red one). You can use paper rather than cardboard as a color layer. In the top, white one, cut out a Christmas tree (a stationery knife will do this well) and glue it with double-sided tape for volume.
A round dance of Christmas trees made from various leftover cardboard, scrapbooking paper, and wrapping paper, tied with a simple ribbon and decorated with a button. Try playing with colors and textures - here you can find an incredible number of options using different colored ribbons, paper and even fabric.
Wonderful watercolor so in the spirit of New Year and Christmas! A simple watercolor sketch can be done by anyone, even those who last painted in school. First, you need to outline the patterns with a pencil, color them, and when dry, carefully erase the pencil sketches and complete the patterns with a felt-tip pen.
Winter landscape
For this postcard, it is better to use structured cardboard, but you can get by with regular, smooth cardboard - it will still turn out impressive. Using sharp scissors, cut out the snowy landscape and moon and paste it onto a black or dark blue background.
Another, white-green, option for a winter landscape that will take a little more time. If you find velvety cardboard (remember, back in school they made crafts out of this), it will be great; if not, you can simply color the Christmas trees with a felt-tip pen. Snow - polystyrene foam disassembled into peas. You can also use a hole punch to make circles out of cardboard and glue them to the card.
Hugging snowman
The author of the blog My kid craft made this snowman with her children. The snowman throws his arms up in joy when the card is opened. You can write your wishes inside. Children will be interested in making an applique (and painting their hands and hat), but for those who want everything to be done quickly, the blog has ready-made parts that can be printed on a color printer and simply glued together.
More snowmen
Snowmen peering inquisitively into the starry sky will look better if you can find a bright ribbon for a scarf.
For that postcard on the left, You need unpainted cardboard, white drawing paper and foam tape to glue the snowman with. Drifts are made simply: you need to tear off the drawing paper so that you get a ragged wavy edge. Fill it in with a blue pencil and blend it with anything, even with your finger or a piece of paper. Also tint the edges of the snowman for volume. For the second You will need buttons, a piece of fabric, eyes, glue and colored markers.
You will want to keep this card for a long time. All you need are circles made of cardboard, a nose and twigs made of colored paper. All this must be assembled using double-sided bulk tape. Draw eyes and buttons with black paint, and a snowball with white gouache or watercolor.
Balloons
Balls are one of the main symbols of the New Year and Christmas. These are made from velvety colored paper and ribbon. But balls are such a win-win option that you can allow yourself to fantasize: make balls from patterned paper, wrapping paper, fabric, lace, cut out from a newspaper or a glossy magazine. And you can simply draw the strings.
Another option is to stick paper with a pattern on the inside of the card, and cut out circles on the outside with a sharp stationery knife.
Volumetric balls
For each of these balls you will need 3-4 identical circles of different colors. Fold each one in half and glue the halves to each other, and the two outer halves to the paper. Another option is colored stars or Christmas trees.
Multi-colored balls
Wonderful translucent balls are obtained using a regular eraser on a pencil. It’s worth starting with a pencil to outline the outline of the ball. Then dip the eraser into the paint and leave marks on the paper. Fun and beautiful.
Cards with buttons
Bright buttons will add volume to the cards, and will also evoke subtle associations with childhood.
The main thing is to find buttons of interesting colors, but the rest is up to you - to “hang” them on the Christmas tree, on a branch with cute owls, or on newspaper clouds.
DIY New Year's card. Master class with step-by-step photos
Greeting card “New Year tree made of beads”. Master class with step-by-step photos.
Gilfanova Victoria Vasilievna, teacher of additional education.Place of work: MBOU DOD "Palace of Children's Creativity named after Yu.A. Gagarin", city of Prokopyevsk, Kemerovo region.
Description: The master class is intended for children of secondary school age, additional education teachers, educators, technology teachers and all creative people who love to create something new with their own hands.
Purpose: A gift for the New Year.
Target: Making a New Year's card using beads.
Tasks:
- teach how to create a postcard with your own hands;
- secure the loop weaving method to the wire;
- improve the ability to work with tools and materials;
- develop imagination, fantasy, aesthetic and artistic taste, fine motor skills;
- cultivate perseverance, patience, accuracy.
Materials and tools:
- decorative double-sided cardboard;
- corrugated paper;
- small green beads;
- large beads of different colors;
- wire with a diameter of 0.3 mm;
- satin tape;
- PVA glue;
- hot glue gun or superglue.

Preface:
A greeting card is a small but very important element of any holiday, because it is it that creates a unique atmosphere of celebration and, even after many years, can resurrect a long-forgotten holiday in our memory. And a New Year's card can convey to everyone who receives it a wonderful feeling of a fairy tale, miracle and childhood.
But have you ever thought about where the tradition of giving cards came from, what is the history of the New Year's card?
And its history began in Ancient China, where already two thousand years ago, on the first day after the New Year celebration, it was customary to congratulate with red cards those who were not able to be seen at the holiday. On the eve of the holiday, the owner of the house hung a bag near the door specifically for these cards, on which was written: “Sorry, I can’t accept it personally.”
However, the tradition of exchanging New Year's cards appeared much later in England. On the eve of the New Year, Henry Cole turned to his friend John Gersley with a request to draw something interesting with a New Year theme. And his friend drew the first card in history with congratulations for the New Year. From this sketch, the first batch of New Year's cards of a thousand copies was printed in London. Since then, the custom of congratulating your loved ones and friends on the New Year with postcards has conquered the whole world. However, for each country this tradition gradually acquired its own characteristic national features.
In Japan, for example, there is a tradition of giving cards before the New Year with the image of an animal that corresponds to this year according to the eastern horoscope. Residents of the Land of the Rising Sun send hundreds of such New Year's cards to each other. They usually thank their relatives and friends for all the good things that happened in the past year, and express hope for the continuation of friendly relations in the future.
In Austria, it is a very common custom to send New Year's cards with national symbols of happiness. These postcards usually feature a chimney sweep, a four-leaf clover, and a pig.
And the Guinness Book of Records names Canadian Booth as the owner of the largest collection of New Year's cards, who collected 205,120 copies.
Today, New Year's cards are made in a variety of techniques: metal, silk, holography. Relief, three-dimensional, musical postcards have become commonplace. Special services of graphic designers have appeared for the production of exclusive New Year's cards.
A postcard is an essential component of every gift, reflecting your thoughts and desires. A homemade New Year's card can not only decorate your gift, but in some cases completely replace it.
Sequence of work execution.
Stage 1 – preparing the basis for the future postcard.1. Fold the cardboard in half.

2. Come up with and sketch a sketch that would reflect the New Year’s mood of your card, taking into account the fact that the design will consist of twigs made using a loop weaving technique.
3. Glue a window of matching colored paper onto the front of the card. The window can be covered with a strip of decorative mesh or tape.

Stage 2 – weaving branches for the Christmas tree.
1. Take a wire 15-20 cm long and place 10 green beads in the middle.

2. Fold the wire into a loop and twist it under the beads several times. The first loop is ready.

3. Then make the same loops at each end of the wire along its entire length. The distance between the loops should be approximately 1 cm. To imitate Christmas tree decorations, randomly string large beads into a loop with beads. Large beads can also be strung separately by twisting the wire directly underneath them. Instead of beads, you can use glass beads or cutting to make a loop.

4. Connect the ends of the wire together and twist them. When twisting two wires into a bundle, they should evenly wrap around each other.

5. Make 2 pairs of branches with 3, 5, 7 and 9 loops.

Stage 3 – design of the postcard.
1. Draw a center line in the postcard window, relative to which the branches will be laid.

2. Lay out the branches, starting with the smallest number of loops, on both sides of the center line, bending them in the form of a Christmas tree crown. Glue the branches to the card with a heat gun or superglue.


3. Make another branch of the required length (9-11 loops).

4. Glue this branch to the center line, covering the ends of the wires from the previous branches.

5. Straighten the loops to form a crown. Design a postcard.

The postcard is ready!
Happy New Year!
Traditionally, beads are used to create elegant jewelry or embroidery, but today we decided to break the stereotypes. Why not make a New Year's card from beads. Shiny miniature beads will add shine and sophistication to the product. Although the work awaits us is painstaking, the result should capture the imagination of family and friends, and a souvenir made with your own hands will be remembered for a long time.
New Year card made of beads
Before starting work, you need to prepare materials. We will need:
- base for postcard
- beads
- thread and needle
- sheet of metallized paper or foil
- pen, marker or pencil
- figured hole punch - star (optional)
The basis for a future New Year's card can be made from ordinary smooth white cardboard or you can buy cardstock for scrapbooking. You choose the size and shape yourself. We took gold beads; red or green also looks great. Threads for work should be transparent nylon. 
The nature of the design depends entirely on your imagination; we preferred the Christmas tree; Christmas wreaths look original, but they require larger beads.

Making a postcard from beads with your own hands, photo
We start working on the craft by taking a cardboard sheet, using a pencil and a ruler to outline the triangular outline of the future embroidery. 
Punch a hole in the bottom corner, pull out the thread and string beads onto it. Pull the thread to the top of the triangle, pierce the cardboard and make a knot on the wrong side, thereby securing the beads. Do the same on the opposite side, form the base of the triangle.
When the frame is ready, thread the beads inside.

As a result, the drawn triangle should be filled, and you will get an original beaded herringbone pattern.
Armed with a soft eraser, carefully erase the pencil marks.
It is impossible to imagine a New Year's tree without a luxurious top. Take a sheet of foil and use a shaped hole punch to make a star.

If you don’t have a tool at hand, draw the outline yourself or use a stencil and cut it with scissors; you need to use sharp, manicure ones. Glue the Christmas ornament to the very top of the tree.
The New Year's card made of beads is almost ready, all that remains is to sign the congratulations.

If you are not good at calligraphy, you can purchase a special sticker for scrapbooking or print an inscription and a frame from the Internet and stick it on.
Pay attention to the following photo. New Year's cards made of beads are made in gold and silver colors. Choose the shade you like best, copy it or create your own unique masterpieces.


Nadezhda Vasilyeva
This postcard can be made for any holiday.

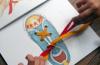
I cut out rectangles about 24 by 15 from an old calendar. I folded them in half.

Acrylic brown (you can add yellow shades) I painted a tree trunk. Then the children did everything.

We place the basis for postcards in a candy box (to the beads did not fall apart) . In the place where the foliage will be, use a brush to apply thick PVA glue in islands. Sprinkle dark green on these places. beads. For getting enough sleep beads It’s also good to use a box with a corner. Then we make new islands with glue and add light green beads. Leftovers beads collect and glue again. We do the same for land plots. We use 2 shades of brown beads. We are like that postcards Made for dads on February 23rd. From the old ones postcards children cut out inscriptions: "To my beloved dad", "From February 23", "Congratulations".

They also cut out boats and tanks. You can print the inscriptions on a computer, and so that the white sheet does not stand out, we age the inscription with tea leaves - it also turns out very interesting! All this was glued to the base - they turned out nice DIY postcards. Unfortunately, I didn't have a camera with me.

The technique is very simple, and the children really liked the result, so we are planning to make such postcards for Victory Day for veterans.

Thank you for your attention!
You might also be interested in:
Only long and thick eyelashes can highlight a captivating look full of depth...

Who is the killer episode 1 word O_ _O. Please help!!! and got the best answerResponse from...
Very cute crocheted monkey. Now it has become a tradition for every new...

A poncho is a versatile piece of clothing that is appropriate in a wide variety of situations. Recently...
Modern children receive sneakers or boots with Velcro for their use, without...

