


Let's learn how to make a fashion accessory to meet the summer fully armed. The article contains master classes on creating a choker from fishing line, spandex, thread, and beads.
The most shocking and controversial decoration of all time is back in trend. Which, in general, is not surprising: well, the accessory that began to be worn back in pre-Christian times could not help but be revived! We are talking about a choker.
How it all began - a brief excursion into history
The whole history of choker transformations is connected with:
- riot
- threat
- power
- slavery
- elegance
- nobility
It is a mistake to believe that chokers are a heritage of North American Indians. Women of the Padaung tribe still wear ring-shaped jewelry like this around their necks. Rings indicate a woman’s status in the tribe and serve as proof of the lady’s unearthly beauty and well-being.
Wooden rings that fit tightly to the neck were worn on the necks of girls from noble families in the Mediterranean and Asian countries back in the Ancient World. In those distant times, a woman with a long neck was also considered the standard of beauty, and by putting wooden rings on the necks of their daughters, parents hoped for a successful marriage for their beauties. The presence of a wooden decoration on the neck became evidence of a high position in society.
Some hundred years passed and neck rings became an attribute of slaves. In Ancient Rome, the name of the owner was stamped on the slave ring. However, after some time, the senators abolished such passport collars so that the forced inhabitants of Rome would not see how many there were and how few their owners were.
The Gloomy Middle Ages revived chokers as a means of protection against thieves, robbers and vampires. Rich citizens drove silver nails into a leather strip intended to protect the neck, in order to avoid unpleasant encounters with bloodsuckers and more. It is quite possible that the choker looked like this back then

 Choker collar with spikes
 The graceful Renaissance changed the purpose of the choker. Now it was an elegant decoration in the form of a velvet ribbon with a pendant, emphasizing the languid pallor of the fragile ladies.
And yes, yes, yes! Indian chiefs wore chokers made from wooden beads, animal claws and bird beaks to protect against evil spirits. In addition, such jewelry could save lives in battle, protecting the neck from a knife or arrow.

 Still from the film “Bury My Heart at Wunden Knee”
 It was on the Indian reservations that the “flower children” spotted all kinds of baubles, bracelets and chokers. Tattoo chokers - jewelry that imitated ornate tattoos - became especially fashionable among the hippies of the 60s.
Then came the 90s: the wind of change, informal youth movements and a new surge of love for tattoo chokers.
Everything came back in the 2000s: chokers are trendy!
What can a choker tattoo be made from?
General advice for all materials
- The thickness of the material you choose must be at least 1 mm
- Length of thread for creating a necklace: 2-3 m
- Tattoo bracelet thread length: 1 m
Now let's talk about suitable materials.
Classic choker weaving - fishing line
It is better to buy fishing line from fishing stores. The beading line may be too thin!

Modern material, which has successfully replaced fishing line, has several names
- silicone rubber band
- spandex
- spandex without braid
- elastomeric thread
- "vein" latex
Some particularly advanced choker weavers call this material “special fishing line for chokers.”
Where can you buy such a treasure? Spandex is available at many craft stores.

 Manufacturers can offer spandex in a variety of colors
 If the desire to immediately weave a choker caught you in the middle of the night and it’s late to run for spandex, and there are no fishermen in the family - don’t despair! Your salvation is old headphones or chargers. Their thin wires can serve well and become material for a choker.
A wire choker may be too rough for a skinny girl, but it's perfect for a boy

The following material for making a bright tattoo choker also has many names:
- plastic cord for weaving
- iris tubes
- Scoubidou colored tubes

 Colored Scoubidou tubes
 A tattoo choker made of beads looks very elegant

Materials for making a choker at home
If a regular tattoo choker is no longer interesting to you, experiment with making chokers from different materials
- rubber bands for bracelets
- thread
- leather laces
How to weave a choker from fishing line at home
Most choker weaving techniques are borrowed from macrame.
A classic tattoo choke made of black spandex is woven using a snake knot. The technique is simple and accessible even to young needlewomen.

In addition to the diagram and desire, you will need
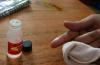
- black spandex (1 mm thick) - 3 m
- scissors
- stationery clothespin
- hardcover book


Fold the spandex “vein” in half. Attach to book using paper clip


Make the first knot


Knit according to the pattern to the required length, alternating left and right loop knots

Fasten the thread


Below are step-by-step instructions on how to make an elegant tattoo choker with pendant rings
 Choker “Snake” with pendant rings
 The video “Tattoo Choker/How to Make a Tattoo Choker From Beads” will tell you how to diversify the classic pattern of weaving a tattoo choker.
Video: Tattoo Choker/How to Make a Tattoo Choker From Beads?
How to make a choker from headphones, diagram
Weaving a choker from wires from an earphone is no different from the classic pattern of weaving a tattoo choker


The work process is as follows.
Fasten the thread in any convenient way and knit according to the pattern to the required length. Decorate the finished work with a chain with a carabiner or decorative ribbon.


How to weave a wide choker yourself, diagram?
If you have mastered the technique of weaving a classic tattoo choke well, weaving a necklace from several multi-colored “veins” will not be difficult for you.

 Choker "Twins"
 Study the diagram carefully. Number of threads: from 4 to 8.


How to make a choker from rubber bands, diagram?


There are a lot of techniques for weaving with rubber bands. If you are a master of this type of needlework, the master class presented below will not interest you.
And if you are new to this business, you have rubber bands, but no hook and machine - you have come to the right place. The master class in the photo below will tell and show how to knit a choker from rubber bands on your fingers.
The choker design is known in rubber band circles as the “Fishtail”. Not very romantic, but very beautiful!
You will need
- rubber bands
- carabiner for jewelry (you can use a plastic hook)

The first rubber band is crossed between the fingers, and two more elastic bands are put on top.


The loops of the bottom elastic band are tightened over the elastic band located at the very top.


Gradually adding one elastic band to the top and securing it with the loops of the lower elastic band, we lengthen the choker.


When the choker has reached the required length, remove the work from your fingers. Remove the top two loose elastic bands. Insert a carabiner into the resulting loop.


How to make a choker from beads, diagram?


The design of this decoration is quite simple.


- Fasten the double line in the eye of the lock and use a needle to thread the first oblong bead
- Divide the double line into single “veins” and thread each into a separate needle
- Work in parallel with two needles, stringing beads according to the diagram
When the choker reaches the required length, secure one of the threads in the eye of the carabiner - Continue working in reverse according to the diagram below


If the previous choker seemed too complicated for you, try making a very simple and very stylish choker from large beads.


Take a strong thread, fold it in half and tie a knot, forming a loop 1.5-2 cm long


Thread the first bead onto one of the threads. Pass the second thread through the through hole of the bead. Tighten the beaded choker threads with your own hands, step 4
Choker is ready

How to make your own choker from threads?
Floss threads, which are usually used for embroidery, are a very suitable material for creating a bright and stylish choker.


You will need:
- multi-colored skeins of floss
- large and small chains
- decorative plastic chain with rhinestones
- connecting rings and carabiner for jewelry
- pliers


- Cut the skeins of floss into equal strands. Please note: the length of the finished braid will be slightly shorter than the original length of the strands
- Fold the threads into a bundle and secure them with a tight winding
- Weave a regular braid
- When the length of the braid reaches the required size, secure the ends with winding

Decorate a braid of threads with a chain with rhinestones, sewing it symmetrically to the center of the base


At the next stage of work, sew a large chain on the outside and inside of the future decoration


Secure the thin chain and carabiner lock using jump rings. Your stylish choker made from floss threads is ready

Is it possible to make a metal choker at home?
Using a special material known among needlewomen as “memory wire” and decorative elements to your liking, you can create exclusive metal necklaces at home


The video at the end will give you a few more ideas for stylish chokers.
Video: DIY CHOKERS with your own hands || CHOKERS
Flowers such as jasmine, apricot, cherry, sakura, strawberry, rose hip and many others are difficult to create without a supply of miniature stamens. Today we will learn how to make them with your own hands from scrap materials with a minimum of financial costs. By the way, if you are going to sculpt a gladiolus, you should look at the article about this flower - I make them from wire.
You will need:
Fishing line or for needlework (medium thickness);
fire - a candle or lighter, a gas burner is also suitable;
scissors;
yellow acrylic paint;
yellow pastel (optional).
Making stamens for flowers
Step 1. Light a candle or lighter. We bring the fishing line to the fire, light the free end and remove it from the fire. It is more convenient to hold the entire skein in your hands and cut off the stamens from the fishing line as they are ready.

The free end of the fishing line melts, forming a round head - this is the future anther of the stamen. There is no point in waiting until it gets too big. You should focus on the size of the flower - the smaller the anthers, the neater the composition looks. If you want to enlarge the ball, simply set fire to the already extinguished end of the fishing line again - it will melt and enlarge.
Step 2. We cut off a piece of fishing line at a level of 1.5 - 3 cm from the melted ball and continue making stamens as described above. As a result, we get such a bunch of stamens.


Stamens from fishing line
Step 3. Pour some yellow acrylic paint onto the palette. And we dip the artificial stamens into it with the melted head. Acrylic dries quickly: this is exactly what you need. Oil paint is not suitable for these purposes.

Step 4. We get a stamen with a yellow anther. For one flower you need 7–20 of these, depending on what we are sculpting.

Step 5. We tint pieces of fishing line with painted heads with pastels. This is optional: I resorted to this method because the yellow paint was too dark and there was no other one.
After covering the top with lemon pastel, the color of the anthers became more realistic. Therefore, before you make stamens with your own hands, make sure that you have acrylic of the same shade as the pollen of the flower you need.

Step 6. These are the little yellow things we got.

And here they are at work: a strawberry flower in person

Strawberry flower with homemade stamens from fishing line
Disadvantages of homemade stamens
Making stamens from flower fishing line takes a lot of time and the work is routine. The girls who made flowering bonsai, for example, said that it was at the stamen stage that the risk of going crazy was greatest!
I don't see any other shortcomings. If you do everything carefully (not like I did), you will get very realistic flowers.
The benefits of homemade stamens
look elegant, like real ones;
making stamens with your own hands is usually cheaper than buying them in a store;
If you run out of purchased stamens and your order is on fire, the fishing line will help out.
A few words about purchased stamens
I started making stamens with my own hands not so much out of economy (the cost of purchased ones is small, and they are inexpensive, although you have to wait for the order to arrive), but because of a desire for realism.
Personally, I find store-bought stamens crude and too large for such miniature flowers as apple or jasmine. In addition, not all of them keep their shape - they fall off and that’s it.
Of course, the matter can be fixed with glue, but you can just as easily do everything yourself. And if you buy it, you won’t have to redo it.
That's all the wisdom. This method was discovered by me in the Country of Craftsmen - one of the craftswomen told how she makes stamens from fishing line. To my shame, as usual, I didn’t remember her name, so I can’t exactly name the inventor of this method! But I am very grateful to him (that is, to her!). I hope that MK will be useful for beginners - there is no need to buy stamens at all!
Inspiration and more wonderful things to everyone! :-)
Did you like the article? Share with your friends!The nutritional properties of red mullet are legendary. They say that in coastal cities, some port stevedores quickly restore their strength by eating red mullet. According to experts, the meat of this fish contains a large amount of high-calorie protein.
The most suitable gear for catching this red mullet is float and bottom fishing rods. The latter must be very sensitive. And it is also important that during fishing the sea is fairly calm, the current is not strong, and there is no wind if possible.
Fishing from the shore
Using a fly rod, red mullet can be caught both with a sliding (moving) float and with a stable one (blind rig). The first, as a rule, is used when fishing at great depths, which are often near steep banks, the second - when the depth corresponds to the length of the rod or is slightly larger than it.
For both types of equipment, it is better to choose an elongated float with a long, clearly visible antenna. The leash (one or two) is the thinnest - 0.1 mm. The main line is 0.12-0.14 mm. It is better to use floats with small weight capabilities, only they will be sensitive to the gentle bites of the red mullet. There are situations when the exact choice of float and its test characteristics determine the success of fishing. Using a 1.5 gram float at a depth of up to 6.5 m, it is possible to detect even a slight bite. But, for example, with a 3-4 gram float, it is quite possible not to notice how the red mullet will not only eat the bait, but even remove it from the hook altogether.
If you are fishing in 7m of water with a 5 or 6m rod, you will need to attach a tiny shot at least 4m from the hook. Then the float will not slide below this place, which will relieve the line from unnecessary friction. With such equipment, it is better to take a 2-gram float.
When fishing with a sliding float, you need to pay attention to one essential detail. If, when using the lightest fixed float, you can lower the bait to the very bottom, then when using a movable float, you need to alternately lower it to the bottom, then raise it. Otherwise, when the red mullet lifts the bait from the bottom, the bite may not be noticed. Options for fishing rod rigs with a sliding float and a fixed one are shown in Fig. 1.

But both the sliding float and the fixed one have their pros and cons. So, when using a moving float, the positive thing is that you can use shorter rods and eliminate the possibility of the float rotating (and this is associated with twisting of the fishing line). Negative side: worse signal function compared to a stable float, poor control if the leader is lowered to the very bottom, and plus there is a danger of spontaneous depth changes if the depth stopper is poorly installed.
The positive aspects of a fixed float are its greater sensitivity and the possibility of using models of minimal weight. And the negative ones are, firstly, that it is unsuitable if there is a discrepancy between the depth and length of the rod; secondly, if the depth is equal to the length of the rod, there is a risk of rotation of the float; and thirdly, the lightest elongated models quickly break.

In the summer, when there are a lot of vacationers and the fish are frightened by the noise, the red mullet becomes more suspicious; you should use the lightest, permanently fixed float and choose leeward areas for fishing, covered by high banks. A sliding float usually weighs more and therefore is not as effective during this period.
With match tackle
Red mullet often stays in areas far from the shore. In this case, a well-balanced match fishing rod will be indispensable. Sometimes flocks of mullet feed on underwater hills, above which the depth does not exceed 2-3 m. Then they use a blind rig, and as a sinker a small “olive” corresponding to the float test or two or three pellets installed side by side - close to the leash. The length of the leash is 15-20 cm. Hook No. 12-14 with a long shank. The nozzle should be 3-5 cm from the bottom. With a fixed rig on a match fishing rod, you can fish with a forced retrieve, i.e. by pulling.
If the depth at the fishing site with a match fishing rod exceeds 3-4 meters, then a sliding float rig is usually used.

With a light picker
For catching red mullet at a considerable distance from the shore, a lightweight quivertip picker with a very sensitive tip and thin equipment is perfect. The reel for it is a spinning reel with a spool with a diameter of 4-5 cm, containing at least 10 m of main line with a diameter of 0.2-0.25 mm. The thickness of the leashes is no more than 0.15-0.17 mm. Small hooks, No. 12-16, on which pieces of shrimp meat, peeled crab pulp, sea and earthworms, and sea fleas are attached.

The quiver tip picker rig for catching red mullet is quite simple. Due to the fact that this fish bites quite pickily and often eats the bait, it is better to use three leashes and, accordingly, three hooks. It is better to take from 1 to 3 sliding “olives” as a sinker. Their number depends on the mass of the individual sinkers, the diameter of the main line and the required casting distance. A swivel is installed at the end of the main line to stop the olives. Two leashes are attached to the swivel using a loop - one 20 cm long, the other 15 cm long. The third leash 20-25 cm long is installed above the sliding “olives” in such a way that there is free movement of the fishing line when biting to the upper leash and that the hook with the nozzle touched the ground. An even more advanced version of the equipment is when the lower leashes are spread with special wire whiskers (Fig. 2). The length of the leashes in this case should be such that the hooks of the leashes do not catch each other when casting (usually 3-5 cm).

Fishing tactics can be either passive or active. In the first option, we mean casting gear to a certain fishing area and waiting for a bite signal by vibration of the tip of the rod, which is installed on a special stand. By the second option we mean casting and dragging the equipment with stops for fishing at this moment on a stationary nozzle. Active fishing allows you to quickly detect a school of red mullet, but this is only possible in areas with a clean sandy bottom. Where there is a lot of algae, such fishing threatens with snags and equipment breakage.

In general, the best places for catching red mullet with picker-quivertip are located in the area of pebbly or sandy-muddy soils, as well as in the estuarine areas of the sea.
From the boat
Fishing from a boat at sea is limited to daylight hours: it is prohibited to be away from the shore in the dark. The boat or motorboat is placed on guy ropes with two anchors, which should be 20-30 m from the vessel so that the ends do not interfere with casting.
Often, especially in spring and autumn, red mullet concentrates in large numbers over shallow banks remote from the shore, where it can be caught from a boat using a regular fly rod with a blind rig.

If you find yourself on a large school, you should expect a confident bite. In this case, the test of the float can reach up to 5-6 g. And with floats of increased test, it is, of course, more convenient to fish at sea, because they are more stable on the wave.
Some fishermen, having discovered a school of red mullet standing at great depths, manage to catch it using onboard fishing rods, designed according to the winter fishing principle - for them, special holder nests must be made at the stern or on board. Such a fishing rod is equipped with a reel with a spool of sufficiently large diameter (so that you can quickly reel in the line when fishing at depths of up to 25 m). As a bite alarm, it is most effective to use a sensitive nod made of a metal or mylar plate. Instead of a jig, a 15-centimeter leash with a small hook is tied through a swivel at the end of the main line. To attract fish, the fisherman moves the bait, periodically slowly raising it from the bottom to 30-50 cm. In addition to red mullet, other small Black Sea fish that stay in schools near the bottom also bite well on such gear.
Bait
The best bait is the red-greenish sea worm Nereis. Usually, not the whole worm is put on the hook, but only a piece of the worm. The polychaete sea worm is collected from vast shallow areas of the sea, where the bottom is covered with black silt. Typically, an angler wades into knee-deep water and scoops up the silt with a shovel, then spreads it in a thin layer on the shore. As the sludge dries, the worms will make themselves known by moving. Here you need to collect them in a jar, after which the worms must be washed and stored along with the algae. In the spring, when red mullet are actively biting, they are often caught using an ordinary earthworm or dungworm.
Another good bait for catching red mullet is freshly caught shrimp meat. These small crustaceans are caught with special nets, covering with them the algae growing on the stones. Sometimes a lot of shrimp can be found in bays and lagoons overgrown with aquatic grass. Here it is good to catch them using a small trawl, which is dragged behind a rowing boat. The caught shrimp is cleaned of its shell, and the flesh is carefully cut with a sharp knife, then placed on a hook, pierced in several places.

If the bite is good, you can use mussel meat to catch red mullet. Colonies of these bivalve mollusks often cover the piles of sea piers. For fishing, they try to take large shells. You need to pick them with special gloves (thick cotton ones are also suitable for this) to avoid cuts on your hands. The harvested mussels are opened with a knife and their contents are allowed to dry a little in the sun, then the muscle of the mussel is cut into pieces for bait.
Lure
The success of catching red mullet depends on finding the habitats of the schools. However, it should be taken into account that on the sandy bottom the red mullet moves a lot in search of food. To keep discovered fish in place and attract new schools, bait is sometimes used. It can be prepared from a mixture of animal feed with the addition of bottom sand. For example, they take two or three kilograms of mussels, pound them on flat stones into small particles, mix them with a small amount of finely chopped earthworms and add soil in a ratio of 1:3. All this is mixed in a large container and then periodically thrown into the fishing area.

About taste
Red mullet meat is very tasty. Grilled mullet is excellent. Usually, red mullet is prepared and served gutted, but with the head, in portions of several pieces. Red mullet dishes come first in all seaside restaurants and cafes that attract gourmets with their exquisite cuisine.

Note!
The red mullet (Mullus barbalus ponticus Essipov), or otherwise known as the red mullet, is a small fish with an elongated, laterally compressed body. The profile of her head is steep but smoothly rounded, her eyes are set high. It has two dorsal fins, the second one is similar to the anal one. She has a pair of long antennae on her chin. The body is red, with silvery gaps, and covered with large scales. The belly is silver, the fins are yellow. The usual length of red mullet is 8-12 cm, but some specimens grow up to 20 cm. It is common in the Black Sea, the Kerch Strait and the Sea of Azov. Sexual maturity - from the 2-3rd year of life. Spawning away from the shore at a water temperature of 16-18 °C, from May to July. First, the larvae and then the fry develop in the water column, feeding on plankton. Then, when they reach a length of about 5 cm, the fry migrate to the coastal zone, switch to bottom feeding, quickly acquiring a protective color close to the color of the bottom.
Red mullet prefers areas with a sandy or sandy-silty bottom. While practicing underwater hunting, I did not often have the opportunity to observe how small flocks of red mullet tirelessly “probe” with their antennae and then “filter” the sand, looking for some kind of food in it. And they feed on worms, crustaceans and mollusks, much less often on fry.
Red mullet lives near the shore in spring and until about mid-October. With a strong cooling of the water, flocks unite and migrate to greater depths (50-70 m), where they stay until the end of winter.
Fishing knots are used by anglers very often; they can help you connect two fishing lines of different diameters, tie a jig or hook, a wobbler, a silicone bait or spinner, a weight or a swivel. This is a very responsible process, because if you use the wrong knot or tie it incorrectly, there is a high risk of the line breaking or untying. Let's take a closer look at some questions about the types of fishing knots depending on their purpose and talk about the correct tying of a fishing knot.

Some of you may have noticed that in the catalogs of various fishing companies and on the boxes of some products (hooks, cords or fishing lines) instructions on how to knit fishing knots are often indicated. These units are suitable for gear in the category or on the box of which this diagram is depicted. They are constantly updated and have a very large margin of safety.
But no matter how strong the knot is, in any case it negatively affects the strength of the fishing line, some deteriorate it almost twice. And this, in the worst case, can lead to a breakage of the gear at the most crucial moment.
You can’t do without knots, because absolutely all gear must be connected to hooks, leashes or lures. Every beginner and experienced angler must know how to tie the right fishing knots; for this, several tricks are used that will help you quickly and without much difficulty tie a strong and reliable knot.

The simplest tips are, for example, wetting the fishing line with water or saliva before tying a knot. This will help reduce friction and increase the strength of the knot. The choice of knot type depends on the diameter of the fishing line used and its purpose. And yes, under no circumstances expose the fishing line to external fire. It is better to bite off the excess with your teeth or cut it off with scissors.
The knitting pattern for the ideal fishing knot has been found by fishermen for a very long time. This is facilitated by the considerable experience of our predecessors in combination with modern materials and technologies, which makes it possible to make very high-quality components. So, with the fact that the knot must be reliable and durable, we have figured out that another important requirement is simplicity. The knot should be very easy to tie.
The Palomar knot is the most popular knot for fishing hooks, which everyone knows. Most often it is used for tying the main fishing line with a swivel, but it also has no equal for tying a hook. Yes, it is also used to tie the weight-heads of silicone fish to a leash or fishing line. But it has one drawback - when tying, you need to fold the line twice, which adds volume and shortens the length of the leash.

The Crawford fishing knot is considered a classic fishing knot for tying a hook. It is used only for hooks with an eye. The knot is very easy to tie and very secure. It can also be used when using regular fishing line and braided cord.

The bayonet knot is also very simple, but its disadvantage is its lack of versatility. They can only connect the hook with a regular fishing line; with braided line it will not be able to be tightened properly and it will simply come undone. A photo of tying is shown below.

The fisherman's figure eight knot, or, as it is also called, the Canadian figure eight knot, is excellent for tying a hook with an eye. Its peculiarity is that it is quite reliable, but if the need arises, it can be easily untied.

The grip knot (more popularly called Clinch) is considered ideal for connecting a hook and braided line. Suitable for hooks made of thick and thin wire. Many anglers make a big mistake by tying winding rings with a clinch. In this case, it is not recommended to use it.

A stepped knot is often used to tie hooks to a blade. Such hooks are often very durable and this is a merit of manufacturing technology. They are simply forged. This knot is considered the most durable of all of the above.

A foreign fishing knot called Twisted Dropper Loop, which is sometimes simply irreplaceable. It can be used to tie a hook into a loop in the middle of the fishing line. It is very often used in sea fishing, less often used in fresh water bodies. Allows you to quickly replace one hook with another if necessary.

Also a knot that came to us from abroad - Centauri Knot. The peculiarity of this knot is that during its tying, the deformation of the fishing line is minimized, and this makes it possible to achieve maximum strength of the equipment.

Hangman’s Knot is twinned with the previous knot, which, although it requires greater deformation of the fishing line and the number of steps during tying, has no less strength and reliability.

The Scaffold Knot is essential if you need to tie a large hook to a thick line. It is very often used in sea fishing; among our fishermen we had to observe it several times among “hunters” of catfish.

The Snelling A Hook fishing knot is quite complex, but very reliable. Used exclusively for tying hooks.

Turtle Knot - Great for tying eye hooks. It is famous for its simplicity and reliability. Yes, by the way, he helped me many times in tying hooks to a drop shot.

These were just the basic knots for the fishhooks. There are a lot of them, and all of them are unlikely to fit into one article. We provided only the best of them, in the opinion of the editors. Choosing only what you have personally experienced in practice and your own experience.
Anglers often face the problem of quickly and securely attaching a leash to a fishing line. I, too, have encountered this more than once, and decided that it was necessary to allocate space in the article for fishing knots for leashes. In order to tie the leash to the main fishing line, you need to make loops on it. Moreover, the loop can be made either permanently or temporarily.
Let's take a closer look, first let's talk about the time loop. The huge advantage of such a loop is the ease of its elimination if necessary. The pattern for tying a temporary loop for mounting a leash is as follows:
- first you need to take the main fishing line and make a loop on it;
- then you need to press the loop near its base;
- then take the leash and tie any knot at its free end, I prefer to tie a figure eight knot;
- after which it is necessary to thread the end of the leash with the resulting knot into the loop on the main fishing line;
- and just tighten the loop.

If you are going to constantly fish with a leash, then you need to make a permanent loop. And it is done as follows:
- holding the base of the loop, you need to twist it on the main fishing line, and pay attention that the diameter is about 10 centimeters;
- Then you need to turn the leash around the main line 5 times;
- then thread the other end into the loop and tighten;
- The knot on the leash is knitted according to the pattern described above.
Did you like the article? Be sure to write comments and share it with your friends on social networks. I also highly recommend watching the video about fishing knots for leashes and hooks, which very clearly illustrates the 10 most popular fishing knots.
Few pieces of jewelry are ready to compete in popularity with a choker. Its triumphant return in the 90s of the last century simply captivated the minds of ordinary girls and cool designers. Then there was a slight lull. And for several years now, decoration has been modified, improved, and appears in new forms and materials.
The latest review of the year, presented in famous collections of world designers, has already been published on the website. It turns out that some fashion gurus regard it as the most suitable decoration for their masterpieces. A worthy alternative to gold chains for spectacular jewelry.
What is a choker? What are the main features of a tattoo choker?
A choker is a thick decoration for the neck or wrist. Translated from English, this word means “strangler.” Obviously, this means that the accessory closely encircles the neck. Although, perhaps, there are other terrible secrets hidden behind this?
Choker tattoo is made from intertwined dense elastic threads or thin wires. From a distance, this accessory looks like a tattoo. That's why it's called choker tattoo. This product gained the greatest popularity in the 90s, then for several years it occupied first place in the ranking of youth jewelry. Today the number of his admirers has decreased slightly. But there is a category of girls who consider it the most suitable for their image. It is for them that we have prepared this photo instruction for making a choker tattoo.

The choker fits tightly around the neck. Perhaps this is its only characteristic by which the accessory can be attributed specifically to chokers.
The site presents for fashionistas, including the history of origin and development, as well as all the most famous modifications of jewelry. From them you will learn that the “authority” of the choker has changed dramatically over the years. Either it was a favorite and constant decoration of royalty and noble ladies, or it was considered something shameful and indicated that it belonged to girls of easy virtue. After all, it was immodest girls of a frivolous disposition who tied it around their necks.
History says that the very first choker was a talisman adornment of ancient Indian tribes. They believed that the neck band protected them during battles. It turns out that the first to appear was the men's choker. Today, too, there are guys who wear this stylish decoration. It is unlikely that men's chokers look like a thin tattoo. Most often, this is a laconic black necklace in a discreet style, reminiscent of a simple cord. The most famous admirer of the choker is Jared Leto, who played the role in the film “My So-Called Life.” Probably, the guys took their example from this handsome guy. 

Women, out of habit, borrowed this decoration from men (just like trousers or). But the female version has become more refined and skillful. Soon, lace chokers and charming choker necklaces appeared.
Then came the high point of the stylish “collar”; wearing it was cool and fashionable. It was a kind of tradition that denoted belonging to the modern movement. The super popular considered choker tattoos part of their style and lifestyle.

But, unfortunately, it was difficult to buy it in stores. It took a long search to find it. But smart girls learned how to make a choker themselves. Today, purchasing an accessory in online stores is not particularly difficult, but we will tell you how to make a choker for your neck with your own hands . It's much more interesting. The accessory will be original, one of a kind. It will keep your hands warm and display your own style.
See detailed and clear step-by-step manufacturing instructions with photos in the next part of the article.
How to make a choker?
What can you make a choker from at home? These can be different materials.
Choker made of fishing line
Choose thick fishing line of any color. The most noticeable thing around the neck will be a black choker. To be different from your girlfriends, you can weave a white, colored, pink, blue, or rainbow “collar.” Often one or more pendants, beads, or stones are added to it. In this article we will teach you how to weave a choker from fishing line yourself. Photos of each stage are attached. It will take you very little time to make. 

spandex choker
A thin, elastic, stretchable, durable thread is an excellent material for weaving an accessory. The thread is pliable, durable, and has a long service life. It can be found at a craft store. 
Choker made of rubber bands
Even children are interested in weaving from colored rubber bands. The pattern for making the jewelry is simple and very interesting. Video instructions and a step-by-step execution diagram with photos have already been published on the website. If you have all the materials in stock, then quickly proceed to production. 
If the headphones are out of order, but outwardly they do not have scratches or other minor damage, then you can give them a new life by making them into a necklace. There should be no problems with weaving a choker - the pattern used is the same as for a “collar” made of fishing line. But making the fasteners is a little more difficult. But even here the site’s experts will come to your aid. A separate publication presents a master class on making a choker from headphones and your choice!

Choker from charger
If the broken charger has a thin wire, then it can also be used. Realistically estimate the thickness of the wire and its length. In a word, experiment!

Ribbon choker
A satin or velvet ribbon around the neck looks very feminine and stylish. You need to know what style of clothing to combine it with. You can attach a small pendant to it.
Detailed instructions with photos on how to make them yourself are on our website! Film stars, singers, socialites are happy to wear it with their fashionable outfits! who adore the choker, published by experts! Check out the gallery of the most interesting photos!

Beaded choker
An elegant option that goes well with festive dresses. A beaded choker is a real work of art, it’s not easy to make! The sophisticated, complex shape is suitable for evening dresses. 

Lace choker
The elegant decoration was chosen by both young girls and adult women. For young beauties it looks like a lace ribbon. Ladies with a certain status in society choose wider embossed lace. Read the secrets of creation on our website.

 We have listed the types of chokers that you can make with your own hands if you have a great desire and a little skill. See absolutely all existing options in the recent publication.
How to weave a tattoo choker from fishing line
The most common and inexpensive option is to weave a choker from fishing line. First, practice how to weave a choker from pieces of old fishing line to determine exactly the required thickness, length and color of the material. The most popular and simple pattern for weaving a choker is shown in the figure. The decoration was created using this technology. It is easy to put on your head, as the loops stretch and return to their original shape at the neck.  For the master class we chose multi-colored fishing line. We will make the decoration as in the photo!
  Our material is less saturated in color, but suitable for training!
  The thickness of our fishing line is not enough for the choker to look beautiful. Therefore, we folded it in half so that the colors matched along the entire length. We needed about 4 meters of multi-colored fishing line. The material was secured to a hook. You can secure the fishing line with a clothespin or ask a friend to hold it.
  Loop one end of the line around the other and pull tight.
  After this, make a loop with the other end of the fishing line. Pull the threads more when weaving so that counter knots are created at the same distance from each other.
  Using the same pattern, weave a choker of the required length. Take turns making loops with different ends of the fishing line.
Handicrafts are gaining popularity, and various forms of weaving jewelry are at its peak today. In 2014, chokers came back into fashion - jewelry for the neck that tightly clasps it, and to this day, decorating yourself with such a product is considered a sign of good taste. Tattoo chokers, which from a distance resemble tattoos on the arm or neck, do not have to be bought in a store; you can make them yourself from materials that you will probably find at home. You will learn how to weave a stylish choker in this material.
How to weave a choker: a step-by-step master class for beginners
Those who are just starting to get acquainted with needlework, but really want to become the owner of an exclusive choker, should start with the basics. We'll tell you how to weave a choker tattoo and what it can be made from. Fishing line, old thin wires, for example, from headphones that are no longer used, or special jewelry wire are best suited for this purpose. Weaving a choker according to the patterns below is also possible from nylon, waxed, leather or suede laces, ordinary satin ribbons and even woolen threads. Absolutely any material suitable for weaving can be used.

Learning to understand the braid technique for beginners
There are a huge number of ways in which you can weave a choker around your neck. One of them is available to everyone, since everyone knows how to braid hair, and any braiding technique that you know will do, be it a regular or reverse braid, a spikelet, a braid of four or more strands. Each time you will get different and original decorations.
We'll tell you how to weave a choker using a regular braid technique. To do this, on a solid base, for example, a book cover, we use a stationery clip to fasten three pieces of fishing line, each a meter or a little more long, or three pieces of headphone wire (of any material chosen for weaving).
Next comes the technique: we cross the right wire or piece of fishing line with the central one, which we then move slightly to the side so that it does not interfere. Now the piece that was on the right becomes central. We take the left piece of the material we are working with and intersect it with the central one, moving it to the left. Now the piece that was on the left has become central. Let's see how it looks on the diagram.

Repeat the technique until there are approximately 3 centimeters of free ends left. They are needed to secure the product. The easiest way is to tie it. To do this, we collect the three free ends of the product and tie them into one bundle with a regular knot. We do the same on the other side of the product. Now you need to tie the two resulting ends together. This can be done in different ways. The diagram below shows options for reliable fastenings.
Or, if the choker is woven from fishing line or nylon cord, you can fuse the ends together using a lighter. Having fused them on one side, we thread the fishing line into the resulting loop from the other end of the choker and also fused it in the same way as shown in the photo.

By experimenting with the colors and materials from which you weave, as well as with the tension force, you can get a variety of options for a choker woven using the same technique.
How to weave a tattoo choker using the technique of simple knots with a description of the work
To do this, a cord 3-4 meters long, depending on the circumference of the neck, must be folded in half and secured, for example, with a paper clip. We will weave a choker from the two free ends, as shown in the diagram.

We take the left end, place it on the right and thread its tip into the resulting loop from below. There is no need to tighten it tightly, otherwise the pattern will not turn out openwork. We do the same with the right end of the cord and weave it to the required length.
Using double knot technique.This weaving option is more complex and involves working with four threads. Secure the threads folded in half, as shown in the figure below, or use a paper clip to secure each thread separately. For convenience, we number the threads from left to right from 1 to 4. Place thread No. 1 on top of ends No. 2 and 3, and bring them under thread No. 4. Now we work with the far right, under the fourth number. We wind it by threads No. 2 and 3 and bring it up into the loop formed between threads 1 and 2. Now you need to tighten the knots if you want to get a tight choker (for example, from suede or leather cords), or straighten the loops if you want to get an openwork decoration (from fishing line or waxed cord). We got 4 threads again. Now you need to continue weaving, starting from the right extreme (No. 4). The diagram shows the weaving process in detail.

Having mastered the basic techniques, you can experiment with the number of knots and the strength of their tension, come up with your own weaving patterns, use a crochet hook for this, weave ribbons, beads, stones or sequins into the choker to create sets of exclusive jewelry for the neck, arm and even leg . With them you will be unique and stand out from the crowd.
Video on the topic of the article
If you still have questions about how to weave a stylish choker, then these video tutorials will serve as an excellent hint.
You might also be interested in:

In the minds of many, ABA therapy has two extremes: Some people think of ABA as...

Shared Tons of things could have been thrown into the trash ahead of schedule if humanity had not...

Properly chosen haircuts for obese women play a big role in the whole image....

According to most lawyers, length of service is the total length of work...

