


We offer you several master classes on creating a variety of valentines for February 14th. Here we have collected the best ideas, diagrams, tips, templates and step-by-step instructions. From this article you will learn how to make valentines with your own hands from various materials: paper, felt, beads, threads (we will crochet), salt dough, jewelry, etc.
In this collection you will find both very simple and at the same time original hearts, as well as those that will take a little more time to create. That is why some of the crafts will be described briefly (you will only need to look at the photo to understand how to make a Valentine), and we will dwell on others in more detail.
Paper Valentines
Let's start with the obvious - paper hearts. To create them you will need cardboard, colored paper and a glue stick. In some cases, additional decor will also be needed - it can be added at will to any of the presented crafts.
Postcard with a 3D heart
This is a very simple and at the same time effective homemade Valentine card, which will be nice to receive on Valentine's Day for a person of any gender and age.

We will need:
- rectangular cardboard base;
- colored paper for decorating a heart;
- glue;
- stencil.
The template can be anything you like, but we suggest you cut out and fold a ready-made heart. It looks like this.

You need to cut it out and mark the folds on it.

Fold the heart in half and bend the sides to it.
Fold the cardboard base in half and attach to it the heart that you cut out of colored paper using a stencil. Mark the place where you will glue the heart. Trace its outline and coat the side parts (small hearts) with glue.
Glue the paper to the cardboard behind the little hearts.


You've got a postcard with a voluminous paper Valentine. You can write your wish directly on it, and decorate the cover of your gift for February 14th using felt-tip pens or rhinestones. You can also place another valentine on the cover, instructions for making which you will find below.
Valentine card made from paper strips
This beautiful and neat valentine card would be a great addition to a Valentine's Day gift. It can be attached to a box or bag with a surprise for your loved one.

We will need:
- paper strips of the same width and different lengths (several colors);
- stapler or rivets;
- glue;
- threads and colored paper for cutting out hearts.
As the main material, you can use craft, corrugated, velvet and any other beautiful paper or cardboard. It would be great if this paper had an interesting decor.
The strips should differ in length by several centimeters - this depends on the size of the desired valentine.
Fasten the paper strips together by the base: short ones - closer to the center, the closer to the outside - the longer the strips.
Then fasten the strips together in twos and bend them towards the center, forming a heart.
Additionally, you can attach a paper loop to the valentine and make a pendant from thread and small hearts.

A great idea is to write a wish or declaration of love on each strip. Do this from the inside and invite the recipient to take the Valentine apart.
Volumetric 3D valentine made of paper
An easy way to cut and fold your own valentine card. The postcard will turn out to be original and very touching. The decor looks complicated, but this heart can be made from paper or cardboard in just a couple of minutes.

We will need:
- cardboard or colored paper;
- stencil or ruler;
- paper cutter;
- lace.
It is better to take double-sided cardboard or paper. If you don’t have one at hand, just glue two sheets together, painted on only one side. Just make sure that all parts of the future gift for February 14 are tightly glued to each other - otherwise it will come out sloppy.
Take a piece of paper and draw a heart on it. Then we apply a stencil to it or make markings at equal distances. For convenience, use this template.

You can print it out or just sketch it out.
Then we simply cut out the valentine from paper and go through the marked strips with a cutter. We bend them one by one: we push the first strip forward, the second - back, the third - forward again, etc.


The craft can be completed with lace or thread. Attach your valentine to a gift or give it just like that.
Paper valentine in the form of a box
Valentine's card is not always a standard card. You can give your loved one a box in which you can hide sweets or any other surprise.

We will need:
- cardboard;
- stencil;
- glue stick;
- satin ribbon.
The stencil for cutting out a valentine box looks like this.

Print it out or draw it. The sizes can be varied to your liking. In this case, the box is made from a standard A4 cardboard sheet.
We cut out the image of the heart, marking the fold lines on it in advance.
We fold the box, making the necessary cuts (look how it looks in the photo) and fastening small parts with glue or double-sided tape.


You can attach a satin ribbon bow to the finished box.

Valentine boxes decorated using the decoupage technique look very beautiful. If you have decorative napkins, consider this type of decoration.
Valentine card made from paper using quilling technique
The easiest way to cut out hearts is to use cookie cutters. If you don't have any, roll out the play dough you'll be making the valentine from and place a cardboard heart on it, then trace around it with a needle and cut off the excess with a knife or spatula.

Decorate the heart with openwork details, buttons, beads and other decor. Bake the Valentine in the oven, making a hole in it for the ribbon in advance.

If you want to add a wish to your homemade Valentine's card, write it on a cardboard heart and tie it to the ribbon. In addition, a heart made of plaster, polymer clay or salt dough can be painted with paints or special markers and the name of a loved one can be written on it.
Felt Valentines
One of the most popular cards for Valentine's Day is felt hearts. They turn out tender and touching, and even an inexperienced craftsman can sew them.

We will need:
- felt of any color;
- embroidery threads;
- cotton wool or cotton pads.
Draw a standard heart on cardboard and then apply it to felt. You need to cut two identical parts.
Make beautiful embroidery, sew on beads or seed beads and sew the parts together. At the same time, it is not at all necessary to make a hidden seam - the external finish also looks beautiful.
Stuff the hearts with cotton wool or cotton pads - plump felt valentines look even more beautiful.
Here are some ideas for inspiration.


Try making several Valentine cards at once - you can put them together into cute compositions.
Crochet Valentine's card
In this collection of video tutorials you will learn how to crochet a Valentine card. We have collected for you the best detailed and understandable instructions that will help even a beginner master this technique. Knitted cards and crafts for Valentine's Day are very attractive and valuable.

- Master class on knitting a voluminous valentine in 30 minutes
- Video tutorial on how to create a simple crochet valentine for beginners
- Master class on creating an openwork valentine: coasters for hot dishes
- Volumetric crochet heart
- Another lesson on knitting a voluminous valentine
You can give hearts just like that, tie them to a gift, or put them on wooden skewers and make a bouquet out of them. Knit colorful, bright valentines - your loved one will definitely not remain indifferent.

Choose any of the proposed ideas. Decide on the material from which you want to make crafts for February 14th, and then read how to make valentines and feel free to get down to business. Your loved ones will definitely appreciate such a gesture of attention on Valentine's Day.
Views: 19,131
The holiday of all lovers is approaching - St. Valentine's Day. A very tender and sensual day. Traditionally, lovers give each other cute gifts with holiday symbols and Valentine cards with love messages. Each of us has people dear to our hearts - loved ones, loved ones whom we want to please. And now is the time to start preparing for this holiday.
If you want to make it unforgettable and arrange it for your significant other, then read these articles.
The stores have a wide variety of gifts and Valentine's cards. But just imagine how many emotions the person who receives a Valentine’s card made by your hands will experience. And what a flight of fantasy you will experience when creating this very Valentine card! Products made by Handmade have the soul and warmth that you put into the manufacturing process.
So let's get started. I'll tell you and show you some interesting ideas for creating Valentine's cards for different recipients, be it messages for children or adults.
Valentines in the shape of hearts are cute, but they’re getting pretty boring. A very creative idea to make a postcard in the shape of a bear with a transparent tummy. You can write wishes on it or give it directly, there are no limits to your imagination. Feel free to experiment with the color of the bear and decorate it as your imagination dictates.

We will need:
- Templates
- Scissors
- Colored or white cardboard
- Cover film or transparent oilcloth
- Stationery glue
- Double-sided tape
- Watercolor paints and brush
- Pen
- Satin ribbon
To begin, cut out the required pieces from the template below. You can print the template on a printer, or you can transfer it onto a sheet from a computer monitor. You need 2 bears, and 4 tummy windows.

Cut out the details, use colored or white cardboard, it all depends on what your Valentine bear will be like.
Glue the ovals together using office glue. The result will be a part that will serve as a border for the hearts inside the bear’s belly.
On the wrong side of the bear template, stick double-sided tape around the window, or you can use super glue and glue a transparent film cut from a cover or oilcloth.
Then glue the border for the hearts onto the tummy with double-sided tape. Cut out small colored hearts and place them inside the window, and cover with another transparent film on top.
Cover the bear with double-sided tape.

Glue the second bear template onto the finished first one. Trim the edges and smooth out any uneven areas.
Cut out a couple more ovals from pink construction paper and glue on both front sides over the tummy to cover the unsightly areas.
Then glue black eyes to the bear, a nose in the shape of hearts and details on the ears.
Use white watercolor paint to add highlights to the eyes and nose. Use a pen to draw eyelashes and a mouth on the bear.
You can also stick hearts on the paws and add highlights with paint.
Make a bow from a satin ribbon and glue it to the bear’s neck.

We got such a cute Valentine. I am sure that such a bear can be made with children and they will be delighted. Very interesting and original.
Making a Valentine card from cardboard and coffee - step-by-step guide
This valentine can be perfectly used as a cute refrigerator magnet or a beautiful and stylish pendant. And the coffee beans will also give a wonderful aroma.

We will need:
- Thick cardboard
- Coffee beans
- Glue gun
- Acrylic paint
- Decorative elements: rhinestones, beads, lace, beads, flowers
First, you need to cut out the base in the shape of a heart from cardboard and prepare the coffee beans, to make them easier to take, pour them into a lid, for example, from a cream.

Start gluing the grains along the contour using a glue gun.

Now fill the space inside the base.

When the valentine is filled with coffee beans, you can cover it with acrylic paint in the color of the beans, but this is not at all necessary.
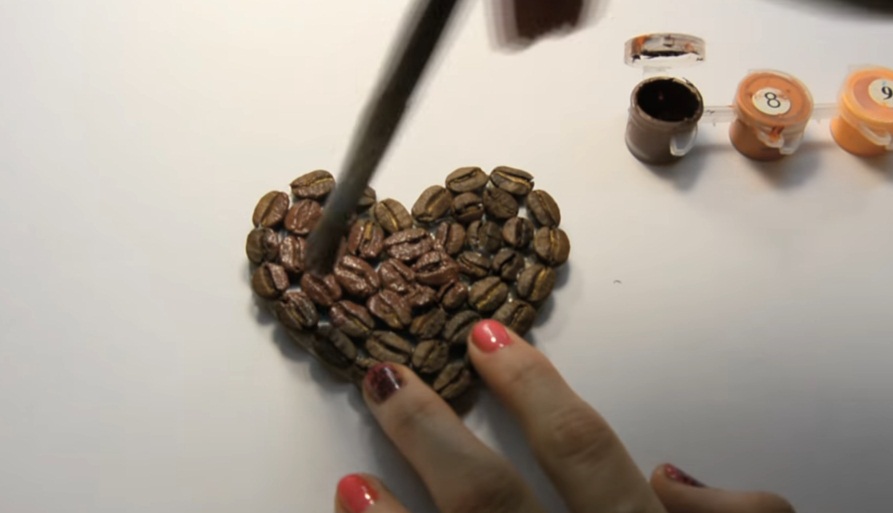
All that remains is to decorate our heart with decorative elements; here you can use anything or whatever you have on hand - beads, decorative flowers, rhinestones, lace or beautiful buttons.

Such a valentine will not only be a beautiful gift, but also an excellent decorative element. To do this, glue a magnet on the back side or make a garter, it’s not difficult at all.
Valentine's card for children with templates - 16 ideas
Children, especially schoolchildren, are also looking forward to Valentine's Day. This is an opportunity to confess to them your very first feelings about love for the other sex. This is all very exciting for them. Or you can make a beautiful Valentine card for your mother or grandmother, they will be very happy. To help them with this, I offer options for Valentine cards that you can easily make at home yourself and then write sweet messages on them.
- Apply gouache or watercolor to your hand and attach it to colored paper to make prints. Cut out hearts and attach a beautiful ribbon. This option will be interesting for preschoolers.

2. Volumetric hearts. You can glue them on a postcard, it will be beautiful.

3. For this valentine you will need white and colored paper, heart-shaped stamps, or you can draw them with felt-tip pens.

4. Glue heart-shaped balloons onto paper and get a beautiful Valentine’s card.

5. Cute valentine with wings. We fasten the parts with rivets.

6. This valentine can be made from felt and paper. Choose a beautiful combination of colors and make a braided pattern.

7. Another option for congratulations, which is very simple to do. On the album sheet in the middle, draw and cut out a heart. Decorate the outline of the cut out heart using a pencil eraser as a seal. Dip the gum into paint and apply it to the sheet.

8. Valentine card made from threads. It turns out creative, and for work you will need paper, a thicker needle and thread. First, draw the outlines of the heart on paper with a pencil, and then, having determined the central point, make stitches in a circle with threads.

9. Valentine hand. The outlines of two hands, and in the middle there is a heart. It turns out cute.

10. Great idea for an envelope made from a heart. Simply cut out a heart from colored paper and then fold the edges as shown in the picture.

11. Ring of love. We make the base in the form of a ring from cardboard, and on top we glue many, many hearts cut out of colored paper.

12. Three-dimensional card with a heart inside. Simple and tasteful.

13. Button heart. You probably have a lot of colorful buttons at home. Just secure them to a thread and shape them into a heart shape.

14. Holiday card with paper curls and beads. Such a card will be welcome for any occasion. Thin strips of paper can be curled using a regular pencil.

15. Original paper garland in the shape of hearts.

16. Valentine's card "Ladybug". The main thing is that there are hearts everywhere, even on the ladybug.

Beautiful cards for Valentine's Day with your own hands
I have two card ideas for you. They are made using appliqué techniques and do not require any labor. The first card will be made from envelopes with wishes, and the second will be an illustration of a jar and a glass cap with hearts. Let's start.
For the first postcard you will need: cardboard, colored paper, glue, scissors, tracing paper, pen.

Prepare the base for the card. Cut out 6 identical blanks for envelopes from colored paper and glue them together.

For wishes, you need to cut out 6 leaves of tracing paper of a suitable size for the envelopes and write wishes for the recipient on them.
Place your wishes in envelopes and seal them. Then glue the envelopes to the card.
If you wish, you can add a twist, for example, make a couple of envelopes with polka dots or decorate them with any design.
Finally, cut out a rectangle from black paper and use a white pen to write an inscription to your loved one with recognition or gratitude from the bottom of your heart.

The first postcard is ready. The recipient will open the envelopes with interest and read what you wrote.
For the second postcard you need: cardboard, colored paper, tracing paper, glue, scissors.

Cut out a cardboard base for the card. Draw a sketch of the jar and transfer it to tracing paper.
Cut out the lid and jar into separate pieces.
Draw hearts on colored paper and cut them out. Then glue it into the center of the card in a chaotic manner.
Glue a jar of tracing paper on top.

Cut out a lid from yellow colored paper and make strokes with a black marker.
Glue the lid onto the card.
For a 3D look on the can, use a simple pencil to shade the left side of the can.
Don't forget to stick a good wish or recognition.

I think that your significant other will be happy to receive such interesting cards made with love.
Video on how to make a Valentine card in scrapbooking style
Scrapbooking is a technique for designing photo albums, books or postcards by cutting out parts from paper. Previously, scrap elements consisted only of paper, but nowadays the range of decorations has become much larger. Decorations include fabrics, rhinestones, ribbons, lace, artificial flowers and other materials. The result is a whole work of art.
Making a Valentine card from threads - easy and simple
By making an unusual Valentine's card with your own hands, you will certainly delight your loved ones with an original surprise. Making a valentine from threads is easy and simple - even a child can do it. The Valentine card turns out delicate and very cute.

We will need:
- Threads
- PVA glue
- Safety pins
- Cardboard
- Food film
- Scissors
The first thing to do is cut out the heart template. To ensure that it has the correct shape, you can use a ruler and compass. To do this, draw a square and mark the middle on both sides, from this middle, draw semicircles with a compass. Cut out the finished heart. You can also draw a heart of any shape yourself. It's up to your taste and desire.

Attach the heart template to the cardboard base and insert the needles along the contour at a distance of 1 cm between them. Then remove the heart template; it will no longer be useful.
Prepare the threads from which the Valentine will be made. Dilute PVA glue with a small amount of water and lower the threads there.

Squeeze the threads a little from the glue and, hooking them onto the needles, form a heart until the threads run out. Then use a brush to coat the entire heart with glue, especially the areas near the needles. Leave the heart to dry for a day.

Once the heart is dry, carefully remove the needles and separate it from the cardboard base. Trim any loose threads.

The finished heart can be coated with glitter nail polish and decorated with rhinestones. Or add artificial flowers and large beads. In general, give free rein to your imagination.
DIY soft felt valentine
Such a souvenir can be made for absolutely any holiday, and not just for Valentine's Day. This heart can also be used as a delicate decorative element.

This is what we need: Felt, heart templates, glue gun, satin and lace ribbons, decorative elements, thread and needle, scissors, cotton wool for filling.

Attach the heart template to the felt with needles and cut out 2 pieces of a large heart.
Cut out one small heart from felt of a different shade.
Using a glue gun, glue a silver satin ribbon in the middle of the heart, then glue a white lacy ribbon on top of the silver one. 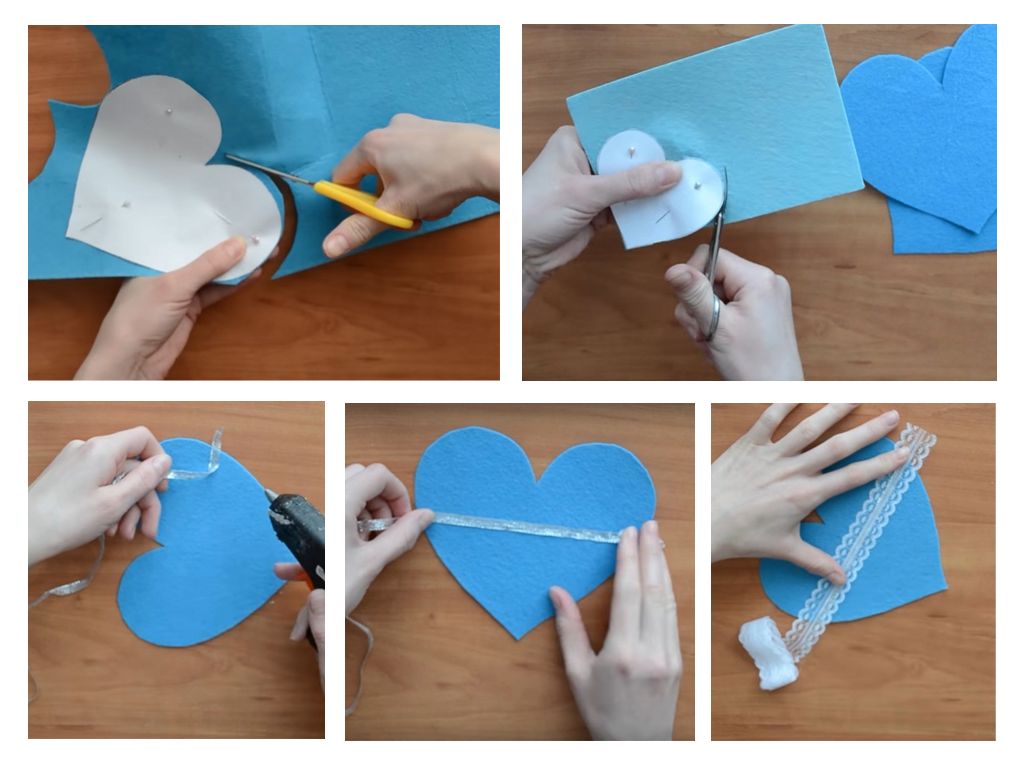 Glue a small heart on top of the ribbons in the middle.
Fold the edges of the tapes and glue them to the inside.
Take the second heart, a needle and thread and sew the pieces together. Sew on a loop.  Leave some space, stuff the heart with cotton wool and sew it up until the end.
For decoration I used artificial leaves, twigs and a rose. You can use whatever you like and have on hand.  Such a soft and beautiful heart will remind the recipient of you for a long time. It can also be used as a pincushion. It will be a universal gift.
Video on how to make a 3D Valentine at home
An original and easy to implement idea. With such a valentine you will definitely surprise and delight your soulmate. The video describes each step in detail, which will greatly help you in making such beauty at home.
Valentine's Day is celebrated in many countries around the world. This is a holiday of pure and warm feelings between lovers. Love each other, do spontaneous things, give gifts and confess your love. Our whole life is built on this. And you don’t have to wait for the holiday. Just say pleasant words to each other more often and give joy, it’s so sweet.
Choosing a valentine for Valentine's Day is quite a difficult task. Of course, a lot of printed products appear in stores on the eve of the holiday, but such valentines are unlikely to surprise anyone and show how much you really love a person. Therefore it is best make your own valentines is the best way to give a unique gift that will help you express all your true feelings.
Paper Valentines: step-by-step master classes
Easiest to make DIY Valentine's card made from paper. Paper and cardboard are inexpensive materials, but the number of design options is unlimited. For work you will only need scissors, glue, a ruler, a stationery knife and a pencil. Even with such a simple set that every home has, you can make a beautiful postcard.

Valentine's card
We all liked pop-up books that, when opened, revealed interesting figures as children. This is how you can make a Valentine's card. For this you will need:
- A piece of thick cardboard;
- Colored or white paper for decoration;
- Glue, scissors, stationery knife and pencil.
 DIY Valentine card made from paper
 The process of making the inner clamshell itself is very simple. First you need to draw an inscription; it may differ from the one in the picture. The most important thing to consider is that the upper sides of the inscription must have an additional plane in order for the letters to unfold. Next, using a stationery knife, cut out the longitudinal lines of the letters, leaving the transverse ones. After this, you just need to stick the resulting blank inside the book, bending the letters so that they unfold when the book is opened.
Important! Before gluing the inner piece of paper, make the outer design of the valentine first.
This paper valentine looks very original, and you can make the external design to your taste. It doesn't have to be in the shape of a book, it can be a heart, a flower, or any other shape that you think is romantic.

And 3 more step-by-step master classes on making a valentine folding card with your own hands:
Valentine's appliques
Some may say that appliqués made from colored paper are a child's activity and are not suitable for an adult. But thanks to their use, you will get a beautiful DIY paper valentine.

Applications can be used for both internal and external decoration of valentines. Standard option: make a big heart with your own hands and decorate it with appliqués.
Important! Do not copy the children and do not make multi-colored and motley appliqué, it is best to do everything modestly and beautifully, such valentines look much better!
We will not list all the possible options for such valentines, as this will be very long. If you want to make valentines with your own hands, the master class that we can show you will still be incomplete. After all, your postcard should be an expression of your feelings, and not a copy of a beautiful craft. To make your work easier, if you decide to make your own valentines out of paper, photo diagrams and other materials can be found online and simply printed on a printer. But remember that your main task is to make your Valentine’s card original.
Here are the options we found for beautiful DIY valentine appliqués:


![]()


DIY Valentines: scrapbooking
If you have been dating a person for quite some time and you have photos together, then it will suit you valentine in scrapbooking style. This style is quite extensive and a wide variety of materials can be used. The most important requirement is that the valentine should be in the form of a story.

How to make a Valentine card in scrapbooking style
The first thing you need to do is come up with a story that you want to convey in your valentine card. This could be the story of how you met, your first declaration of love, how you fell in love with a person. It is important that the story fits the theme of the holiday.
The second stage is the preparation of materials for manufacturing. Scrapbooking is a style in which stories are conveyed not only through visual images; you can also use tactile sensations, smells and any other methods to create the appropriate atmosphere when viewing a story. It is, of course, desirable to have photographs, but they can be replaced with inscriptions or pictures that will convey the meaning of the story itself.
The traditional option is an album with photographs, looking through which you can understand the story. It can even be one-page, since you only need to convey the essence. A good option is to make a postcard with heart stickers; the inscriptions can be on top of them, or they will need to be opened one by one to view the story.

Important! You make a congratulation or recognition yourself, remember, you are free to choose its design and content, you just need to adhere to the basic canons of your chosen style.
DIY Valentines made from fabric
Fabric is also an excellent material for making valentines, there are also a lot of options for such valentines, and you can really make unique and inimitable crafts. The most important thing when working with fabric is not to rush, as fabric is a little more difficult to work with than paper and cardboard.

Valentine pillows
Making a heart shaped pillow is quite simple. For this you will need: two pieces of fabric for a pattern, cotton wool or other filling for a pillow (you can even use pieces of fabric), needles and threads, scissors, a piece of cardboard for a pattern.

First, a heart-shaped pattern is made (you can change the shape at your discretion). After this, the outline of the future pillow is drawn on the fabric using a pencil or felt-tip pen.
When cutting out patterns, remember that the outline you draw is a seam indication, not a cutting line. Be sure to step back 1-2 centimeters when cutting from the outline so that there are no problems when sewing the pad. When you make valentines with your own hands from pattern fabric, you don’t have to cut them straight. The edges of the fabric will not be visible anyway, since they will be inside.
Next, the two pieces of fabric are folded together so that the right side is on the inside. If you have a sewing machine, then you can sew the fabric together on it, if you don’t, then you can get by with a simple needle, although it will take a little more time. The heart is not completely stitched, but a small hole is left on one side. It is needed to turn the workpiece inside out and fill it.
When everything is ready, just carefully sew up the hole that remains after filling the pillow. Additionally, before sewing the blanks together, you can embroider an inscription on the pillow to make it as original as possible.
Important! It will be easiest to embroider an inscription on a pad using satin stitch.
You can easily make these DIY valentines from felt, velvet, silk or other fabric that you like. The most important thing is that it is not only beautiful, but also durable. Indeed, in this case, your congratulations will be remembered for many years.


Embroidery valentines
If you like to embroider with cross stitch, satin stitch or another method, then you can make an original Valentine card that will be an excellent addition to the interior. To do this you will need:
- Embroidery fabric;
- Needles and threads;
- Embroidery pattern or drawing.
The easiest way to embroider a Valentine's card is with a cross. To do this, just find an embroidery pattern, transfer it to the fabric, and then put it in a frame. For embroidery you will have to spend a little time, but such a gift is rare and you can show the person how dear he is to you.
Satin stitch embroidery opens up a lot of scope for imagination for needlewomen. By embroidering with satin stitch, you can transfer almost any design onto the fabric; all you need to do is simply have the desire. You can make inscriptions in an original font, embroider hearts and much more.


Important! Try to find a beautiful frame for your embroidery; it is also an important design element and gives the gift a beautiful and finished look.
Embroidery patterns for valentines

DIY Valentines for children: templates
As you know, children also love to give each other Valentines, and if your child is still in kindergarten or primary school, then you will have to help him. Of course, at such a young age, Valentine’s cards for February 14th are congratulations, not declarations of love, but it’s still better to try so that your child can assert himself.
The easiest way would be to use templates for making, they are not difficult to find, and they are varied. When you make DIY valentines for children, it is best to choose templates that will be as easy as possible for your child to make. After all, not all children do appliqué or other types of crafts.


Templates make it much easier for parents, as they can simply be printed on paper, cut out and signed. Of course, you can buy similar cards in stores and simply sign them, but for a child, as well as for an adult, it will be much more pleasant to give gifts that are made with your own hands.
There are many ways to make a valentine card. It could be a postcard, a book, a box, a painting, a photograph, a pillow. The most important thing is desire and a little imagination. Gifts made with your own hands are always more valuable than those simply bought in a store. Happy Valentine's Day!
Share your valentines in the comments!
Valentine card is one of the symbols of Valentine's Day. Of course, you can buy such a postcard in a store, but it is much nicer to receive a similar product made by yourself. You can make valentines from different materials. Paper, fabric and even food are suitable for this. We offer 7 best ideas on how to make an unusual and cool DIY Valentine card from paper and fabric.
Photos of the simplest schemes
Now we offer you 5 of the simplest patterns for making a cute and original valentine with your own hands.
Valentine's card "Romance"
This card is very easy to prepare; such a product does not require additional skills or unusual decor. This Valentine can be classified as a traditional paper one.
To work you will need:
- white cardboard;
- red glitter paper;
- glue;
- decorative shiny ribbon;
- glitter;
- beads;
- scissors.
How to do:
Using a pencil and a ruler, the cardboard sheet must be divided into three parts so that the sum of the two extreme parts is equal to the middle part. Bend along the marked lines. You will get a blank with two doors. You need to cut out two hearts of different sizes from red paper. The smaller heart is glued into the larger one. Then they need to be glued to the folds of the postcard so that it does not open. Then, at the junction of the halves of the postcard, the hearts need to be cut with scissors. To prevent the valentine from opening randomly, it must be tied with a ribbon. Additionally, the card can be decorated with beads, sparkles and small paper hearts.
Valentine's card "Beloved Heart"
For this postcard you will need:
- thick paper;
- bright pictures in the theme of Valentine's Day;
- decorative ribbon;
- beads.
Preparation method:
- You need to cut the required rectangular piece from thick paper. The size of the postcard depends only on your wishes. This blank should be folded like an accordion. Cut out several hearts of various sizes. The number of hearts depends on the number of “steps” in the accordion. They will need to be glued to each bend.
- Hearts can be cut out either from pictures or from decorative paper. Near each heart you can write tender words and declarations of love. Further decor depends only on your imagination. You can use beads, sequins, etc. Tie the finished card with a ribbon.
Valentine's card "Beloved"
For the postcard you will need:
- thick paper;
- scissors;
- glue;
- photo of you together.
Preparation method:
Cut out a heart from construction paper. Choose the size of this valentine yourself. Next, you need to cut out your faces from photos together. There is no need to cut out “just the faces.” It will look more beautiful when the pictures contain images, for example, waist-high. Paste these photos over one side of the heart. On the other side, write a beautiful declaration of love.
Valentine "Tender"
You can make a Valentine card not only from paper. Such fabric products turn out to be very original.
To work you will need:
- thick paper;
- thick fabric (preferably red or shiny);
- threads;
- scissors;
- sentipon or cotton wool;
- decorative tape;
- shiny or mother-of-pearl beads;
- lace.
Manufacturing method:
- Make a heart template of the required size from cardboard. After that, attach it to the fabric and trace it. It is necessary to cut out the heart along the outlined contour. We make two such blanks. Next, they need to be sewn together, leaving 2 centimeters unsewn. Through this hole you need to turn the products inside out and stuff them with cotton wool or centipon. Only after this you need to sew up the hole.
- Next, we decorate the valentine, here you can show your taste and creativity. For example, trim the seam with lace, and make a bow from a ribbon in the center and trim it with beads everywhere.
Valentine's card "Delicious"
An unusual and delicious Valentine's card will be a wonderful present for Valentine's Day.
For the product you will need:
- 250 grams of butter;
- 200 grams of homemade sour cream;
- 500–600 grams of flour;
- 300 grams of sugar;
- baking powder.
Cooking method:
Cold butter needs to be chopped with sugar. Add sour cream, vanilla, flour and baking powder. Knead. It should not be a very tough shortbread dough. Roll out and cut out hearts. Decorate with melted dark chocolate or egg white glaze.
Master class on making sweet valentines with video instructions
Well, one more
Valentine's card "Full Heart"
It is not only very original and beautiful, but also has a wonderful aroma.
To work you will need:
- base for making soap;
- red food coloring;
- essential oil; soap mold (preferably silicone).
Cooking process:
To work, you will need a metal container in which our heart will be drowned. Grind the soap base into this bowl and place in a water bath. When the mass becomes liquid, add dye and aroma oil. Pour the finished mixture into a mold to make this Valentine’s card more colorful, add dried flowers to the liquid mixture. The finished product must be removed from the mold and tied with a decorative ribbon.
Video instructions for making soap
Valentine's card "Three hearts"
This card is very easy to make, even small children can make it.
To work you will need:
- thick white paper;
- not thick red paper;
- glue;
- scissors;
- pencil.
Preparation method:
Fold a white sheet of paper in half. Draw a heart on it so that when you cut it out, it will be double. The result should be a blank of two leaves, each of which is in the shape of a heart. Next, a sheet of red paper needs to be folded like an accordion. Cutting hearts out of it is much smaller than the white blank.
You should get an “accordion” of hearts. Glue one half of the accordion to one wing of the white blank, and the other half to the other. The result is a voluminous postcard. It can be decorated with sparkles, sequins or any decor of your choice. You need to write a beautiful congratulation on the finished product and tie it with a decorative ribbon.
18 photos of ideas for creativity
Additionally, I have collected 18 photos of ideas for the most beautiful postcards from around the Internet, I am sure you will be able to choose something original for yourself.


Crafts for Valentine's Day in elementary school
DIY paper valentine card.
Master class with step-by-step photos
Description: This master class is intended for children from 8 years old, primary school teachers, and parents.
Purpose: crafts for Valentine's Day, gift, work for an exhibition, decoration.
Target: creating a postcard using the kirigami technique.
Tasks:
develop practical skills in working with paper;
consolidate skills in handling tools - scissors, paper:
develop artistic taste, creativity, fantasy, imagination;
develop fine motor skills of the hands, eye, spatial imagination;
to form a work culture: teach accuracy, the ability to use materials carefully and economically, and keep the workplace in order;
cultivate independence, patience, perseverance, a sense of satisfaction from the habit of finishing things;
instill an interest in art, arts and crafts.
Valentine's Day ( Valentine's Day) has long turned into a full-fledged holiday for most Russians. According to statistics, almost 80% of boys and girls under the age of 25 celebrate this fashionable holiday. (Only those unfortunate people who don’t currently have a partner defiantly ignore it).
All over the world February 14th is celebrated as Day of Love: boys and girls, men and women, friends and acquaintances exchange valentines - greeting cards in the shape of hearts. Why not? After all, this is a great reason to wish your friends love and happiness!
Dear colleagues, today I would like to present you a master class on making valentine greeting cards using the kirigami technique.
Material: colored cardboard, carbon paper, scissors, shaped scissors, ruler, pencil, stationery knife, shaped hole punches.

Step-by-step description of the work:
Option 1. To make a Valentine's card, we need stencils.


Stencils can be printed on colored cardboard. The size can be changed as desired.

You can transfer stencils through carbon paper.

Carefully cut out the workpieces using scissors or a stationery knife, observing
Rules for handling cutting tools:
1. Check the tool before work. Work with well-adjusted and sharpened tools.
2. Do not hold scissors with the ends up, do not carry them in your pocket.
3. Do not use scissors with loose hinges.
4. Do not cut with scissors on the go, do not approach your friends while working, do not leave the scissors with the blades open.
5. Pass tools only in closed form, scissors - in rings towards a friend.
6. Place tools on the table so that they do not hang over the edge of the table.
7. Monitor the movement and position of the tool blades during operation.
8. Use cutting tools only for their intended purpose.

Two blanks.

On each workpiece, cut out the selected internal parts with a stationery knife.

The central lines of the blanks must be pressed using scissors and a ruler (punched).

Fold the parts in half.

Make cuts along the center line at a distance of 0.5 cm from the edge (for the blue workpiece at the top, and for the red one at the bottom) for the slot joint.

Open the blanks. Close the gap connection on one side first.

Then on the other. The heart is collected! Valentine's card is ready!

You can trim the edges of the card with curly scissors.

Option 2. I offer a simpler version of a Valentine's card.
For production we will use a stencil.

The stencil can be printed on colored cardboard or transferred through carbon paper 2 times. (The size can be changed as desired). Carefully cut out two pieces using scissors.

The central lines of the blanks must be pressed using scissors and a ruler (punched). Fold the parts in half. Make cuts to the middle of the small heart (top of one piece, bottom of the other) for a gap connection.

Close the gap connection on one side first.

Then on the other. Valentine's card has been collected!

Decorate the cards with small snowflakes, hearts, and flowers made using shaped hole punches.

Decoration of 1 version of postcards.

Decoration 2 options for Valentine's card.
You might also be interested in:

If you dream that your lover is having fun with someone, then expect disagreements with...

Preparing for motherhood involves many changes: hormonal changes...

Published 06/01/17 01:04 Children's Day 2017 in Moscow: program of events for 1...

Goal: To draw the attention of parents to the importance of cultural values and traditions of the family in...

Long-term planning for visual activities in the 2nd junior group. Month...

