


When the word "tree" is pronounced, a forest or a New Year's holiday is immediately imagined. These are the associations she evokes. And for all the people of the globe, the New Year is coming soon. And the Christmas tree becomes the center of attention and attraction for adults and children. In the article we will show how to make different Christmas trees with your own hands using unusual materials.
Make Christmas trees with your own hands, they will be small and desktop. Put them in every room in your home or give them to your loved ones as a gift.
Beautiful and original ideas with step by step master classes are waiting for you.
DIY Christmas tree ideas
Christmas tree with a star
You will need:
- A4 cardboard sheet
- Sisal red, green, yellow flowers size 50 x 80 cm
- Satin ribbons of red and green colors 1 cm wide = 1 meter each
- golden thread
- Wrapping paper and pieces of styrofoam measuring 3 x 3 cm
- Christmas balls of golden color with a diameter of 4 cm = 4 pieces
- Beads of green, red golden colors with a diameter of 5 mm
- Cones = 8 pieces
- Artificial rose hips = 6 pieces
- red star
- Christmas tree stand
- glue gun
- hot glue cartridge
- Scissors
Operating procedure:
- Cut out a template from cardboard and twist it into a cone, secure with glue.

2. Cut out 8 cm squares of sisal. Roll them into balls.

3. Cut out a square from wrapping paper, wrap the foam in it, fasten and tie with a golden thread.

4. Starting from the bottom of the cone, alternately glue the sisal balls, gifts, cones and rose hips.


5. Glue multi-colored beads.

6. Glue green and red satin ribbon bows.

7. Attach a star to the top of the Christmas tree and place it on a stand. The star on the Christmas tree with your own hands is ready and looks like this.

Sisal balls in a herringbone pattern
You will need:
- Whatman
- Sisal brown and milky
- Beads on a fishing line
- Styrofoam berries
- Gypsum planter
- Paint - golden spray
- Nuts, cones, acorns
- glue gun
- satin tape
- Plaster container
- Scissors
Operating procedure:
- Paint with golden paint - spray cones, acorns, nuts. There is a good paint Deco Lack. It is advisable to get the kernels out of the nuts and then glue the shell back.

2. Tear off some sisal and start twisting the fiber inwards. Do this until a small small tail remains in your hand.
3. Roll the sisal ponytail into a ball.
4 - 5. Make balls of milky and brown sisal.

6. Twist the cone from a sheet of drawing paper A3 in size, cut it evenly. Please note that its bottom should be freely worn on the pots.

7. To give the herringbone more density, you can twist another sheet of whatman paper and place it in the base. Cut off excess corners with scissors. Stick sesal balls, acorns on the cone. nuts and cones. Try to arrange objects in such a way as to alternate colors. Remember, you are doing it yourself and you must be in a good mood.

Check how you made the bottom of the Christmas tree: put it on a flat surface and step back a couple of steps. If the top of the cone looks exactly up, everything is fine. If not, cut off the side of the cone that is opposite the side of the slope. The cone must be level on the table.
8. Please note: the bottom of the cone must be very carefully closed so that the drawing paper is not visible.

9. Tie bows and glue them to the Christmas tree.

10. In between the sisal balls, glue the golden elements - the heart and stars.


11. In the remaining voids, glue candied milky berries and gold-coated foam balls. Try to place as many berries as possible and leave space between them.
12. Glue the beads in a circle, starting from the top.

13. Dilute the gypsum in a plastic container and pour it into a pot. Let it dry.

14. Apply glue to the edge of the planter and glue the top of the Christmas tree to it. Also apply glue to the sisal balls, glue them to the planter and press firmly.

The DIY Christmas tree is ready and looks great.
Christmas tree from the vine
You will need:
- Tree branches (wild grapes) and long sticks
- cones
- dried flowers
- Star anise, nuts, acorns, cinnamon
- Leg-split
- beads
- glue gun
- Clothespins (you can not use them)
Operating procedure:
1-1a. Braid a wreath - this will be the basis of the Christmas tree. To do this, hold the vine with your left hand so that a circle forms, and wrap it with the rest of the branch with your right hand.

2. Insert 6 long sticks into the wreath. They must be tough. Fix the top with twine - this is the frame of the Christmas tree.
Tip: Make sure the base of the tree is strong enough to fit sticks into. So, you did everything right and you can move on.
3. Push the flexible branches through the rigid ones.
Tip: It is advisable to weave a Christmas tree from freshly plucked branches. If fresh ones could not be found, soak the old branches for a couple of hours in the bath. They will absorb water, become soft and it will be convenient for you to weave a cone.
4. Braid the Christmas tree to the top.

5. Attach the vertical sticks to the bottom of the Christmas tree with glue.

6. Glue cones, acorns, cinnamon, star anise, dried flowers, vine balls to the Christmas tree.

7. Wrap the top of the Christmas tree with twine.

8. Now glue beads, twine bows and clothespins to the Christmas tree (you can not do clothespins). Make the crown, as in the photo.


You can show your imagination and decorate the Christmas tree with birds.

9. Insert a garland into the cone, secure with wire and light the lights. A do-it-yourself Christmas tree from a vine is ready. Here is a modern contemporary decor of the room made of natural materials and an original lamp.

At the end of the article, you are provided with examples of similar Christmas trees that you can buy in the distribution network, but they cost several thousand rubles. Compare them and you will understand that Christmas trees made with your own hands are no worse, and even better, because they contain the warmth of human hands and your pride - you are the creator.


Sisal Christmas trees have become quite popular Christmas decorations for homes and gifts for relatives and friends. And all because these Christmas trees look very original and festive.
I made such Christmas trees last year, but, unfortunately, I didn’t write master classes at that time, so I made new ones this New Year’s season sisal fabric Christmas trees.
Usually, in most master classes, such Christmas trees are made on a cone. But since we will do sisal fabric tree, I don’t want to make it heavier, let’s make the Christmas tree translucent. Moreover, the sisal fabric can be quite easily rolled into a cone, without additional tricks.
And so, let's figure out how to do New Year's sisal fabric Christmas tree.
You will need:
- sisal fabric of any color 0.5 meters,
- any jar or small pot-planter,
- 3 barbecue skewers
- wire with a diameter of 3mm,
- building gypsum (alabaster),
- satin ribbons or brocades of different widths,
- hot glue gun,
- an asterisk, a bell or a small ball for the top of the Christmas tree,
- decor - optional: bows, beads, etc.
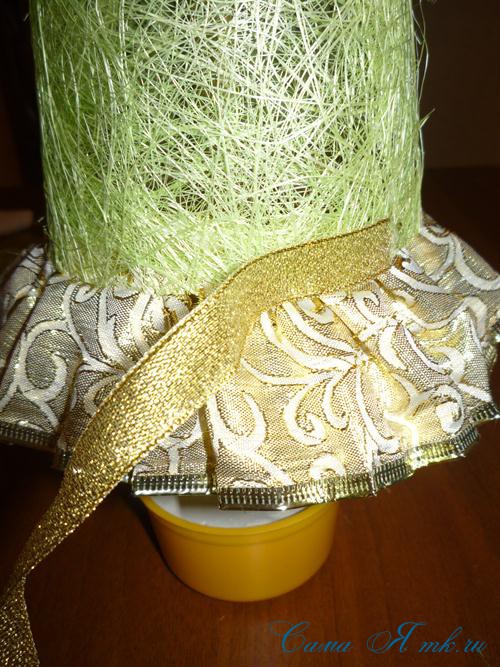
Let's start with the base of our Christmas tree. Barbecue skewers will serve as the stem of the Christmas tree. We connect together 3 skewers with hot glue. We dilute the gypsum with cool water and pour it into the prepared container, set the stem in the center and wait for the gypsum to completely harden.

This is how it should turn out...

Since I plan to make a Christmas tree with a curved crown, then glue 3 wires with a diameter of 3 mm and a length of 20-25 cm to the top of the skewers.

Wrapped it around with ribbon for more decoration.


The base is ready!
And here I will reveal my little secret. In order for the curved-topped sisal tree to stand straight and not move when you bend the top of the tree, you need to separate the top and the main part of the tree.
I do so...
First, measure out as much sisal fabric as we need for the main part. And cut out the blank for the cone.

Let's leave some on top.

Sisal fabric can be either very dense or sparse, as in my case. Therefore, you can make several layers, 2-3 layers is enough.
I put a second layer from the leftovers, fixed it a little with hot glue.

We turn off the cones, narrow - for the top, wider - for the base. Fasten with hot glue.
We put a small cone on the base, fasten the decoration on the top of the Christmas tree and fix it well with hot glue. Be sure to glue to the skewers, not to the wire. Otherwise, the Christmas tree will then warp!

From above we put on the main cone of a larger diameter, if desired, you can fix it, but it will hold on perfectly anyway.


The most interesting thing remains - decorating the Christmas tree and the pot . Use a hot glue gun and decorate to your liking.


Or so...
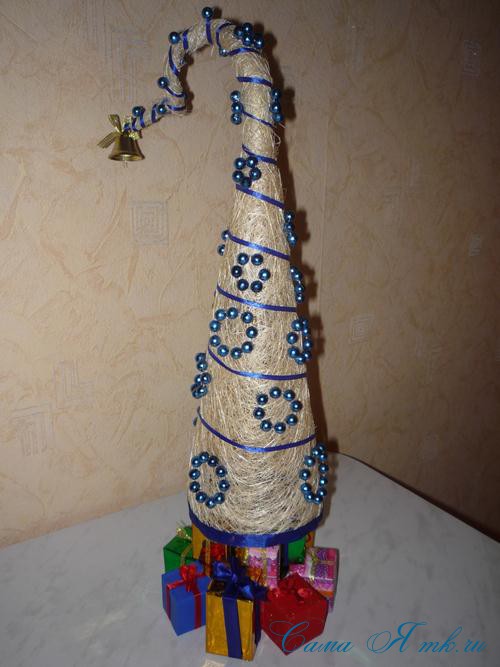

Do do-it-yourself sisal tree very simple - you just need a little skill and imagination to create this festive decor element.
I hope the manufacturing technology was clear. And how to decorate such a Christmas tree is up to you, it all depends on your desire and imagination!
I was glad to help!
Do you want to learn how to make beautiful Christmas decorations? To quickly master the manufacturing technology, study the Sisal Christmas Tree master class. Below are several options for designs and decor. Read on, choose the right one. Create spectacular details of the festive atmosphere.
Sisal
This term refers to a special natural fiber obtained from the fresh leaves of a plant of the Agave genus. Unpainted material has a light yellowish tint. For practical purposes, it is used for the production of ropes, twine and other things. Currently, sisal is popular in the field of decorating floristic compositions, as well as creating souvenirs and handmade jewelry. Master class "Herringbone of sisal" will teach you how to make the most of the properties of this material for design purposes.

Christmas gifts
If you are interested in the possibilities of this material or have been eyeing it for a long time in a flower shop, then it's time to create hand-made gifts with it. Master class "Herringbone from sisal" will show you how to make different types of decorations:
- herringbone pendant;
- topiary;
- Christmas tree made from sisal balls.
Manufacturing options are different. Decoration for the holiday can be made both in the traditional green color, and in any other, for example, blue or red. The material is sold in a fairly wide range of colors, but on the eve of the New Year holidays, green just may not be there. So you should worry in advance, but if you didn’t have time, it’s okay - you just have to paint the existing blanks in the right color.

What will be required
A do-it-yourself sisal Christmas tree can be made in many ways. You can use any materials to complete the base: both purchased and those that you already have in stock. All options will be discussed below, and the list of necessary tools, compositions and accessories is as follows:
- foam cone;
- cardboard or paper;
- pencil;
- compass;
- stapler or tape;
- glue or thermal gun;
- wire;
- wire cutters;
- gypsum or alabaster;
- mixing container;
- stirring stick;
- cup or pot for fixing the base;
- rod, stick, skewers to create a stem;
- sisal of the desired color;
- paint of the corresponding sisal shade;
- brush or sponge (sponge);
- decorative elements (satin ribbons, beads, beads, sequins, bows, balls, tinsel, soft, etc.)
Using this list, you can easily determine what you need or which way to work to choose, based on what you already have in stock.

How to make a Christmas tree out of paper
In order for you to get a beautiful and neat sisal Christmas tree (it’s not so difficult to make such a miracle with your own hands, as in the picture above), you need to properly prepare the basis for decorating. If you have not bought a foam blank, it is easiest to make it in the form of a cone made of cardboard or thick paper. The work goes in the following sequence:
- Roll up a piece of paper in the form of a bag, or first draw a diagram of the future cone with a compass and ruler.
- Glue the workpiece with an overlap using a thermal gun, ordinary glue, adhesive tape (can be double-sided) or fasten the seam in several places with a stapler.
- On another sheet of paper or cardboard, draw a circle with a diameter corresponding to the base. Gluing allowances should be done if you do not have a heat gun. They can attach one part to another end face.
- Glue the circle to the cone.
- Paint the resulting part in the tone of sisal so that ugly gray cardboard or white paper does not shine through the gaps between the fibers.
The workpiece has been completed. You can start decorating.
Fabric base
You have learned how to make a sisal Christmas tree, or rather, so far you have only made the paper base for it. Another option is to make a soft blank from fabric or filler, for example, synthetic winterizer. To do this, do the following:
- Cut the synthetic winterizer or prepared dense fabric into strips. Width and length depend on what size of material you have, as well as the size of the souvenir that you plan to make.
- As a frame, take a strong wire of the desired length.
- Start winding strips of synthetic winterizer on the rod from the place where the top of the tree will be, downwards, not reaching the end of the wire a few centimeters. To prevent the material from moving out of the frame, be sure to fix it with glue.
- When the first strip is over, continue on with the second, and so on.
- Pay special attention to the base of the workpiece. In this part, uniform expansion should occur.
The second method will require a tighter arrangement of the sisal fibers so that the filler does not show through, however, with this method, you can give the tree a slightly rounded shape. It will look more natural, not geometric.

How to make a suspension
So, you have learned how to make a Christmas tree. Very beautiful topiaries are obtained from sisal, both a pendant and just a decoration that can be put on a festive table will look great. Depending on what you want to make, choose the appropriate method of attaching (installing) crafts.
If you want your souvenir to be placed on the Christmas tree or decorate the interior with it, and you are thinking how to make a Christmas tree pendant, make a loop or hook in the upper part of the workpiece. You can make such a functional element like this:
1. For a paper cone: fold a small piece of wire in half into a loop and thread it through the hole at the top of the cone. Tie a knot on the inside, twist the ends of the wire with wire cutters, and drip glue from the heat gun on the outside. You need to perform the operation before gluing the bottom.
2. For soft workpiece: before you start winding the strips on the core, step back to the desired length of the wire and roll it into a loop. If you want the suspension element to be thinner and more decorative than the frame rod, attach a loop made of thin wire or other material to the top of the rod.
Sisal Christmas trees
The master class came to the most important stage - gluing a layer of sisal. This must be done carefully so as not to damage the fibers. If the color of the base of the Christmas tree matches the shade of the material, you can glue the sisal in one layer. When you need to hide the "insides", you will have to try and wrap the Christmas tree with a lot of material if you bought it in the form of a roll.

As for the base, you can cut it out in the form of a circle, and carefully decorate the borders of the transition from the cone to the bottom. If you have sisal in the form of a fiber, and not a sheet (roll), the surface of the tree may turn out to be excessively shaggy. To eliminate this drawback, you will have to wrap the workpiece with a special bouillon thread, for example, silver.
New Year's topiary
This souvenir is a small man-made tree trimmed in the form of a ball in a pot.

Usually, a foam ball or a papier-mâché sphere is taken as a base. If you want to make from sisal, then take the same cone as for a regular Christmas tree as a blank. In order for your Christmas tree to become what is called a topiary, you will have to make a stem, which is fixed at one end in a cone, and at the other in a pot. This construction is carried out as follows:
- Take a glass, pot or other suitable container.
- Pour some water and put plaster or alabaster. Mix the ingredients thoroughly. The consistency should resemble thick sour cream.
- Pour the composition into a pot.
- Immediately, before the plaster has hardened, place a stick, a rod or a stem made up of several thin skewers in the center of the pot. Hold it so that it does not fall or move while the mass hardens.
- When the composition has become solid, cut off the top of the cup if you did not fill the plaster to the brim.
- Wrap the stem with decorative tape. It is better to do it at this stage, so as not to stain the decorated surface with drops of liquid gypsum when installing the rod.
- Also decorate the pot, for example, with a satin ribbon.
- The surface of gypsum is easy to decorate with the same sisal, tinsel, beads or coffee beans.
- Fix the Christmas tree-cone on the rod, having previously cut a hole of the appropriate diameter in the base of the craft. Glue the joint with a thermal gun.
If your Christmas tree is made of soft material wound on a metal rod, you will not need an additional stem. Place the finished structure directly into the pot of hardening plaster. The main thing is not to stain the product.
Herringbone from sisal balls
All steps for making such a souvenir will be similar to those described above. The difference is that the surface of the Christmas tree will not be flat, but will consist of balls.

They can be twisted directly from the fibers or any filler can be used as a base, for example, a synthetic winterizer, which will be wrapped with sisal on top. This will save decorative material and make more balls. By the way, they can be the same in diameter or different. In the latter case, large ones should be placed closer to the base of the tree, and small ones, respectively, to the top.
How to decorate a product
Sisal Christmas trees look especially cute if they are decorated with all sorts of small details.

The options you can use are:
- String beads or beads on a thread or wire (or buy ready-made) and wrap the product in a spiral from top to bottom.
- The same as in the previous paragraph is easy to do with thin satin, brocade or other decorative ribbon, lace or braid.
- Glue lumps of artificial snow (purchased or made from cotton wool) at the base of the Christmas tree or on the top of the pot.
- Cut out the snowflakes and glue them to the surface of the Christmas tree.
- Use tinsel.
- In the free areas between the ribbons, you can place small balls, bows.
So, the Sisal Christmas Tree master class has come to an end. We discussed several solutions for creating a beautiful one. Choose the one you like and start the creative process.
To do today DIY decorative Christmas trees can be made from a variety of materials. For their manufacture, tinsel, cones, fabrics, paper, feathers, yarn, wool - anything is used. Creative imagination is so wide and varied. For decoration decorative Christmas trees use everything that is at hand - buttons, beads, ribbons and much more.
What are decorative Christmas trees? Let's consider some of them.
Sisal or stick fir trees.
Oooh... These beauties have been in great demand for the New Year holidays for the last couple of years. Sisal Christmas trees are a great option for a little New Year's beauty. This is a wonderful element of New Year's decor and very original New Year's gift, which can be easily do it yourself.
Below is a detailed description of how to make them.


Felt Christmas Trees


I already once told how such a cute Christmas tree is made. Here it is a master class Christmas tree made of shells. Learn and do it yourself.


There are a lot of options for Christmas trees. And many of them you can do yourself.
And now, as I already wrote, "We're doing a sisal tree"
Detailed master class from Anna Tyumerova on.

The materials we need:
- penoplex;
- foam cone;
- acrylic paint;
- tassel;
- tree branch;
- wire;
- glue gun;
- sisal;
- decor for decorating the Christmas tree.
Step 1. In order to make the base of the Christmas tree, take a foam cone. The cone can be made independently of any required height and width. We paint over it with acrylic paint. We select the color of the paint to match the color of the sisal.

Step 2. We stick a piece of wire into the top of the cone. We fix with glue.

Step 3. We coat the Christmas tree with glue, over small areas, not all at once. Wrap sisal on the smeared areas. We begin to wind the sisal either from the base of the tree, or from the end of the wire. It's whatever is more convenient for you.

A little trick when working with titanium glue:
In order for the glue not to spread and dry out, you can fill the glue into a syringe and squeeze out the necessary portion of the glue from the syringe.

The result is a cone like this


Step 4. We make the basis for the Christmas tree. To do this, take a small piece of foam and glue it with corrugated paper. You can make a stand from a pot of gypsum diluted with water.
Step 5. Insert one end of the stick into a piece. Fix with hot glue.
Step 6. We make a hole at the base of the cone. We insert and glue the other end of the trunk there.
Step 7. We give the wire the necessary shape.
Step 8. Now we decorate the Christmas tree. We use our imagination and the materials that are at hand.
Step 8. We decorate the base for a Christmas tree or a pot with sweets, flowers and various decorative materials.

All these decorative Christmas trees easy to do do it yourself, a little desire and effort and all. A decorative Christmas tree can be a chic gift for friends. Also, such a Christmas tree can decorate a work table or a place by the mirror in the hallway.
Wonderful creations!
Sisal Christmas trees have become quite popular Christmas decorations for homes and gifts for relatives and friends. And, I must say, not in vain - these Christmas trees look very stylish, cute and festive, but the festive atmosphere is the most important thing in a holiday.
So, let's figure out how to make such a Christmas tree with the help of a master class on making a Christmas tree from sisal.
Sisal tree: master class
Making your own sisal Christmas tree is very simple - you just need a little skill and imagination to create this festive decor element. And, of course, you must follow the instructions, because the instructions are everything to us.
First, let's look at what you need:
- whatman;
- sisal;
- gouache to match sisal;
- wire;
- a plastic cup;
- gypsum or sponge;
- Chinese chopsticks;
- glue;
- Christmas decorations: bows, beads, etc.
And now let's move on to making a sisal Christmas tree with our own hands.
Step 1: To get started, take whatman paper (take the size that suits you) and paint it with gouache to match the sisal you have chosen. Sometimes sisal is thick, and sometimes quite thin, and, accordingly, transparent, so in order not to wind sisal in a dozen layers, it is better to paint the base in the same tone with sisal. In this case, even if the base is slightly translucent, this will not be noticeable. Let the paint dry thoroughly before proceeding.

Step 2: Next, you prepare the base for your Christmas tree - you roll the painted paper into a cone, you can fix the cone with glue (namely, glue, not tape). After that, thread the wire through the top hole of the resulting cone and secure it - this will be the top of your Christmas tree. Now wrap the Christmas tree with sisal. To make sisal more pliable, you can slightly wrinkle it in your hands.

Step 3: Now let's digress a little from the Christmas tree - you also need to make a stand for the Christmas tree in which it will stand. To do this, you will need a plastic cup and Chinese chopsticks. It is better to take several Chinese sticks and connect them together by wrapping them with paper or tape. Pour gypsum into the glass and fix the sticks in it, which will stick out of the glass, like a trunk for a future Christmas tree. Instead of plaster, you can also use a sponge, but plaster is sure to fix everything better.

Step 4: Now decorate your Christmas tree however you like. First, you can wrap it with ribbons, which will serve as a kind of garland, and then add bows, beads, and other tinsel that you like. After that, you just have to fix the Christmas tree in the "pot", which can also and should be decorated with all sorts of ribbon bows. You can fix the trunk of Chinese sticks in the cone of the Christmas tree by stuffing this cone with napkins. The bottom can be fixed with glue. The tree is ready for the holidays!
You will also be interested in:

Sewing machines can seem intimidatingly complex to those who don't know how to...

Of course, household appliances greatly facilitate the life of a woman, but so that the machine does not ...

Tatyana Boyarkina Organization of summer recreational activities in a preschool...

"The best thing to do with psychics is to drive with a filthy broom!". Ural...

Divorce is always stress, emotions, tears. The very word "former" is given in the soul with pain, ...

