


Despite the abundance of tools and hair products in stores, sometimes situations may arise when it is necessary to make curlers from improvised materials. For example, you went to the sea and forgot your curling iron, but you want to curl your curls.
Making curlers with your own hands is not difficult at all, besides, they have a number of advantages over finished goods: they do not injure the hair, do not tangle them, you can sleep in them all night. And of course, they cost free, because you can use improvised materials for them.
The disadvantage may be the time spent on making curlers, but with the emergence of experience, this process will take little time, and the design of home-made curlers is simple. In addition, you will have to spend a lot of time in such curlers (you may even have to sleep in them), but beauty, as you know, requires sacrifice.
The curls obtained from homemade curlers come out natural and light, and you can adjust the curls of the hair with the thickness of the curler. In any case, the result of curling with homemade curlers is always pleasing to the eye, and for this it is worth spending a little time making them.
For achievement best result hair must be washed, dried, carefully calculated and divided into strands. You can fix the curls after curling with hairspray, so they will last longer.
There are several options for home-made curlers, and for all of them, improvised means can be taken as materials - fabric, paper, foam rubber, insulation, etc. This allows you to make curlers with your own hands, not only while at home, but also on a hike, business trip or vacation. Consider the most affordable options for homemade curlers.
Fabric curlers
For their manufacture, you will need a fabric, preferably non-slip and rather dense. It is cut into strips about 20 centimeters long. Wrap your hair around these ribbons. following method: strands of hair are slightly moistened with water and the ends are tied with a fabric ribbon. Then the fabric together with the hair is twisted into a spiral and fixed with the end of the tape. The fluffiness of the curls depends on the number of such curlers, that is, the more such “rolls”, the more magnificent the curls will be, and light waves can be obtained using 6-8 home-made curlers.
Paper curlers
 It is paper that is needed - thick, but soft enough to make it comfortable to work with. Cardboard is too hard and not suitable for these purposes. You can take sheets of A4 paper or any other size, as long as it is suitable for the length of the hair.
Tubes or flagella are made of paper and strands of hair are wound around them. After folding, the ends of the paper flagellum must be tied, and in order to further secure the structure, it is better to tightly tie the head with a scarf so that the curlers hold tightly next to each other.
You can combine two materials and wind a paper roller onto a fabric strip. Then a strand of hair is wound around it and fixed with the ends of a fabric tape.
Curlers made of foam rubber or insulation
If at home there are remnants of foam rubber or insulation remaining after the repair, then they can also be used to make curlers. You can also use a dense film with air bubbles. Its advantage is also that the hair is held tightly on such homemade curlers.
The material is cut into strips of the desired width and length and the hair is wound around them according to the same principle as with the rest of the curlers - twist around the strip, fix the hair at the roots with the ends of the foam strip. Unlike previous materials, such homemade curlers can last longer, because they can be used many times.
For creating soft waves enough 7-8 foam curlers. They should be wide enough, but at the same time should not interfere with each other. If the hair is thin, then the strands of hair for wrapping can be taken thicker, and vice versa, for thick hair need more curlers.
Foil curlers
These curlers are distinguished by the fact that they can easily bend into different sides. To make such curlers you need foil and cotton wool. Strips 5-7 centimeters wide are cut out of foil, and cotton wool twisted into a flagellum is placed inside each such strip. The foil is wrapped in a tube and curlers are obtained, similar to a boomerang. Next, the strands of hair are wound, starting from the tips and moving towards the roots, and then fixed by tying the ends.
With any type of curler, the principle is always true, according to which the thicker the roller, the larger the curls. For greater strength, the curls should be moistened before wrapping styling tool- foam, gel or wax.
Do you want to make your own curls at home? How to do it safely for your hair? What from existing funds perfect for you, and what do you recommend experienced cosmetologists? We will answer all your questions
Do you think only men like beautiful and thick curls at a woman? But no, women are also crazy about such hair. But, the truth of life is that often "keep" beautiful hairstyle very difficult, and the hair straightens itself after a few hours, nullifying all your work. And the question is how to beautiful curls the way they do it in the salon, for long hours? We will give you an answer, for this we present you with several options for solving the problem.
Popular methods for getting curls
Today we will analyze three options for how to make curly hair at home, but you will most likely need to try them all. Why is that? Firstly, experience is important here, and secondly, everything is individual, and depends on a certain type of curls ..
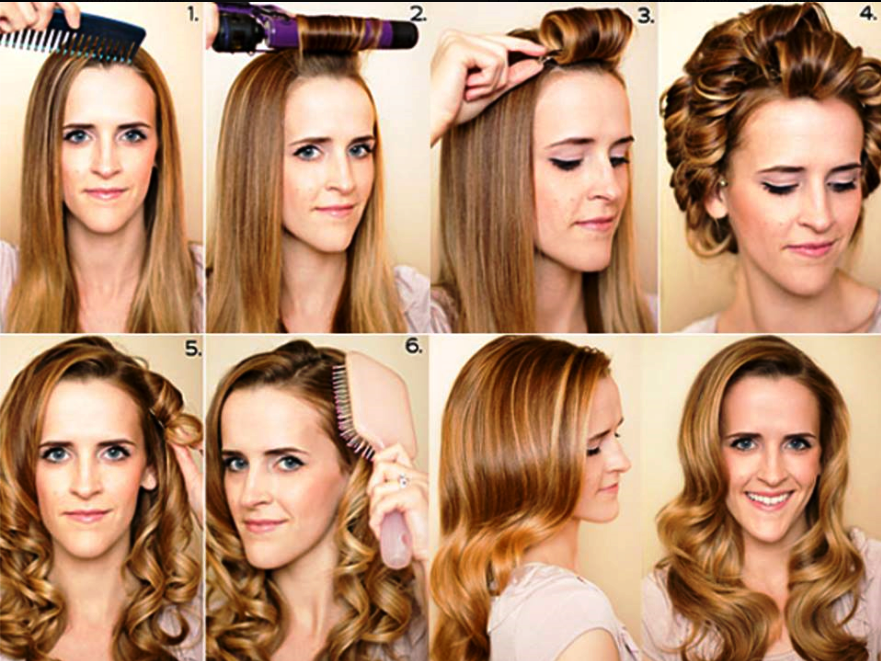
curling iron
With this method, you can quickly achieve desired result, to give the hair waviness due to heating. There are two types of curling iron: thick and thin. Its appearance affects the final size of the curls. But, there are also contraindications for use. Do not use a curling iron if your hair is unhealthy or has increased fragility, also, this method should not be used too often, because it weakens your hair and destroys its structure.
Application:
- First of all, treat your hair with a heat protection spray, and apply special gel or styling mousse.
- Next, you should wind your hair, it is important to start from the back of your head, for this, take a bunch of them, carefully put the ends in a curling iron. hold down. The strand should be as thin as possible, then your curls will be more natural and clear.
- Hold the hair for about 10 seconds and release from the clip.
- When you do this with all your hair, spray it with varnish, and in no case comb it.
iron
It is also called a straightener, but today we will not straighten, but create curls, and we will tell you how. The process of curling hair with an iron is practically the same as the previous method. But, here you create curls big size, unlike a curling iron, where the curls are small.
Before starting the procedure, as in the previous method, treat your hair with a heat protectant. Often, in salons they ask: “Which hair straightener is better when creating wavy curls?”, we answer, rounded, narrow in shape.
Application:
- You have already sprayed your hair, now also apply the gel and start styling.
- Take a strand of the required volume, and at its very root, leaning an iron - wind it around it.
- Now, carefully and slowly move the iron to the ends of the hair, so you avoid damaging the hair.
That's all, we showed you how to make curls with an iron, if the result lasts a long time and there are no problems, as well as appearance you are completely satisfied - perhaps this is your way. If not, we move on to the classics, curlers.
Often we, ladies, have a problem, the curls are electrified, what should we do? The answer in our material is.
To make your curls pleasing to the eye, healthy and beautiful - you should use.
curlers
The classic and time-tested way, allows you to get chic curly curls, but there is one “but” - the curlers will have to be carried for quite some time. It is best to perform the procedure before going to bed.
Want to try? Then, go to the store and choose the size of curlers you need:
- Thin. Make small curls.
- Thick. Bulky and dense.
- Bobbins. Will help to make a perm with spirals.
As for the material, they are perfect for curling at night. soft types"- made of polyurethane or foam rubber.
Application:
- Wash your hair and let it dry, but not completely, and by yourself, do not use a hair dryer.
- Without waiting for the hair to dry completely (should be slightly damp to the touch) - take the curlers and start separate strands wind your hair on them from the very roots to the tips. After each winding - secure the curlers with a lock (elastic band or something else).
- Wear curlers as long as possible, then your curls will hold better. We recommend 8-10 hours (just in time for sleep). Longer - on request.

Stylish hairstyle, 4 methods
We have already talked about how to make curls at home, and now let's look at methods for creating curls of different intensities.
Waves
- Use mousse on slightly damp hair and run your hands through it, lifting in some areas.
- You will get a kind of "wave", now use a hairdryer with a diffuser.
Vertical curls
- Divide your slightly damp curls into small strands.
- Cross the strands with your hands, and then dry them with a hairdryer.
- To fix the result - use a curling iron, run it through each twisted strand.
Hollywood curls
- And here to start, you need to treat your dry hair with styling gel.
- Using a conical curling iron (it does not have a clip), wind the strands from the very roots to the tips and warm up for 5-7 seconds.
- Straighten your strands.
- By lightly combing the hair roots - you will get a small volume.
big waves
- After washing your hair, dry it with a hair dryer, but not completely.
- Prepare heated thermal bags four centimeters in diameter.
- Wrap your hair in curlers.
- Apply hair styling spray and wait ten minutes.
- Remove the curlers and shape the waves with hand movements.
/ 09.11.2017
Paper curlers. How to make curlers from ordinary socks.
Papillottes to create a beautiful and lush hairstyle were used in ancient times. The ladies of the court made paper or fabric flagella, on which they subsequently wound their hair. It is not so easy to make styling with papillots, because it requires hair preparation and knowledge of the nuances.
What are papillots?
Papillots are a kind of curlers made of soft elastic material. Previously, such accessories were made of paper, fabric and other available materials. The definition of "papillote" came from French. The original meaning of the word is paper tube put on something."
Photos of such accessories look different. Soft curlers are produced in several versions, which differ mainly in material.
Kinds
The main types of papillots:
- paper;
- tissue;
- plastic (made from foamed plastic);
- on Velcro.
Types of curlers: 1. Velcro, 2. Thermal curlers 3. For vertical curls, 4. Foam curlers
The first two options can really be done at home from improvised means, but the others can only be bought in a store. Paper and fabric curlers are not wear-resistant, that is, they are enough for only 2-3 applications. Plastic straws and Velcro accessories are more stable, comfortable and functional. With their help it is easier to get curls different sizes. Such curlers are also made of foam rubber (the material does not differ in characteristics from foamed plastic). Store accessories may vary in color and size.
Features of use
 The scheme of using boomerang type papillots
Benefits of using papillots:
- Soft material. With tubes you can go to bed, they do not interfere and do not put pressure on the scalp. Elastic and pleasant material is their main advantage.
- Natural effect. Soft accessories help to acquire fair sex natural curls. This hairstyle will not look pretentious, which will allow you to wear it every day. With the help of tubes you can make fashionable beach styling, creating the effect of disheveled hair by the sea wind.
- Safety. Papillots do not injure the hair, unlike any thermal perm. The hair will not deteriorate, even if a woman does her styling every day with curlers.
They have only one significant disadvantage - time costs. A woman will have to walk with curlers on her head for four hours (maybe more).
How to wind papillots?
How to use papillots correctly? Main advice: well prepare the hair. Regardless of the desired effect and the length of the hair, the hair must be moistened and covered with a fixative before styling. You can use regular mousse for additional volume and fixing spray. The tool must be tested: the duration of wearing the resulting curls will depend on its durability.
For short hair
The technology of twisting curlers is completely simple. If you have short hair, you will need no more than 10 small hairpins.
Thin curlers help create expressive curls, while thick curls help to create natural curls. When choosing accessories, it is important to be based on the desired result.
Step by step guide for styling:
- Prepare and divide all hair into three sections. Each part must be re-divided into several small strands. A complex process justifies itself by creating more pronounced curls.
- You should take one strand and twist it onto a papillot. You need to twist from the middle (capturing the tips) to the base. The straightened tube must be placed perpendicular to the strand of hair (closer to the ends).
- It takes 3-4 hours to keep soft tubes on short hair. After that, apply varnish, and only then remove the curlers. You need to unwind the accessories carefully so as not to spoil the curls.
A beautiful perm will require three basic rules:
- You need to curl your hair in curlers before going to bed. The longer the tubes are on the hair, the more resistant and beautiful the hairstyle will turn out.
- You can not deviate from the basic technology of using tubes. First, the curlers are applied to the strand, then the tips are wound onto it. Only after that you need to twist the tube up to the roots.
- You should carefully remove the tubes, starting from the base and moving to the ends of the hair. This is the only way to get a beautiful curl.
Curling your hair at home is not difficult, the most important thing is not to take too large strands. This is one more important condition home perm.
For big and expressive curls
In order to get voluminous and expressive curls, you need to take large or medium-sized curlers. They should not be very thick, since the severity of curls depends on the thickness of the curls.
All hair will need to be divided into 7-10 sections, depending on the length and thickness of the hair. After that, each strand should be curled and immediately varnished. You do not need to take means of strong fixation, so as not to glue and weight the curls.
How to make hair curlers with your own hands?
Ways to make homemade papillots:
- You will need to take a fabric, linen is best. From a piece of matter, you need to cut several strips (20 cm long and 3 cm wide). After that, you need to take the resulting flap and twist it into a tight flagellum.
- Instead of fabric, thick paper can be used. From paper, you should also twist the flagellum until it becomes dense. You need to wind your hair on paper papilots, and then fix them with hairpins.
Soft curlers from the fabric are tied at the ends. Therefore, the ends of the tissue flagella should not be too dense.
With these tips, you can get beautiful strands at home. Any woman can create the effect of Hollywood or natural curls using papillottes.

Every woman will be interested to know how to curl her hair properly and get beautiful curls when there are no curlers or curling irons in the house. It is important to understand how to make curlers from improvised means, which are always present in every home. In addition, it is convenient to rest on the curlers that you make with your own hands at night, and this is very important. Making impromptu curlers at home is not difficult at all, and you can do it in many ways. Properly made homemade curlers have their own positive traits. They won't disturb your sleep because they are soft and won't pull your hair. As a result of their use, the hair does not deteriorate, and the size of the curls can be varied at your discretion. They are made from common and affordable materials that require absolutely no material costs. This method of shaping curls is suitable even for children.
Homemade paper and fabric curlers
Our grandmothers also knew how to make homemade curlers at home, using the most different materials. Earlier than others, home-made curlers made of paper and fabric strips appeared. To make curlers with your own hands, you will need any paper, fabric and scissors. Some girls prefer to form home curlers exclusively from fabrics, without using paper. This is a matter of taste, but keep in mind that fabric does not hold curls as well as paper. In addition, paper will allow you to wind very large curls, unlike fabric. To form the curlers, we take one piece of fabric, and cut off several long ribbons from it. Then we cut the paper into strips, the length of which is much less than the fabric ribbons. We place strips of paper on a horizontal surface, and place fabric ribbons on top. Next, gently wrap the paper around the fabric, making it look like a tourniquet. For medium length hair, you will need about ten of these curlers.
 When the curlers are ready, you just have to wind your hair around them. Optimal time for this is the evening, just before going to bed. If you did the right thing paper curlers at home, they will not give you any trouble at night. Note that for education persistent curls it will take about six hours. When curls are required for evening time, they should be formed around noon. For very dense and coarse hair, the calculation of the time varies, it will take a little more. Such hair is usually moistened with foam, varnish, or sugar dissolved in water. After using the foam, go through the hair with a comb with rare teeth. After combing your hair, start winding it to the length of the curl that you need, to the roots or to the middle. Having twisted the hair, we tie the fabric into a knot or bow around the curl. Repeat these steps until you wind all the curls to the last. In this method, chaotic winding is allowed, which leads to excellent results in any case, even with such a chaotic method.
Video: Learning to make curls on paper curlers
How to make curlers from plastic flexible tubes
The next master class considers very easy and effective method formation of magnificent spiral curls. This video shows how to make curlers from ordinary plastic tubes. These flexible tubes are designed for drinking juices and cocktails, but can also be used as homemade curlers. To do this, you will need a comb, invisible, and tubules. We begin the winding process by combing the hair, and lightly wetting it with water. Instead of water, hair is often sprayed with a styling spray, which makes the curls strong. After that, we begin to separate the strands, and wind them on the tubes. To do this, place the tube below, under the strand. Then we begin to wind from the roots of the hair to the ends, while performing a slight tension. At the roots we pin the invisibility, fixing the tube. We twist the strand to the end, then bend the second end of the tube, and also pin the invisibility to it. We will repeat the same actions with each strand of hair.
 First, we separate it, then comb it, carefully wind it onto a tube and fix it with the help of stealth or crabs hairpins. For owners of coarse and unruly hair, it is advisable to spray the strands with varnish, or smear with styling foam to make the curls as strong as possible. Having finished the winding process, we will withstand the required time, which will depend on the quality and thickness of the hair. The minimum exposure time is about an hour, after which we remove the invisibility and tubes. After that, vertical curls will remain in their splendor. Slightly separate the large curls with your fingers, and also lift the hairstyle at the roots of the hair and spray varnish on top. This method does not require material costs at all, does not damage the hair structure and is extremely effective. Plastic straws and invisibles are reusable, so you will use them all the time without making other material investments.
Video: Making curls with juice tubes
How to make curlers from ordinary socks
You may be surprised, but you can make curlers at home from pieces of cloth, baby wipes, and even ordinary socks. This video tutorial shows how to make beautiful curls with your own hands using simple socks. Before the winding procedure, wash your hair and dry it slightly. IN this case it is best to wind wet curls. After drying your hair, comb it gently and slowly with a wide-toothed comb, starting at the ends and gradually rising to the roots. Freshly washed and still wet hair combing is not recommended, because their structure may be damaged. After combing, lightly spray on the hair from the tips to the roots with styling liquid (styling spray), or apply a little special foam, distributing it over the entire length of the hair. After that, we begin to separate strands of medium size.
When choosing socks for winding curls, focus on those that are long enough. The fact is that you will have to not only form curls, but also tie the ends of the socks, fixing the strand. Start winding each strand from the ends, moving up to the roots. Everything will depend on how long the curls you need. You can stop winding both in the middle of the strand, and reaching the very roots of the hair. Having formed a curl of the desired valley, we tie the ends of the sock into a knot. Both the thickness of the strands and their number vary according to the desire of each woman. Remember that thin strands better and faster turn into beautiful curl. Stop at the average thickness of the strand. This is the most correct winning option. After completing the procedure correctly, and having formed all the curls, leave them in this state for a period of time of six hours or more. Hair twisted in this way will not cause any inconvenience even at night. When more than six hours have passed, unroll each curl, and lightly spray hair with varnish. Pay attention to what magnificent wavy hair is obtained after the formation of curls at home.
Video: Curls based on socks
Despite the abundance of tools and hair products in stores, sometimes situations may arise when it is necessary to make curlers from improvised materials. For example, you went to the sea and forgot your curling iron, but you want to curl your curls.
Making curlers with your own hands is not difficult at all, besides, they have a number of advantages over finished products: they do not injure the hair, do not tangle it, you can sleep in them all night. And of course, they cost free, because you can use improvised materials for them.
The disadvantage may be the time spent on making curlers, but with the emergence of experience, this process will take little time, and the design of home-made curlers is simple. In addition, you will have to spend a lot of time in such curlers (you may even have to sleep in them), but beauty, as you know, requires sacrifice.
The curls obtained from homemade curlers come out natural and light, and you can adjust the curls of the hair with the thickness of the curler. In any case, the result of curling with homemade curlers is always pleasing to the eye, and for this it is worth spending a little time making them.
To achieve the best result, the hair must be washed, dried, carefully calculated and divided into strands. You can fix the curls after curling with hairspray, so they will last longer.
There are several options for home-made curlers, and for all of them, improvised means can be taken as materials - fabric, paper, foam rubber, insulation, etc. This allows you to make curlers with your own hands, not only while at home, but also on a hike, business trip or vacation. Consider the most affordable options for homemade curlers.
Fabric curlers
For their manufacture, you will need a fabric, preferably non-slip and rather dense. It is cut into strips about 20 centimeters long. You need to wind the hair on these ribbons in the following way: the strands of hair are slightly moistened with water and the ends are tied with a fabric ribbon. Then the fabric together with the hair is twisted into a spiral and fixed with the end of the tape. The fluffiness of the curls depends on the number of such curlers, that is, the more such “rolls”, the more magnificent the curls will be, and light waves can be obtained using 6-8 home-made curlers.
Paper curlers
 It is paper that is needed - thick, but soft enough to make it comfortable to work with. Cardboard is too hard and not suitable for these purposes. You can take sheets of A4 paper or any other size, as long as it is suitable for the length of the hair.
Tubes or flagella are made of paper and strands of hair are wound around them. After folding, the ends of the paper flagellum must be tied, and in order to further secure the structure, it is better to tightly tie the head with a scarf so that the curlers hold tightly next to each other.
You can combine two materials and wind a paper roller onto a fabric strip. Then a strand of hair is wound around it and fixed with the ends of a fabric tape.
Curlers made of foam rubber or insulation
If at home there are remnants of foam rubber or insulation remaining after the repair, then they can also be used to make curlers. You can also use a dense film with air bubbles. Its advantage is also that the hair is held tightly on such homemade curlers.
The material is cut into strips of the desired width and length and the hair is wound around them according to the same principle as with the rest of the curlers - twist around the strip, fix the hair at the roots with the ends of the foam strip. Unlike previous materials, such homemade curlers can last longer, because they can be used many times.
To create soft waves, 7-8 foam curlers are enough. They should be wide enough, but at the same time should not interfere with each other. If the hair is thin, then the strands of hair for wrapping can be taken thicker, and vice versa, for thick hair you need more curlers.
Foil curlers
These curlers are distinguished by the fact that they can easily bend in different directions. To make such curlers you need foil and cotton wool. Strips 5-7 centimeters wide are cut out of foil, and cotton wool twisted into a flagellum is placed inside each such strip. The foil is wrapped in a tube and curlers are obtained, similar to a boomerang. Next, the strands of hair are wound, starting from the tips and moving towards the roots, and then fixed by tying the ends.
With any type of curler, the principle is always true, according to which the thicker the roller, the larger the curls. For greater strength of the curls, before wrapping, moisten them with a styling agent - foam, gel or wax.
Curlers are the most popular and easiest way to create beautiful curls. Modern manufacturers provide big choice these devices. However, not always a wide range of can satisfy specific desires and requests, because every girl wants to make a unique hairstyle that suits her. Today we will talk about how to make curlers from various improvised materials at home.
Making such devices for styling curls with your own hands is quite simple. In addition, home-made papillots do not injure or tangle hair, unlike factory-made products. So, how to make curlers yourself from improvised materials?
QUICK ARTICLE NAVIGATION
fabric
Making fabric devices with your own hands is quite simple. To do this, you only need thick non-slip fabric(linen or cotton is best). If you can't find or pick up right material, then you can use an ordinary gauze bandage.
To make curlers, take a small piece of fabric and divide it into several equal stripes(width from 2 to 4 cm, depending on the desired size of the curls). The length of the strips can vary from 10 to 20 cm (depending on the length of the strands).
Curling hair on rags has whole line benefits. Firstly, natural materials Not spoil the structure of the strands. Secondly, in this way you can achieve an amazing result, because you choose the size of the curls yourself.
Curling technique on fabric papillottes
- Comb your slightly damp hair thoroughly. If the hair is difficult to style, then you should use a special fixing mousse and spray.
- Select a small strand. Place its tip in the middle of the strip of fabric and twist the hair.
- Secure the strand by tying the ends of the fabric into a knot.
- Repeat the process with the rest of the strands.
- In a few hours you will get gorgeous curls!
Paper
Every girl can special efforts make your own paper curlers. To do this, you need a soft, but enough thick paper(in this case, cardboard will not work). You can take A4 or A5 material, depending on the length of the hair.
To make paper stackers, roll small pieces of paper into a tube. After that, you can start curling. Curling hair on paper strips is carried out in the same way as on fabric ones.
However, it should be borne in mind that paper does not hold well on long hair, therefore, after winding the strands, the head should be covered with a scarf or towel.

Tissue and paper
To make such devices at home, take soft paper and dense fabric . Cut the fabric and paper into equal strips. Put the two materials together and twist them into a tube. Wherein paper strip should be inside the tube.
The process of curling curls on fabric-paper curlers is much simpler than on fabric devices. In addition, tying fabric tips is easier than paper ones.
Foam rubber
At home, you can make comfortable papillots from foam rubber, insulation or a film with air bubbles. The process of their manufacture does not require special skills. To do this, you only need to cut the foam into narrow lanes(width depends on the desired size of the curls).
Curling technique for foam curlers
- Comb your slightly damp hair thoroughly and apply a special styling product (if necessary).
- Select one strand from total weight hair and place its tip on the center of the curler. Twist the strand and tie the foam tips.
- Repeat the previous step with all strands. To create chic voluminous curls, you will need only 8 - 10 foam rubber devices.
Such curlers (unlike fabric and paper ones) can be used to create styling several times.

Foil
Foil curlers easily bend in different directions, so curling your hair with their help will not take much time and effort.

Technique for making foil curlers
- Cut the foil into small strips (5-8 cm).
- Take cotton wool and twist it with a tourniquet.
- Wrap the cotton swab in foil. As a result, you will get soft devices with which you can easily create both voluminous curls and perky curls.

As you can see, making curling tools with your own hands is not such an impossible mission. This way you save money and do not expose the strands harmful effects factory counterparts.
With all the variety of styling products, curlers from waste materials, on vacation, on a hike, away from civilization, on a business trip, away and in other situations. Making curlers with your own hands is very simple, it only takes a few minutes. They are comfortable, curl gently, without tangling, without injuring curls, allow you to sleep comfortably, and cost nothing.
Many women love the effect of curls.
How to make curlers out of paper, fabric or foil? There are several ways, the most unexpected things are suitable as a basis: wet wipes, insulation, rubber bands, hairpins, fabric scraps, ribbons. Consider simple and quick options for making homemade curlers.
Fabric long curlers: how to use them
Rags are familiar to all schoolgirlsThe technology for making soft papillots from pieces of fabric is simple. It is better to take a non-slippery, rather dense matter, cut strips of it 20 cm long and 2-3 cm wide. Spray each strand with water, tie the ends with a strip. Then we twist the fabric with a curl into a spiral, fix it with the end of the strip.
The more blanks to wind, the more curls will be, and the hair will be fluffier. For getting easy For wavy styling, 6-10 soft curls are enough, depending on the thickness of the hair. This method is different in that you can randomly wind blanks of different lengths. After 6 hours, curls will be ready.
You can curl your hair with ordinary rags
3 options for how to make paper curlers: this is not magic leverage for you
Paper curlers are not used by many, however, they fix the curl better, allow you to make more large perm. Therefore, among all improvised materials, paper is considered the most preferable.
Method 1 using thick, not hard, flexible paper. Album will do. We make paper bundles or tubes, the size of which depends on the length of the hair. We wind curls on them. We turn the tourniquet, tie the ends. When everything is done, we put on a scarf for a tight fit.
Method 2. Papillottes from toilet paper or napkins. According to the perforation, we tear off strips of four rectangles in each, fold in half along the line. We twist the paper rectangle along the long side into a tight tourniquet. The result should be a rope. We make papillots in the right amount, depending on the thickness and length of the hair. Having wound a strand on a tourniquet, we tie the ends with a knot.
Method 3 is very convenient, simple and harmless. These curlers will require a little more time to make, but they can be used several times, they are also suitable for curling babies. We combine two materials: strips of fabric and paper. It is not advisable to use old newspapers. We prepare 12 strips of 4 sheets, cut ribbons 15 cm long. Place the fabric strip on a piece of paper, fold in half, twist. We wrap paper tubes around the tape, fasten. For large curls, thick rollers will be required. We wind the strands on paper tubes, we tie the ends of the ribbon.
Before the curling procedure, it is not recommended to apply fixatives to home-made blanks. If the hair is naughty, does not lend itself to styling, use the folk method: 2 tablespoons of sugar per 1 glass of water, mix and sprinkle the strands.
Do everything right and the result will be obvious
Foam perm with soft spiral curlers
Scraps of foam rubber, insulation are quite suitable for soft papillots. You can use a film with air bubbles. We cut from the selected material of the workpiece. We choose the parameters depending on the density of the hair. It is advisable to make the stripes wider, but so that they do not take up too much space on the head. Curling thin hair, we select thicker curls, for thick ones we prepare larger curlers.
Foam perm is very popular
We wind the curls onto the finished strips according to the same principle as in the previous methods. The remaining ends are tied or fixed with invisibility at the roots of the hair. Up to 8 foam rollers will help you create soft waves.
Choose your styling method
Foil-based hairstyle: how to wind curls with it
Foil is a flexible material that will allow you to create bending curlers. In addition to it, cotton wool is required. From the foil it is necessary to prepare strips of 5-7 cm wide. Place a piece of cotton rolled into a bundle in the center of each workpiece. We twist the foil blank into a tube. You should get something like boomerangs. We wind the strand in the direction from the ends to the roots, tie the ends, fasten. For large curls, thicker boomerangs will be required.
Curling created with homemade curlers is natural, easy. The steepness of the curls can be adjusted by changing the thickness of the blanks. If you wind your hair carefully, then the result will please the eye more than once.
WATCH VIDEO
Of course, before the curling procedure, the hair must be prepared:
- Wash;
- dry;
- comb;
- Divide into strands.
To fix the styling, you can use varnish.
Curlers are the most popular and easiest way to create beautiful curls. Modern manufacturers provide a large selection of these devices. However, not always a wide range can satisfy specific desires and requests, because every girl wants to make a unique hairstyle that suits her. Today we will talk about how to make curlers from various improvised materials at home.
Making such devices for styling curls with your own hands is quite simple. In addition, home-made papillots do not injure or tangle hair, unlike factory-made products. So, how to make curlers yourself from improvised materials?
QUICK ARTICLE NAVIGATION
fabric
Making fabric devices with your own hands is quite simple. To do this, you only need thick non-slip fabric(linen or cotton is best). If you cannot find or find the right material, then you can use an ordinary gauze bandage.
To make curlers, take a small piece of fabric and divide it into several equal strips (from 2 to 4 cm wide, depending on the desired size of the curls). The length of the strips can vary from 10 to 20 cm (depending on the length of the strands).
Curling hair on rags has a number of advantages. First, natural materials are not spoil the structure of the strands. Secondly, in this way you can achieve an amazing result, because you choose the size of the curls yourself.
Curling technique on fabric papillottes
- Comb your slightly damp hair thoroughly. If the hair is difficult to style, then you should use a special fixing mousse and spray.
- Select a small strand. Place its tip in the middle of the strip of fabric and twist the hair.
- Secure the strand by tying the ends of the fabric into a knot.
- Repeat the process with the rest of the strands.
- In a few hours you will get gorgeous curls!
Paper
Each girl will be able to make paper curlers with her own hands without much effort. To do this, you need a soft, but enough thick paper(in this case, cardboard will not work). You can take A4 or A5 material, depending on the length of the hair.
To make paper stackers, roll small pieces of paper into a tube. After that, you can start curling. Curling hair on paper strips is carried out in the same way as on fabric ones.
However, it should be borne in mind that paper does not hold well on long hair, therefore, after winding the strands, the head should be covered with a scarf or towel.
Tissue and paper
To make such devices at home, take soft paper and heavy fabric. Cut the fabric and paper into equal strips. Put the two materials together and twist them into a tube. In this case, the paper strip should be inside the tube.
The process of curling curls on fabric-paper curlers is much simpler than on fabric devices. In addition, tying fabric tips is easier than paper ones.
Foam rubber
At home, you can make comfortable papillots from foam rubber, insulation or a film with air bubbles. The process of their manufacture does not require special skills. To do this, you only need to cut the foam into narrow lanes(width depends on the desired size of the curls).
Curling technique for foam curlers
- Comb through damp hair thoroughly and apply special agent for styling (if necessary).
- Select one strand from the total mass of hair and place its tip in the center of the curler. Twist the strand and tie the foam tips.
- Repeat the previous step with all strands. To create chic voluminous curls, you will need only 8 - 10 foam rubber devices.
Such curlers (unlike fabric and paper ones) can be used to create styling several times.

Foil
Foil curlers easily bend in different directions, so curling your hair with their help does not take much time and effort.
Technique for making foil curlers
- Cut the foil into small strips (5-8 cm).
- Take cotton wool and twist it with a tourniquet.
- Wrap the cotton swab in foil. As a result, you will get soft devices with which you can easily create both voluminous curls and perky curls.

As you can see, making curling tools with your own hands is not such an impossible mission. This will save you money and will not expose the strands to the harmful effects of factory analogues.
Girls love to experiment with their appearance, so these accessories are in almost every cosmetic bag! It remains only to learn how to wind your hair on curlers, and go to create a luxurious styling.
Basic principles of using curlers
To get beautiful curls without harming your hair, remember these simple rules.
- Rule 1. Wet styling lasts much longer, so be sure to moisturize the strands before curling. Of course, in the case of thermo and electric curlers, this should not be done.
- Rule 2. The thinner and rarer the hair, the smaller the strand for winding should be. Thanks to this, the curls will turn out to be voluminous, and the hair will visually become thicker.
- Rule 3. It is recommended to start winding the hair from the middle of the head.
- Rule 4. There are two ways to position curlers - vertical (oblique) and horizontal.
- Rule 5. Short hair should be twisted only from above. If you wear a side parting, then curl only those strands that are on the larger side of it. But do not twist the smaller part at all. This will give your haircut the now fashionable asymmetry.
- Rule 6. Do not go to bed with curlers (except foam) and do not leave them for more than an hour. It's bad for hair.
- Rule 7 Do this very carefully so as not to spoil anything.

Rule 8 Special attention give the size of the curler:
- Small - for short strands;
- Medium - for medium length hair;
- Large - for long strands.
Ideally, you should have accessories of different sizes in your arsenal - by combining them, you will get an unsurpassed result. For example, in the middle part of the head, the hair is twisted onto the largest curlers, medium-sized devices are used on the back of the head, and small strands near the face and neck are wound onto the smallest ones.
Rule 9. Curlers with an elastic band will leave creases on the strands. It is better to use devices that are fixed with clips, special skewers or hairpins.
Rule 10. If the hair is long, wind it in as thin strands as possible. So they dry faster and will hold curls better.
Rule 11. Short strands will be easier to wind if you place a strip of paper on the curlers.
Rule 12. When twisting your hair, try not to wring the ends.
Rule 13. Remember, too much perm dries out and weakens the hair, which can cause hair loss.
How to wind curlers of different shapes
How to wind correctly different types curlers? We provide you with detailed instructions.
Boomerangs
Suitable for hair of any length. Boomerangs can be of different shapes and diameters, therefore they are able to cover even a very long and wide strand. Another important advantage of boomerangs is their density. Thanks to the dense foam rubber, the strand will be fixed in one position - this will protect it from deformation.

How to use boomerangs?
- Spray clean hair with water from a spray bottle.
- Comb and divide your hair into thin sections.
- Apply a fixative to the strand near the face from the middle to the ends.
- Attach the boomerang to the tip of the strand and twist it from the bottom up.
- On right level wrap the boomerang with a pretzel.
- In the same way, process all the remaining strands, winding them alternately from the left, then from the right side.
- When your hair is completely dry, gently unroll the boomerangs and style the curls.
- After an hour, they can be sprinkled with varnish.


One of the latest innovations are electric boomerangs. They are first heated, and then wound on the hair. When the strands are heated to desired temperature, on the boomerangs, a light indicator is triggered, indicating that it is time to remove the curlers.
Velcro
Curlers of this type are ideal for giving hair splendor and volume. It seems to many that using Velcro or hedgehogs is incredibly simple. In fact, this is not so - in a long hair they are easily tangled, but on short strands do not always hold tight. The ideal length is a bob or bob haircut.

To beautifully wind your hair with Velcro, use this instruction:
- Divide clean, damp hair with a horizontal parting into several parts - frontal, middle and occipital. The winding must begin with the latter.
- Attach the tip of the strand to the Velcro and twist it down. No additional fixation is required.
- Blow dry your hair to speed up the process.
- Remove the curlers and shape the curls.
![]()

Tips that will teach you how to properly wind curlers of any type on your hair:
Thermo curlers
Hair styling with thermal curlers is considered the fastest and most effective. But they have one big minus - it is this type that most harms the hair.

How to apply correctly:
- Dip the hot rollers in boiling water for a few minutes.
- Comb your hair and apply a heat protectant to your hair.
- Divide dry and clean hair into thin strands.
- Starting from the bottom zone, wind them around the curlers and secure with a clip. To achieve volume, this must be done from the base of the strand, to obtain spiral curls - from the tips to the roots.
- Wait 20 minutes and remove the curlers.
- Spread the curls with your hands and sprinkle with varnish.


Spirals
Spirals are wooden and plastic. With their help, you can get elastic vertical curls. It's very easy to do this:
- Moisten clean hair with water from a spray bottle.
- Divide your hair into several horizontal sections.
- Separate a thin strand and gently wind it from top to bottom. Secure the end with a special clip.
- Let your head dry completely.
- Remove the clamp and unwind the coil by pulling it down.
- Disassemble the curls with your hands.


![]()
Bobbins
Bobbins are called plastic curlers in the form of sticks with rubber bands at the end. They give a very fine curl and are most often used for chemical and biowaves. But for normal winding, they are also useful.

- Apply a fixative to wet hair.
- Divide it into thin strands.
- Screw them onto the bobbins, fixing them with rubber bands.
- Wait until the hair is completely dry and remove it from the head.
- Put the curls in your hair.


Foam curlers
Accessories of this type are made of foam rubber.

Applying them is very simple:
- Wash your hair and apply conditioner to your hair.
- Dry a little with a hairdryer - the hair should be slightly damp, but not wet, otherwise it will dry for a long time.
- Start curling with strands near the face. Apply mousse or styling spray, place the tip of the strand on the foam roller and twist it to the base. Secure with a rubber band. By the way, some girls manage to replace store curlers with the smallest sponges for washing dishes.
- Now divide the hair into 3 sections (top, side, occipital) and wind all the hair. It is important that all the strands are the same thickness - then you will get uniform curls. The width of the strand depends on the width of the curler.
- If you want the effect of body waves, place the curlers horizontally. If you would like to receive spiral curls, place them vertically.
- After your hair dries, remove the attachments and spread the curls with your hands.
- Fix with varnish.

Electric curlers
Using electric curlers at home is quite simple:
- Wash your hair with shampoo and conditioner.
- Dry it with a hair dryer.
- Plug them in for 15 minutes. On some models there is a special indicator that determines the readiness of the curlers for use.
- At this time, prepare your hair yourself - apply a heat protectant and let it dry. Hair must be completely dry!
- In the case of electric curlers, the strands are wound in the same way as on a thermo. It is better to apply near the forehead large curlers, on the back of the head and on the sides - small. Make sure that the width of the strand does not exceed the width of the curler, otherwise the curl will not be too neat. Secure them with a hairpin or clip.
- Once the curlers are completely cool, remove them from your head.
- Do not comb the curls for another 15 minutes.


How to achieve persistent curls?
Knowing how to wind strands on curlers, you will be able to achieve a very beautiful styling. And to increase its durability, use the following tools:
- Mousse;
- Gel;
- Varnish;
- Foam;
- beer;
- sugar water;
- gelatin;
- Decoction of flax seed.

Papillottes have been used to create a beautiful and lush hairstyle since ancient times. The ladies of the court made paper or fabric flagella, on which they subsequently wound their hair. It is not so easy to make styling with papillots, because it requires hair preparation and knowledge of the nuances.
What are papillots?
Papillots are a kind of curlers made of soft elastic material. Previously, such accessories were made of paper, fabric and other available materials. The definition of "papillote" comes from French. The original meaning of the word is "a paper tube worn on something."
Photos of such accessories look different. Soft curlers are produced in several versions, which differ mainly in material.
Kinds
The main types of papillots:
- paper;
- tissue;
- plastic (made from foamed plastic);
- on Velcro.
 Types of curlers: 1. Velcro, 2. Thermal curlers 3. For vertical curls, 4. Foam curlers
The first two options can really be done at home from improvised means, but the others can only be bought in a store. Paper and fabric curlers are not wear-resistant, that is, they are enough for only 2-3 applications. Plastic straws and Velcro accessories are more stable, comfortable and functional. With their help, it is easier to get curls of different sizes. Such curlers are also made of foam rubber (the material does not differ in characteristics from foamed plastic). Store accessories may vary in color and size.
Features of use
 The scheme of using boomerang type papillots
Benefits of using papillots:
- Soft material. With tubes you can go to bed, they do not interfere and do not put pressure on the scalp. Elastic and pleasant material is their main advantage.
- Natural effect. Soft accessories help to acquire natural curls for the fair sex. This hairstyle will not look pretentious, which will allow you to wear it every day. With the help of tubes, you can make a fashionable beach styling that creates the effect of disheveled hair by the sea wind.
- Safety. Papillots do not injure the hair, unlike any thermal perm. The hair will not deteriorate, even if a woman does her styling every day with curlers.
They have only one significant disadvantage - time costs. A woman will have to walk with curlers on her head for four hours (maybe more).
How to wind papillots?
How to use papillots correctly? Top tip: prep your hair well. Regardless of the desired effect and the length of the hair, the hair must be moistened and covered with a fixative before styling. You can use regular mousse for extra volume and spray for fixation. The tool must be tested: the duration of wearing the resulting curls will depend on its durability.
For short hair

The technology of twisting curlers is completely simple. If you have short hair, you will need no more than 10 small hairpins.
Thin curlers help create expressive curls, while thick curls help to create natural curls. When choosing accessories, it is important to be based on the desired result.
Step by step guide for styling:
- Prepare and divide all hair into three sections. Each part must be re-divided into several small strands. A complex process justifies itself by creating more pronounced curls.
- You should take one strand and twist it onto a papillot. You need to twist from the middle (capturing the tips) to the base. The straightened tube must be placed perpendicular to the strand of hair (closer to the ends).
- It takes 3-4 hours to keep soft tubes on short hair. After that, apply varnish, and only then remove the curlers. You need to unwind the accessories carefully so as not to spoil the curls.
You can not twist too wet hair. They must be slightly damp for the effect to be persistent and beautiful. If the strands are wet, then the curls will not work at all.
For long hair
Long hair allows you to create any hairstyle. In order not to get too hung up on styling, you must first apply mousse to the hair roots for volume. This will help to make not only beautiful, but also lush curls.
Instructions for creating styling:
- Long hair will also need to be divided into sections. If the hair is thick, then it is better to take a large tube.
- You can create a light curl only at the tip of the strand. To do this, twist the curlers, starting from the middle of the strand.
- You need to wear straw accessories for 5-7 hours.
After removing the curlers, the strands must be carefully combed so that the hairstyle looks natural and soft.
How to curl beautiful curls?
A beautiful perm will require three basic rules:
- You need to curl your hair in curlers before going to bed. The longer the tubes are on the hair, the more resistant and beautiful the hairstyle will turn out.
- You can not deviate from the basic technology of using tubes. First, the curlers are applied to the strand, then the tips are wound onto it. Only after that you need to twist the tube up to the roots.
- You should carefully remove the tubes, starting from the base and moving to the ends of the hair. This is the only way to get a beautiful curl.
Curling your hair at home is not difficult, the most important thing is not to take too large strands. This is another important condition for home curling.
For big and expressive curls
In order to get voluminous and expressive curls, you need to take large or medium-sized curlers. They should not be very thick, since the severity of curls depends on the thickness of the curls.
All hair will need to be divided into 7-10 sections, depending on the length and thickness of the hair. After that, each strand should be curled and immediately varnished. You do not need to take means of strong fixation, so as not to glue and weight the curls.
How to make hair curlers with your own hands?
Ways to make homemade papillots:
- You will need to take a fabric, linen is best. From a piece of matter, you need to cut several strips (20 cm long and 3 cm wide). After that, you need to take the resulting flap and twist it into a tight flagellum.
- Instead of fabric, thick paper can be used. From paper, you should also twist the flagellum until it becomes dense. You need to wind your hair on paper papilots, and then fix them with hairpins.
Soft fabric curlers tie at the ends. Therefore, the ends of the tissue flagella should not be too dense.
With these tips, you can get beautiful strands at home. Any woman can create the effect of Hollywood or natural curls using curlers.
Some girls nature has awarded thin straight hair. And, of course, they often want curls, although for many others, straight hair is a dream. It happens often. Of course, on this moment There are many tools and methods that make it easy to curl your hair. These are curling irons, and various curlers. But there is the most ancient way, no worse than those listed, is winding hair on pieces of paper with a rag. It has a number clear benefits before the others:
- you can sleep with them - the curlers do not pinch the hair and do not interfere at all;
- they are available to absolutely everyone (do not require any cash costs);
- you can vary the diameter of the curls yourself;
- Very convenient way for small children;
- the simplest and most harmless way curling hair.
We will need:

The process of creating homemade curlers
Many people make curlers without using paper, but paper curlers hold the curl better and at the same time create it larger. Therefore, it is better to do it with paper, especially since everyone definitely has it.

The technique of winding hair on home curlers
As a rule, it is better to curl your hair before going to bed so that in the morning you will already have beautiful and stylish curls. As we have already noticed, sleeping on such curlers is very convenient and comfortable. If you need a hairstyle for the evening, then the average time for wrapping is about 6 hours. Given time depends a lot on the type and texture of your hair.

Every woman will be interested to know how to curl her hair properly and get beautiful curls when there are no curlers or curling irons in the house. It is important to understand how to make curlers from improvised means, which are always present in every home. In addition, it is convenient to rest on the curlers that you make with your own hands at night, and this is very important. Making impromptu curlers at home is not difficult at all, and you can do it in many ways. Properly made homemade curlers have their positive qualities. They won't disturb your sleep because they are soft and won't pull your hair. As a result of their use, the hair does not deteriorate, and the size of the curls can be varied at your discretion. They are made from common and affordable materials that require absolutely no material costs. This method of shaping curls is suitable even for children.
Homemade paper and fabric curlers
 Our grandmothers also knew how to make homemade curlers at home, using a variety of materials for this. Earlier than others, home-made curlers made of paper and fabric strips appeared. To make curlers with your own hands, you will need any paper, fabric and scissors. Some girls prefer to form home curlers exclusively from fabrics, without using paper. This is a matter of taste, but keep in mind that fabric does not hold curls as well as paper. In addition, paper will allow you to wind very large curls, unlike fabric. To form the curlers, we take one piece of fabric, and cut off several long ribbons from it. Then we cut the paper into strips, the length of which is much less than the fabric ribbons. We place strips of paper on a horizontal surface, and place fabric ribbons on top. Next, gently wrap the paper around the fabric, making it look like a tourniquet. For medium length hair, you will need about ten of these curlers.
 When the curlers are ready, you just have to wind your hair around them. The best time to do this is in the evening, just before bed. In the event that you have correctly made paper curlers at home, they will not cause you any trouble at night. Note that it will take about six hours to form persistent curls. When curls are required in the evening, they should be formed around noon. For very dense and coarse hair, the calculation of the time varies, it will take a little more. Such hair is usually moistened with foam, varnish, or sugar dissolved in water. After using the foam, go through the hair with a comb with rare teeth. After combing your hair, start winding it to the length of the curl that you need, to the roots or to the middle. Having twisted the hair, we tie the fabric into a knot or bow around the curl. Repeat these steps until you wind all the curls to the last. In this method, chaotic winding is allowed, which leads to excellent results in any case, even with such a chaotic method.
Video: Learning to make curls on paper curlers
How to make curlers from plastic flexible tubes
The following master class looks at a very easy and effective way to create gorgeous spiral curls. This video shows how to make curlers from ordinary plastic tubes. These flexible tubes are designed for drinking juices and cocktails, but can also be used as homemade curlers. To do this, you will need a comb, invisible, and tubules. We begin the winding process by combing the hair, and lightly wetting it with water. Instead of water, hair is often sprayed with a styling spray, which makes the curls strong. After that, we begin to separate the strands, and wind them on the tubes. To do this, place the tube below, under the strand. Then we begin to wind from the roots of the hair to the ends, while performing a slight tension. At the roots we pin the invisibility, fixing the tube. We twist the strand to the end, then bend the second end of the tube, and also pin the invisibility to it. We will repeat the same actions with each strand of hair.
 First, we separate it, then comb it, carefully wind it onto a tube and fix it with the help of stealth or crabs hairpins. For owners of coarse and unruly hair, it is advisable to spray the strands with varnish, or smear with styling foam to make the curls as strong as possible. Having finished the winding process, we will withstand the required time, which will depend on the quality and thickness of the hair. The minimum exposure time is about an hour, after which we remove the invisibility and tubes. After that, vertical curls will remain in their splendor. Slightly separate the large curls with your fingers, and also lift the hairstyle at the roots of the hair and spray varnish on top. This method does not require material costs at all, does not damage the hair structure and is extremely effective. Plastic straws and invisibles are reusable, so you will use them all the time without making other material investments.
Video: Making curls with juice tubes
How to make curlers from ordinary socks
You may be surprised, but you can make curlers at home from pieces of cloth, baby wipes, and even ordinary socks. This video tutorial shows how to make beautiful curls with your own hands using simple socks. Before the winding procedure, wash your hair and dry it slightly. In this case, it is best to wind wet curls. After drying your hair, comb it gently and slowly with a wide-toothed comb, starting at the ends and gradually rising to the roots. It is not recommended to comb freshly washed and still wet hair, because their structure may be damaged. After combing, lightly spray on the hair from the tips to the roots with styling liquid (styling spray), or apply a little special foam, distributing it over the entire length of the hair. After that, we begin to separate strands of medium size.
When choosing socks for winding curls, focus on those that are long enough. The fact is that you will have to not only form curls, but also tie the ends of the socks, fixing the strand. Start winding each strand from the ends, moving up to the roots. Everything will depend on how long the curls you need. You can stop winding both in the middle of the strand, and reaching the very roots of the hair. Having formed a curl of the desired valley, we tie the ends of the sock into a knot. Both the thickness of the strands and their number vary according to the desire of each woman. Remember that thin strands turn into a beautiful curl better and faster. Stop at the average thickness of the strand. This is the most correct and winning option. After completing the procedure correctly, and having formed all the curls, leave them in this state for a period of time of six hours or more. Hair twisted in this way will not cause any inconvenience even at night. When more than six hours have passed, unroll each curl, and lightly spray hair with varnish. Pay attention to what magnificent wavy hair is obtained after the formation of curls at home.
You will also be interested in:

Dating and Pickup How to meet a girl in a club Dating a girl in a club...

The club differs from other places, such as the street, cafes and shops, with a special atmosphere. Into him...

Among the many precious stones, there is one that has unique properties and...
Garnet stone has been known to people for a long time. This gem has been attributed...
Summer is great with good weather, bright sunshine, outdoor activities,...

